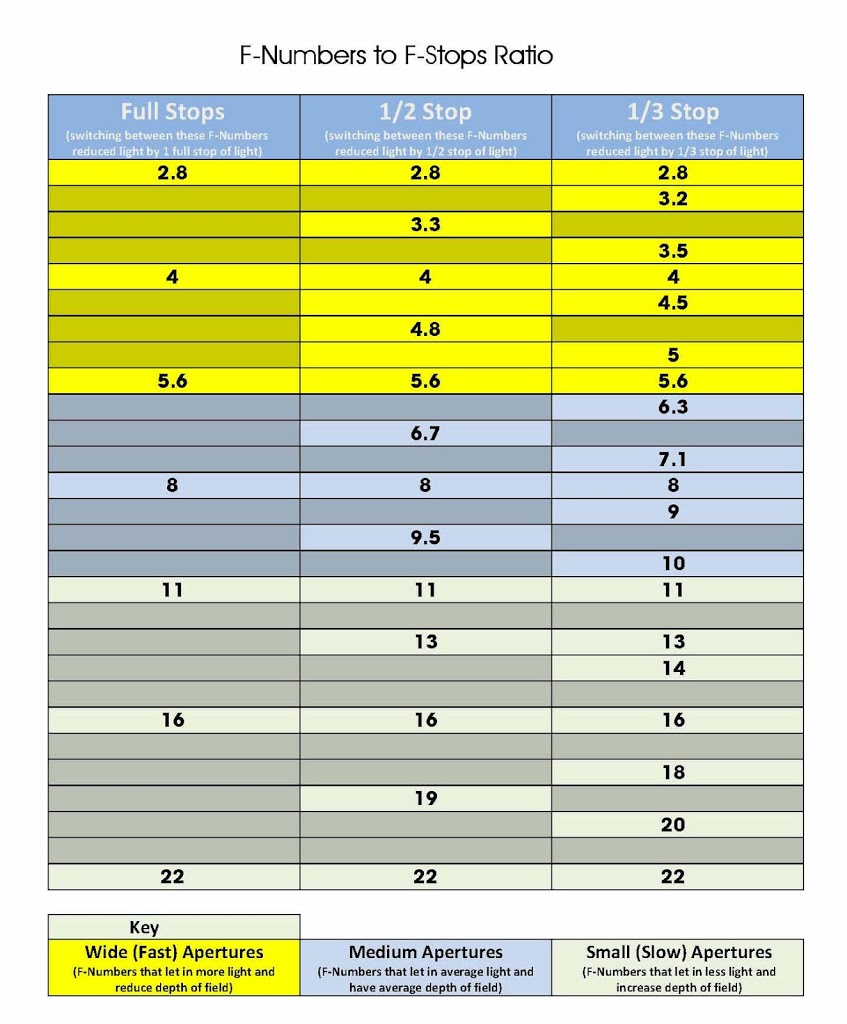
DSLR Controls – Back / Rear Controls
I must start first off by saying that the shots in this post are of my Canon 7D and whilst most Canon cameras all have the same layout, Nikons do not. This does not really make a lot of difference as the operation of most DSLR cameras are the same, and whilst the buttons may not be in the same place, they do operate in the same or similar way.
Also another important note is that you can program the buttons on most DSLR to do different functions as you prefer, the diagrams and descriptions although are correct for the functions may not operate the same as your camera as these layouts are the default layouts.
The way this will work is I will cover each side of the camera in turn, Back, Front ,Top and left. I am not going to mention stupid things like where the batteries go, or how to attach a strap but the more necessary things as well as somethings that when I first started I just could not figure out. Also I have changed the names slightly to help you make more sense of things and not be too technical.
Back of DSLR
 |
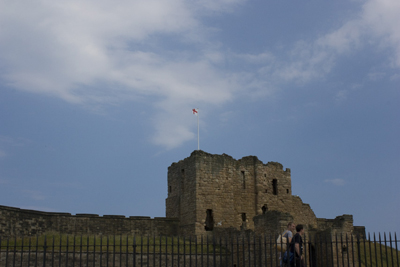
| Back / Rear of Canon 7D |
The rear of most DSLR consist of a large screen and to the side the main image selector wheel. I will start at the bottom left of the picture and work clockwise, ok here goes
Playback / Live View Screen
The large screen on the back of your DSLR serves two purposes. One is very simply it allows you to view shots you have taken after you press the Playback button, and by using the Adjust / Scroll wheel you can view your shots and then zoom in or out using the Zoom in or Zoom Out buttons on the right above the big wheel.
Note when you zoom into an photo and view it on the screen you can use the View Joystick to move around the image.
The other use for this screen and hence why I have named it the Live View Screen is that when you are taking photos with your camera it is possible to see a variety of different things on this screen and not just what you are taking a photo of. These include a Quick Menu, a Camera Level, Shot histogram and information and of course Live View (basically what the camera sees). Most of these are accessed by using the Info button. (more on this later)
How to Access to Live View on DSLR
HUGE note to get Live View to work on the LCD screen you actually press the Start / Stop button during shooting mode, just make sure the little outer ring around the Start / Stop is pointing at the white camera.
If Live view fails to operate you need to enable it as follows
- Press the System Menu Button
- Use the Little Wheel on the top of the camera and scroll to menu option 4
- Use the big wheel to select live view
- Press the Set / Enter button then select enable to activate live view, press the Set / Enter button.
- Press the System Menu button to come out of the system menu.
Live view is now working
Delete
Does exactly what it says on the tin, deletes your photos.
Playback
Go on guess, yes it shows you photos you have taken on the big Live View screen, not quite 3D IMAX but at least you know what you shot.
Info /Level / Quick Menu
When in shooting mode this button allows you to do 1 of 4 things
- On first press you see the information about the shot your are taking, such as colour temp, white balance as well as how much space you have on your card and how many shots you can take.
- On pressing again you get a camera level indicator, showing if the camera is level or not, a solid green line indicates your camera is level (note this is not available on all DSLR’s)
- On a third press you get the Quick menu, a quick over view of your current settings such as Aperture and shutter speed. (Note this is a view only option and in order to make changes you need to use the Quick Menu button)
- On a fourth press you turn off the back LCD screen all together.
When in playback mode this button gives your either on screen info about the shot or pressed again gives you more detailed shot information.
Picture Style
This button allows you to change how your photo will turn out whether you are shooting a landscape, portait or want to change the sharpness.
System Menu
This is the main menu button on your camera and gets you into the main system menu, where you can change all sorts of good things and some not so good things.
Quick Menu
This button gives you access to the quick menu, where you can quickly change many camera settings. To scroll around the screen use the Qucik Menu / View Joystick and then use the main dial or Adjust / scroll wheel to make changes.
Instant Raw + Jpeg
This is a kinda cool button it allows you to quickly set you camera to take both a RAW and Jpeg photo at the same time, can save you alot of time. Although my advice is to always shoot in RAW.
Viewfinder
D’oH this shows you what you are taking a photo of, that is unless you are using the Live View Mode.
Word of caution if you are using Mirror Lock after your shot you will not be able to see through the View Finder
Still / Video Recording (outer ring)
The little outer ring switch to the right of the view finder is the selector to set the camera to either shoot still photographs or record HD video, white for photos red for video.
Video Record Start / Stop / Live View
The button marked start /stop to the right of the view finder is the button that does one of two things.
- If the camera is set to record video it starts and stop the video
- If the camera is set to take still photographs this button shows / turns on Live View on the LCD screen. (see note above about how to enable live view)
Auto Focus Button
This button starts the camera focussing, it does not take a shot it simply gets the camera in focus ready to take a photo. Great for use if you are taking shots of things that will move.
AE Lock Button / Zoom In
This button allows you to lock the exposure for a given shot, simply press the button and the green light in the viewfinder will show to show you exposure is locked, when you take a photo it will be taken with this exposure setting.
This button also acts as a zoom in or magnify button during playback.
Focus Mode / Zoom Out
This button lets you select the area to focus on when used in conjunction with the Main Dial on top of the camera. Simply press the Focus Mode button them use the Main Dial to select the area to focus using the view finder.
This button also lets you change the focus mode and lets you scroll through the active modes on your cameras to change focus mode.
How to select Focus Mode and Focus Point on DSLR
- Press the Focus Mode / Zoom Out button
- Look through the view finder and press the Multi Function / Manual Focus Select button on top of the camera (next to the shutter release), for each press of this button you will see the focus point and mode change in the viewfinder. Just keep pressing it until you see the desired Focus Point / Mode in the view finder.
- Once you find the desired mode, simply use the Main Dial on top of the camera to move the point to where you want to focus.
Quick Menu / View Joystick
When in quick menu after press the Quick Menu button this joystick allows you to select the option you wish to adjust.
Whilst in playback this joystick allows you to navigate around a photograph after pressing the Zoom In button.
This joystick can also be set to allow you to select a focus point on the screen.
Set / Enter
This is kinda like the save button, pressing it selects menu options.
Adjust / Scroll Wheel
This is the companion to the main dial, it allows you to change camera settings, as well as being used to scroll through photos during playback.
Activity light
This shows when the camera is doing something, such as writing to the card, cleaning the sensor, etc.
Wheel Function Lock
This switch when pushed to the right stops you from accidently making camera setting changes.
NOTE the quick menu adjustment and on screen options still work with this in the Lock position, the main purpose of this switch is during shooting as it stops you making adjustments via the top LCD screen.
Light Sensor
There is a small light sensor just to the left of the big adjust / scroll wheel this is used by the camera for taking light readings. It is mainly used during exposure setting in non manual modes and in auto mode it also sets the LCD screen brightness.