Lighting
As every good photographer will know the word photography actually means “writing with light” and this means that one of the most important things you can get right in order to get a great photograph is the lighting.
For an excellent video guide please check out this great series of tutorials by the Better Photos Academy
Lighting comes from two main sources ambient and artificial, and being able to control your lighting is the key to your photos being great rather than good.
Ambient Light
This is very simple to understand but difficult to master, ambient light is using the light from available light sources that occur naturally in your environment, this can be light from street lighting, light from the sun, the moon or anything else that is around that you do not have direct control over.
The simple fact that your do not have direct control over ambient light means that you have to use otherways to bring some form of control to the lighting.
Reflector
 |
| Multi Purpose Reflector |
The most common way to control ambient light is with a reflector / diffuser, this small or large piece of kit allows you to reflect the light to exactly where you want to, and some reflectors are multi purpose and have an in built diffuser which allows you to scatter the light more evenly across your subject.
A multi purpose reflector works usually in one of the following ways
- Directly reflects the light to where you want it, normally done using the silver side.
- Reflects the light but softens its colour, normally done using the white side.
- Reflect the slight and adds a gold / yellow tinge to it, normally done with the gold side
- Diffuses the light by softening it, normally done by using the internal part
- Remove light from your subject by absorbing it, normally done with the black side.
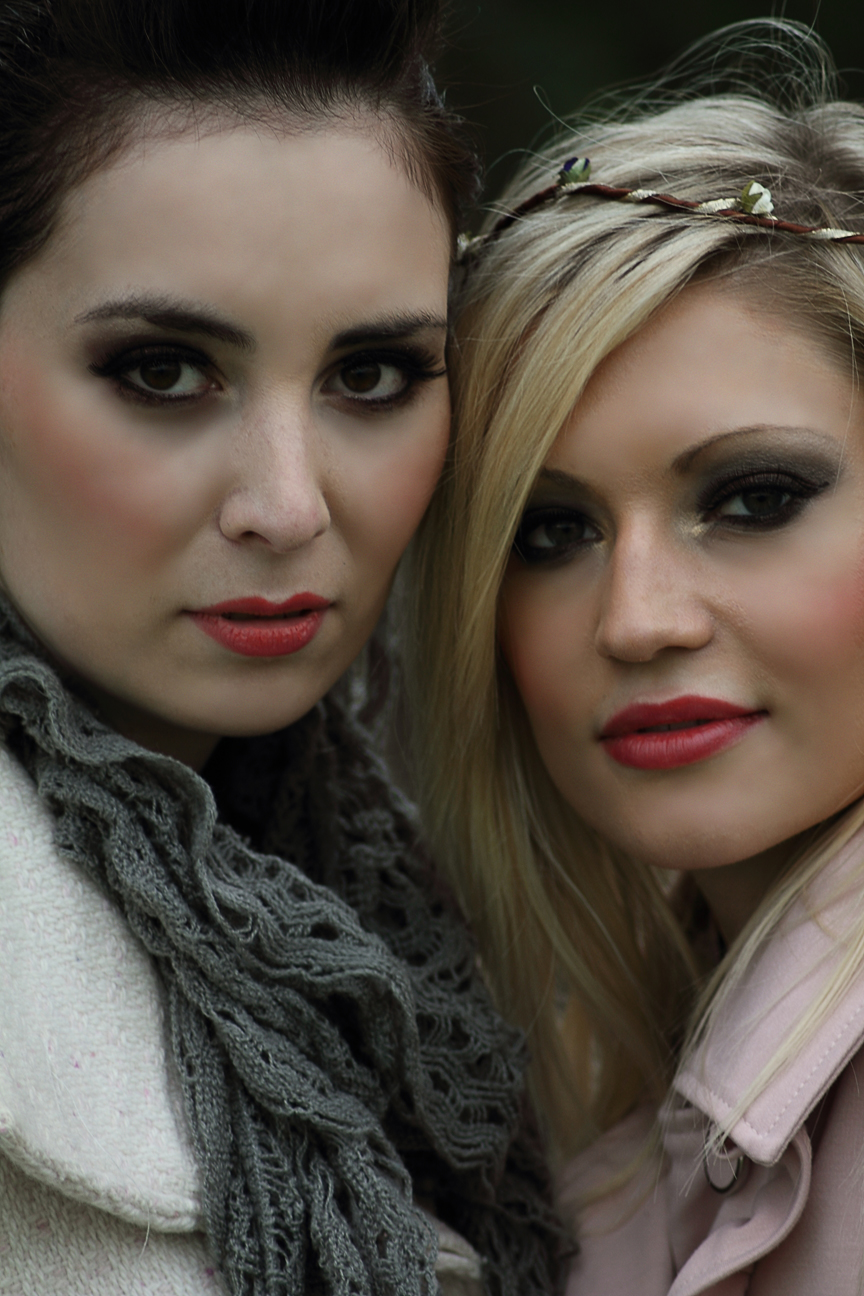
 |
| Without / With Reflector |
As you can see from the above portrait sample shot the image on the left is dark in the front, whilst the image on the right has a nice even lighting
Now although a reflector is the most common tool used to control ambient lighting, you can pretty much use anything you like to get the desired effect, even closing curtains is a way to control ambient light in fact you can just play around with everday objects to give you the right lighting.
In Camera
Althought this may sound obvious the best way to play around with ambient or available light is to change the camera setting, this may mean using a smaller or larger aperture or changing the shutter speed, by adjusting in camera setting you can also control directly the ambient light entering the camera to get the desired effect.
The simple rule of thumb is
- Slower shutter speed will let more light in / Faster shutter speed will let less light in
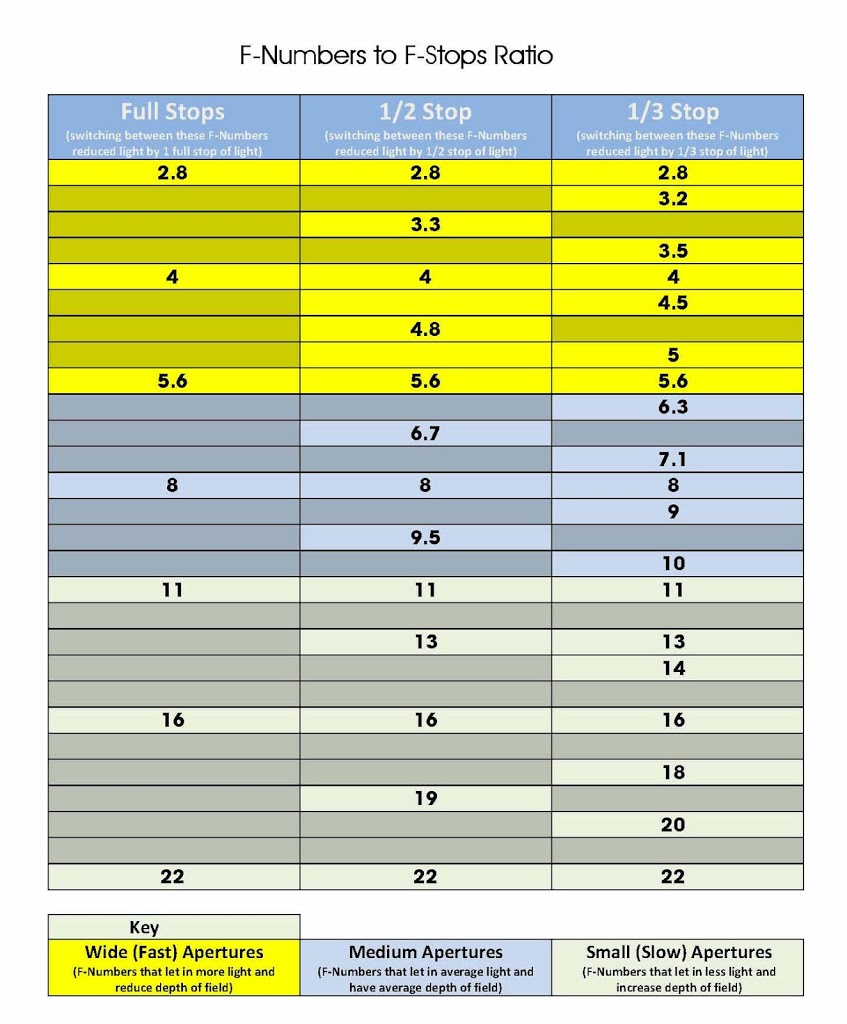
- Smaller aperture number = wider aperture which lets more light in
- Higher aperture number = smaller aperture which lets less light in
- Hgher ISO number will give lighter photos, but also add noise to your shots.
Note when shooting at slow shutter speeds remember to put your camera on a stable platform or tripod
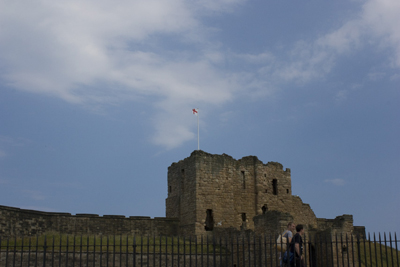
 |
| Changing Shutter Speed – Long Exposure |
As you can see in the example above by using a slower shutter speed the ambient light can be made to look really cool. So remember that the only limit is your imagination so go nuts.
Artificial Light
When time calls for it and the ambient or available light is insufficient for your needs there are two main choices when it comes to lighting your subject, flash / strobes and continuous lighting.
Flash / Strobes
A flash / strobes is the common term for a portable unit that provides light directly in connection with your camera shutter, these come in all shapes and sizes but have common features and functions which I am going to talk about here.

Ok I will start by giving you an over view of the most common function on modern flash units, I will start at the bottom left of the diagram and work clockwise.
On / Off Switch
This switch is used to turn on or off the flash unit, when switch on the flash will normally make a high pitched sound until it is ready to fire.
Flash Ready / Test
This button has two purposes the first is it will light up when the flash unit is ready for use, the second is that when it is lit up it can be pressed in order to test fire the flash.
Flash Zoom (optional)
This button is used when the flash in in manual mode to zoom or move the flash head inside the flash, this allows the flash to cover either a narrower area or a wider area.
Note Not all flash units are zoom units and have this function, also this option will be controlled by the flash when not in manual mode.
Mode
This is used to switch the flash mode, normally used to select between ETTL (auto) and manual modes.
F/Stop
This button is sometime labelled power and allows you to control the output level of the flash when in manual mode, most units support anything from full power to 1/16 of full power, someother units can step down a bit further to reduce the power up to 1/32 of full power.
Note – the measurement is a percentage of the full output, 1/1 being full power.
ISO (optional)
This allow the light sensitivity of the flash to be change as needed
Alert (optional)
This allows the noise and alerts on the flash to be alerted.
Back light
This turns on and off the flash back light, this is only available on flash units with an LCD screen.
ETTL – Evaluatitive Through The Lens
This indicates that the flash is operating is full auto mode and directly in sync with the camera, this mode is only supported by the flash being connected as follows.
- On the camera Hot Shoe connector
- Tethered to the Hot Shoe connector via a cord
- Connected to the camera via a wireless trigger that supports ETTL.
Note – ETTL simply means that any adjustments made to the camera will be automatically done tot he flash, such as focal length, etc.
Slave / Master Switch (optional)
This changes the flash from being either the main flash unit in the set to the slave unit, simply put if your flash has this option it can be remotely fired by other flash units, there will be a infrared sensor on yoru flash either the side or front that must be in the line of sight of other units. When the other flash unit fires this unit will also fire.
The above is only a guide to the flash units, most work in the same way, but will be laid out differently, but in essence the principles are the same for all.
Ok that concludes the basic workings of your flash, the other things to look for in your flash and to know about is as follows.
Guide Number – this is the effect distance your flash can cover when your camera ISO is set to 100, normally expressed in feet ie 48 feet.
Gels – these are attached to give the flash a colour light rather than the typical white light, if you look at reflector photo above you can see it is back lit in blue, this is done using a gel.
 |
| Flash Gels |
Continuous Lighting
This is the form of lighting that is always on, it can come from a variety of sources, it is something to play around with and use what ever you have around to light your subject, some of the more common continuous light sources are
- Purpose built continuous lights, unlike stobes these do not cycle with your camera.
- torch
- Anything else you like that gives off light.
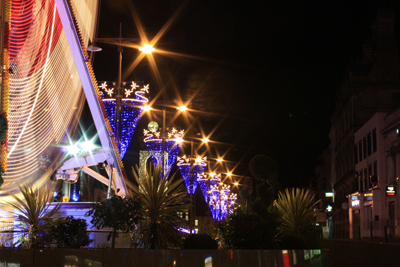
 |
| Playing around with lighting |
The shot above shows use of other forms of continuous lighting, again it is only limited by your imagination.