Canon 7D Soft Focus and How it Fix It
Ok so you have just bought your nice new Canon 7D, and whilst it works great you are finding that some of the shots you take using the Autofocus (AF) are not quite in focus, they look soft. So is it the camera or is it you?
First off it’s possible it could be either or both, you or the camera, so I am going to address the latter here, the camera.
Now there are two things to try to fix this issue without the need to send your camera off to the shop for recalibration.
Remove the 2 camera batteries
Open the battery compartment on your camera and take out the main camera battery, now remove the system battery. This battery is the one that is responsible for storing your user setting, dates, etc.
The system battery is located inside the battery compartment on the left, if you hold the camera upside down with the lens facing you and the battery compartment on the top, you will see the system battery holder inside to the left of the main battery compartment.

Now leave both batteries out of the camera for at least 10 minutes, this will allow the camera to completely discharge.
Now reinsert the system battery and the main battery. Hopefully your autofocus problems will be solved.
However if they are not, you may need to use the inbuilt Micro Auto Focus Adjustment functions, now whilst there are lots of different way to make change to the camera Auto Focus system. I am going to concentrate on the one that is fairly straight forward and doesn’t require you to buy anything additional to do the testing and adjustments.
This technique is known as Moire Fringing.
Moire Fringing
In order to make changes to the camera Auto Focus system using Moire Fringing there are a few things you need to have or know before your get started.
1. The Moire Fringing Chart, you can download it here
2. An available computer and enough room in front of it to be able to mount your camera on a tripod / stable surface and get the entire screen in the frame.
3. Know where to find the Auto Focus Micro Adjustment settings on your cameras
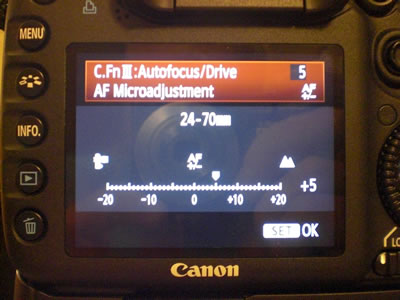
a. On the Canon 7D the settings for Auto Focus Micro Adjustment are located in the Fifth option in the third Custom Functions (CIII) Menu (Auto Focus / Drive)
i. Press the Menu button on the back of the camera
ii. Use the top scroll wheel to scroll to the Custom Functions Menu (the second to last icon on the menu list)
iii. Use the Main Scroll wheel on the back of the camera to scroll down to C Fn III then press the set button

iv. Use the Main Scroll wheel on the back of the camera to scroll to the fifth option, so number 5 is shown at the top right.
v. You should now be in the C.Fn III Autofocus/Drive AF Microadjustment screen

To find out more about Moire Fringing and some other great techniques I recommend you take a look at the video by Jared aka Fro Knows Best
Camera Testing Setup
1. Download the Moire Fringing chart, if you have not already done so, and load it up on your computer full screen, so it completely fills the monitor or as near as you can get. NOTE you cannot print the Moire Fringing chart for use as it’s the viewing it via your monitor that gives us the effect we need.
2. Attach a lens to your camera that you wish to test and adjust, we are going to make adjustments to the lenses individually so pick anyone, or just the one you think is focusing a bit soft.
3. Mount your camera on a tripod or other stable surface in front of your monitor. The camera ideally has to be a far enough away from your monitor as possible so that when you zoom your camera lens to its furthers zoom, i.e 300mm on a 300mm lens the whole of the Moire Fringing chart can be seem in the view finder. Now in practice this is not really possible, unless you happen to live in a castle or other equally long room. So in reality just make sure your camera is as far as possible from your monitor as you can get it, and then use the furthest zoom possible to fill the view finder with the Moire Fringing chart. Try to avoid fully zooming your lens to its widest point i.e if you have a 28-300mm lens try to get as close to 300mm as you can whilst keeping the chart in the view finder.
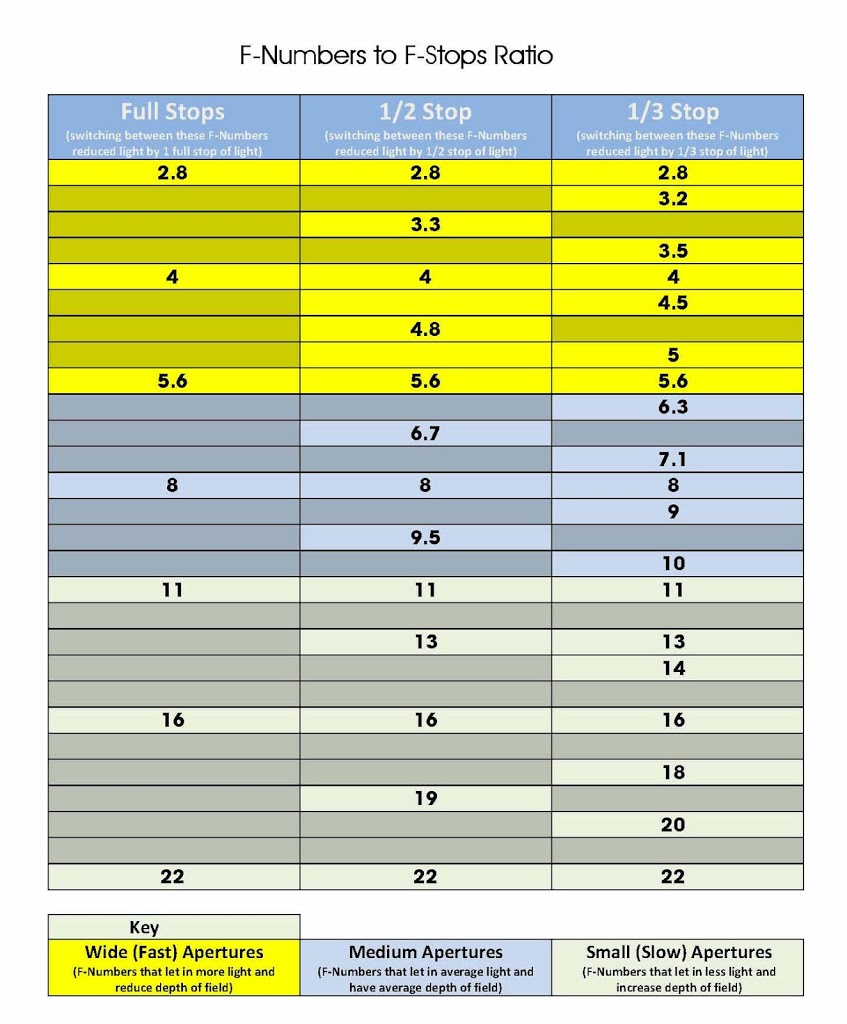
4. Please note you can use which ever mode on your camera you normally use, Full Auto, Full Manual, AV, TV, P but just make sure what ever setting you use you can clearly see the full Moire Fringing chart in the view finder. Unless you are noticing that your photos are soft at a particular F Stop (F8, etc) in that case choose either Full Manual or AV and set the camera to the required aperture you feel is soft. But again make sure you can clearly see the chart in your view finder.
5. I also recommend using either a centre focus or spot focus for testing, and focus on the centre of the chart.
Testing
Ok first off the idea behind the Moire Fringing chart is to try to get as many concentric circles in your view finder as you can.
The correctly focused image should look something like the one below

Ok so lets get started with the testing and adjustments. I am going to list the process of testing and adjustment in order to hopefully make it easier for you to understand and follow.
1. Set your camera to Manual Focus and focus manually on your monitor with the Moire Fringing chart loaded and your camera at a distance to allow for the complete chart to be visible in the view finder, you are trying to get an image similar to the one above showing the Moire Fringing chart and several concentric circles on it. Now take a photo
2. Next switch your camera to Auto Focus and set your focus point on the centre of the chart of take a photo.
3. Now go into the C.FnIII Autofocus / Drive AF Microadjustment menu (as described above) and select the Adjust by lens option (we are selecting this option as not all lenses focus the same and you can repeat the process for each lens you are having problems with), to select the option simply press the set button, then use the big scroll wheel to select the option then press the INFO button. You should now be on the following screen
4. Make sure that the Marker on the bar is set to 0, then press the set button and then use the menu button to exit the system menus. Now take a photo again making sure you are using Auto Focus and you are focusing on the centre of the chart.
5. Next go back into the screen, as shown in figure 4, and using the scroll wheel move the marker to +5, then exit the menu and take another photo. Now continue this process and each time you enter the AF Microadjustment menu change the marker in increments of 5, so start with it +5 then take a photo at +10, +15 and +20 and each time exit the menu system and take a photo. After this set of shots you should have taken 5 photos, one for each increment starting with 0 then +5, +10, +15, + 20 in order.
6. Now do the same this time starting at -5 and take a photo at the same increments, -5, -10, -15, -20.
7. You should now have a total of 10 photos on your camera, one taken using manual focus and 9 taken using Auto Focus and at each increment along the AF Microadjustment scale.
Adjustment
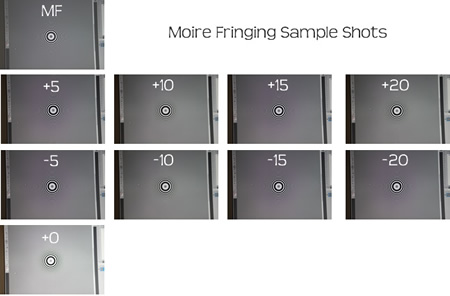
Now you have a set of 10 photos taken on your camera, and you have made adjustments after each shot, you should have a set of shots similar to the ones below. If you took the shots in the order as advised above starting with Manual Focus, then starting with 0 doing the + adjustment then working through the – adjustments your shots will be in the order below.
You now need to do the follow
1. Load the first shot you took your computer and view it at 100%. (the one your took using manual focus)
2. Now load the other shots in turn onto your computer and compare each shot to the one first shot you took using manual focus. You are trying to find the shot that matches as close to this one as possible, showing the same amount of concentric circle as the Manual focused shot. The shots you took will be different slightly, and this different is normally very slight but can make all the difference between soft focus and tack sharp shots.
3. If you look at the sample shot above, click on it to enlarge it, you can see that the there are two shots that are very similar to the manual focused shot and these are shots with adjustments of +5 and -5. You will notice that unlike the other shots taken at other adjustments you can clearly see the concentric circles around the centre of the shot.
4. Ok so now you have your adjustment setting you need to go back into the camera AF Microadjustment menu (shown below) and set the marker to the number you think is the closest shot to your manually focused shot.

If the adjustment number is 0, this means that your lenses is focusing fine and doesn’t need any Micro adjustment.
Conclusion
If you use more than one lens on your camera simply repeat the steps above for each lens, you can make the same adjustment for all the lenses, but I recommend doing it for each lens, as I found that my Canon kit lens needed no changes at all by my Sigma lens did, also one other word of caution do not take any more shots than the 10 shots your need for testing as this will throw out your order and you won’t know which shot is done at which setting.
One final thought if you find that doing the above does not result in sharper images, you should firstly try to work on your camera holding technique or try tour camera using the timer and a tripod, but if this fails you may need to send your camera off to Canon for recalibration. However thankfully I was able to solve my own soft focus issues using the above technique.


Just went through all the steps. Hopefully I will be happier with my photos. The 7D has been soft since I bought it when it first emerged. I will let you know how I feel with the results. My Tokina lens was off +10 and each of my Canon L lenses were off +5 and -5.
Cheers.
Shane
I had the same problem and doing the above made my shots just look so sharp. Let me know how you get on, I would be more than happy to share some of your shots on here.
Sean
Canon Inc. is a global brand and has seen surge in popularity because of the rising customer interest in the consumer, office, and industrial solutions provided by the company. Despite economic slowdown and low consumer confidence in U.S. and Europe, customers continue to buy canon products over the period of time.
I have OOF and soft focus issues with my Canon 7D also. This is with all my Canon lenses.
Tried MA but no good, always have to sharpen to 500 in Canon's Digital Photo Pro. I'm not happy with Canon's WB on the 7D. On tripod, with mirror up, form 1.4 to 22, with great light I can't get a tack sharp shot. I give up! 😉
Tony.
Sorry for the delay in responding, have you tried removing the camera battery, that is the small battery just inside the main battery compartment.
Also which mode do you shoot in?
thanks
Sean
I had issues with my 7D and it was driving me nuts. just tried removing both batteries and this seems to of worked i am now getting sharp images straight from the 7D. Can you advise as to what has actually happened and why removing the two batteries solves the problem.
Great to hear you got your problem sorted. The reason this works is that when the camera is initially setup everything is calibrated, but over time it can get a bit unset, leading to soft focus.
Removing the batteries sets the camera back to the orignal firmware settings and calibrations, and hopefully gives your sharp shots again.
This comment has been removed by the author.
I have a Tamron lens that I purchased a couple months ago that was not as sharp as I expected, so today I decided to try using the micro adjustment on my 7D for the first time. I started out using the Moire pattern as you suggested, and while each shot looked different, I really couldn't tell which was sharpest. I finally got a box with clear text on it and set it up on a table and with my camera on a tripod I focused on the text and took numerous shots while playing with the micro adjustments until the trial and error process narrowed in on the correct adjustment. Lo and behold, my lens needed a -20 adjustment! Now I'm happy to report that everything is nice and sharp.
RCinEP – That is totally awesome. I know what you mean the moire fringe pattern can be a bit difficult to see the difference in the shots.
Great idea using pain text instead, and so glad you managed to sharpen your lens.
Great article just purchased the Canon 7d learning all of the amazing new things that the camera can do, and when taking amazing photographs you want them to be as sharp as possible. I know that by using this great information my photography will be as sharp as possible.
Thanks Bryan, always glad to know my tips help people make the most of their cameras.
Sean – You mentioned, "but over time it can get a bit unset, leading to soft focus." Does this mean that these steps you outlined will need to be performed from time to time over the life of the camera?
I am currently debating the purchase of either a 7D or a 60D, but am leaning toward the 7D for the 8fps. However, if those shots are going to be difficult to get tack sharp, I may be better off going with the 60D.
Yes, like anything things can alter with your camera. The 7D, just like other DSLR cameras will need servicing from time to time, sometimes including the above to get tack sharp focus, although being honest I have only ever had to do this once on my 7D and it has been fine ever since.
Although it is good practise to service your camera regularly to keep it in good working order. But I agree I would recommend the 7D as not only is the frame rate good, but it ISO performance is excellent for low light work, with very little noise at high ISO.
After making these micro focusing adjustments, do you set the Custom function back to disable of leave it on #2 ?
Just leave it with your custom settings, but remember that you can change the settings for each lens you use, so you will need to change it each time you change your lens.
I did the above procedure a few times and my manual focus and the camera autofocus were the closest match, HOWEVER, with this Sigma 8-16mm the shots I take a horribly soft. Don't know what to do.
Focus seems to improve if I add a bunch more lighting to the room (not always desirable) and the .CR2 RAWs look sharper for some reason than the JPGs. If I slap on another lens the results are much sharper.
Discouraged. Any thoughts?
Thank you, thank you – I am thrilled that the battery removal seems to have worked – I wish I had found this page sooner as I was having a lot of trouble with the f2.8 EF 24-70 L which started off amazing and gradually lost its focus – it is night time now – can't wait to try this in the light tomorrow
I noticed your comment (Below) and wondered if by….. Setting the camera back to 'Orignal' firmware do you mean, 'as from the factory' original firmware or back to any last firmware update i have performed myself?? Am i right in saying that you cannot install an 'old' firmware version if you have installed the latest version???
(Removing the batteries sets the camera back to the orignal firmware settings and calibrations, and hopefully gives your sharp shots again.)
Hi there, I bought a 2nd hand 7D (very nice condition) in the summer, along with a 2nd hand Canon EF-S 15-85 mm f/3.5-5.6 IS USM Lens. I traded up from a older digital rebel, from which I was getting very nice results. I was looking forward to the results from the much better spec'd camera. However, I am a little disappointed with the results, which are much softer than expected. Turns out I'm not alone, which is great. I'm going to try out the fixes above in the hope that they work, but I wanted to ask a question – the lens I bought gets very good reviews, but it has a some lens creep, which I didn't notice in the shop. Would this effect the sharpness of the pictures?
Thanks for review, it was excellent and very informative.
thank you 🙂
I finally broke down and tried MA. Tickled pink. I happened to use an adjustable drywall square and shot till the scale (inches to 1/16) showed sharp top to bottom, left to right. Then I leaned it back at 45 degrees and fined tuned. As I said, so far, tickled pink.
Set 5 seperate Lens, 100-400L, 24-105L, 200PrimeL, 100mm Macro (non IS) and a Tokina 11-16mm. All needed some tweaking.
Noel
Thanks for letting me know, so glad it helped you. If you need anything just let me know
Hi! I am excited to find this blogpost, but none of the images have come through, so I don't know what to look for. Have the images been removed? If so, has this been reblogged somewhere else? If not, it may be that your photos are not viewable in South Korea. I hope that isn't the case!
KFamily thank you for your post, not sure where the shots have gone. I will reupload them this weekend
KFamily and everyone, this post is now fixed and the shots are back up and running
Thank-you so much for these clear instructions. I've had my 7D for years, and had about given up on it. Shots are so clear now, I can count the eyelashes again!
Cate It is my pleasure, so glad it worked for you and your are back to taking awesome shots again
Great post. Although you could just use the test image, manually focus and take the shot then select auto focus and take the shot, load up the two images at 100% and if they both look the same, no adjustment is needed.
I have completed this test and it worked now I have charged all my batteries and it is doing the same thing again. I am doing the test again and I am getting soft images
It worked with complete discharge then I left camera over night fully charged my normal batteries and the camera has gone back to a soft focus again. I am gonna try with a discharge again but there has to be something else wrong. Any ideas….
This post really helped a lot! I had my 7D stored because it wasn't giving the results I was expecting. I did the batteries trick and it seems it's working nice 🙂 Thank you for sharing!
Its my pleasure, so glad it helped
Nicola I would suggest doing a check for the firmware version and update as necessary, then go through the procedure again. Make sure you also check the Micro Adjustment for each lens correctly.
Hey thanks for this amazing post. You can also have a look at LED Street Light for more information
Paper Led Bulb/Lamp Manufacturers Supplier in India, Delhi
Tube Lights Manufacturers Suppliers In India , Delhi
Down Light Manufacturers Suppliers & Exporter in India Delhi
Cob Light Manufacturer Suppliers In India Delhi
Industrial Light Manufacturer Suppliers in India Delhi
Flood Light Manufacturer, Suppliers in India Delhi
Street Light Manufacturers Suppliers in India Delhi
Led Display Board Manufacturer Suppliers in india Delhi
Solar Inverter Manufacturers Suppliers In India Delhi
Thankyou..