LATEST SHOOT NEWS: Currently seeking models. Get in touch.
CT Magazine is Relaunching Soon. Get in touch be featured.
LATEST BLOG NEWS: To Edit or Not To Edit – Check it Out Now
Sean J Connolly PhotographySean J Connolly PhotographySean J Connolly PhotographySean J Connolly Photography
  • About Me
  • Portfolio
    • Fashion and Lifestyle Photography
    • Location Photography
    • Event Photography
  • Google + 360 Photography
  • Blog
    • Resources
  • Contact
  • About Me
  • Portfolio
    • Fashion and Lifestyle Photography
    • Location Photography
    • Event Photography
  • Google + 360 Photography
  • Blog
    • Resources
  • Contact

My Essential Kit

  • 0 comments/
  • October 29, 2011

I thought I would mention some of the essential items I carry with me in my kit bag everywhere I go and I mean every shoot I go to these items apart from my Canon 7D and memory cards go with me.

UPDATE – I now also use a Canon 5D mk2 but all my other kit is the same.

Camera Bag – Lowepro Fastpack 350

I get asked this question alot, well apart from which camera do I use, what camera bag do I use.

Lowepro FastPack 350


The answer is simple I use a lowepro FastPack 350,  I find it lightweight and full of features such as useful side mesh pockets, huge top pocket and of course quick access to your camera, all wrapped up in a ruck sack style bag, with enough space to happily hold two lenses and 2 flash units, along with anything else you can or wish to carry. I have found that what ever I have wanted to carry this bag has been more than big and strong enough to cope.

This bag also has space for a laptop, killing several birds with one stone, so to speak.

Battery Grip

Battery Grip


I always have a battery grip attached to my camera, and although I use a non Canon grip it has worked without fail in some very harsh environements, from rain to sand, dust to darkness.

I find not only does the extra battery power make a big difference during longs shoot, as it holds two catteries as oppossed to one, but the additional features of the grip make using the camera a whole lot easier, as the extra side grip makes holding the camera on the side easier (for portraits) added with the extra shutter button makes picture taking a whole difference experience.

I also find that the extra weight added to the camera gives it better balance.

Remote Shutter Release Cable

Remote Shutter Release Cable

One of the other things I always keep in my kit bag is a remote shutter release, and whilst I have an infrared remote for my camera, I find the cabled version a whole lot better to use. I think the fact that I know it is always ready to use, no worry about batteries, sunlight or anything else, makes it a great piece of kit to keep about me at all times.

The main reason for keeping this on me is that you never know what kind of shtos you want to take, and in my view its better to “have and not need than need and not have”.

Lens Pen

Lens Pen Cleaning Tool


The Lens Pen tool is such as god send and makes lens cleaning so easy, it is basically a little brush on one end and a cleaning pad on the other, it gets rid of marks on my lens way better than any cloth and the brush means I can easily remove dust, sand, dirt or any other dry stuff from my camera without damage.

Filters

The first thing to mention is that I always have a screw on UV filter attached to my lenses, as the UV filter does not have a great deal of effect to my shots, although it does absorb some UV light, it is a great way to protect your lens from getting scratched. After all its alot cheaper to replace the UV filter than it is to replace my lens.

Cokin P Filter Holder and Ring

I always have in my bag my Cokin P filter holder, like I said before the bag is more than big enough to carry all the little extras I may need, so I keep my Cokin filter holder and adapter ring there in case I heed it. I use this type of filter as it allows me to simply buy different sized adapter rings for my different lenses, instead of buying the same filter for each lens.

Cokin P Filter – ND Filter


This is because unlike screw on filters the cokin system has a lens ring attached to your lens, then the holder simply slides onto the holder then into that you can put an array of different filters as you can see from the above pictrue, the actual filters are all the same size, the only thing that changes is the adapter ring for the thread size of your lens.  Much cheaper than buying screw on filters for all my lenses.

Multi-Tool

Multi Tool

One of the most useful thing in my camera kit bag is my multi tool, it has come in handy so many times I just don’t know how I would cope without it, so I recommend to anyone out there to carry a multi-tool in there kit bag.

Flash

Flash / Strobe

Although it is not always night time I always carry a flash, I just think you never know when you might need one, even on the brightest sunny days with the sun behind your subject you will need to light then at the front with something, and other than a reflector a flash is a great way to do this.


Gels

Flash / Strobe Gels

Gels are a really cool way to add that something extra to your shots, and as they are so light to carry keeping them with my flash in my kit bag does not add anything to the weight, but can add a whole lot to my shots.

As you can see in the picture above I use velcro dots to attach my gels to my flash, simply stick one on either side of the flash and one on each end of the gel.

Tripod

Although I dont carry my tripod to ever shoot I do carry it alot and my chosen tripod is a Red Snapper tripod, and although these tripods get mixed reviews online I find it to be light enought carry, yet strong enough to hold the camera firmly.

For more info on Red Snapper Tripods check out http://www.redsnapperuk.com/

Ok thanks for reading about whats in my kit bag, so what do you have in your kit bag that you could not live without? answers please in the comments section.

  • Under : battery grip, camera kit bag, cokin filters, flash, gels, lenspen, lowepro fastpack350, remote shutter release cable

Lighting

  • 0 comments/
  • October 28, 2011

As every good photographer will know the word photography actually means “writing with light” and this means that one of the most important things you can get right in order to get a great photograph is the lighting.

For an excellent video guide please check out this great series of tutorials by the Better Photos Academy

Lighting comes from two main sources ambient and artificial, and being able to control your lighting is the key to your photos being great rather than good.

Ambient Light
This is very simple to understand but difficult to master, ambient light is using the light from available light sources that occur naturally in your environment, this can be light from street lighting, light from the sun, the moon or anything else that is around that you do not have direct control over.
The simple fact that your do not have direct control over ambient light means that you have to use otherways to bring some form of control to the lighting.
Reflector

Multi Purpose Reflector

The most common way to control ambient light is with a reflector / diffuser, this small or large piece of kit allows you to reflect the light to exactly where you want to, and some reflectors are multi purpose and have an in built diffuser which allows you to scatter the light more evenly across your subject.

A multi purpose reflector works usually in one of the following ways

  1. Directly reflects the light to where you want it, normally done using the silver side.
  2. Reflects the light but softens its colour, normally done using the white side.
  3. Reflect the slight and adds a gold / yellow tinge to it, normally done with the gold side
  4. Diffuses the light by softening it, normally done by using the internal part
  5. Remove light from your subject by absorbing it, normally done with the black side.
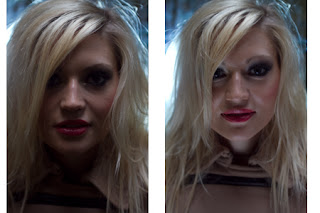
Without / With Reflector

As you can see from the above portrait sample shot the image on the left is dark in the front, whilst the image on the right has a nice even lighting

Now although a reflector is the most common tool used to control ambient lighting, you can pretty much use anything you like to get the desired effect, even closing curtains is a way to control ambient light in fact you can just play around with everday objects to give you the right lighting.

In Camera
Althought this may sound obvious the best way to play around with  ambient or available light is to change the camera setting, this may mean using a smaller or larger aperture or changing the shutter speed, by adjusting in camera setting you can also control directly the ambient light entering the camera to get the desired effect.
The simple rule of thumb is

  1. Slower shutter speed will let more light in / Faster shutter speed will let less light in
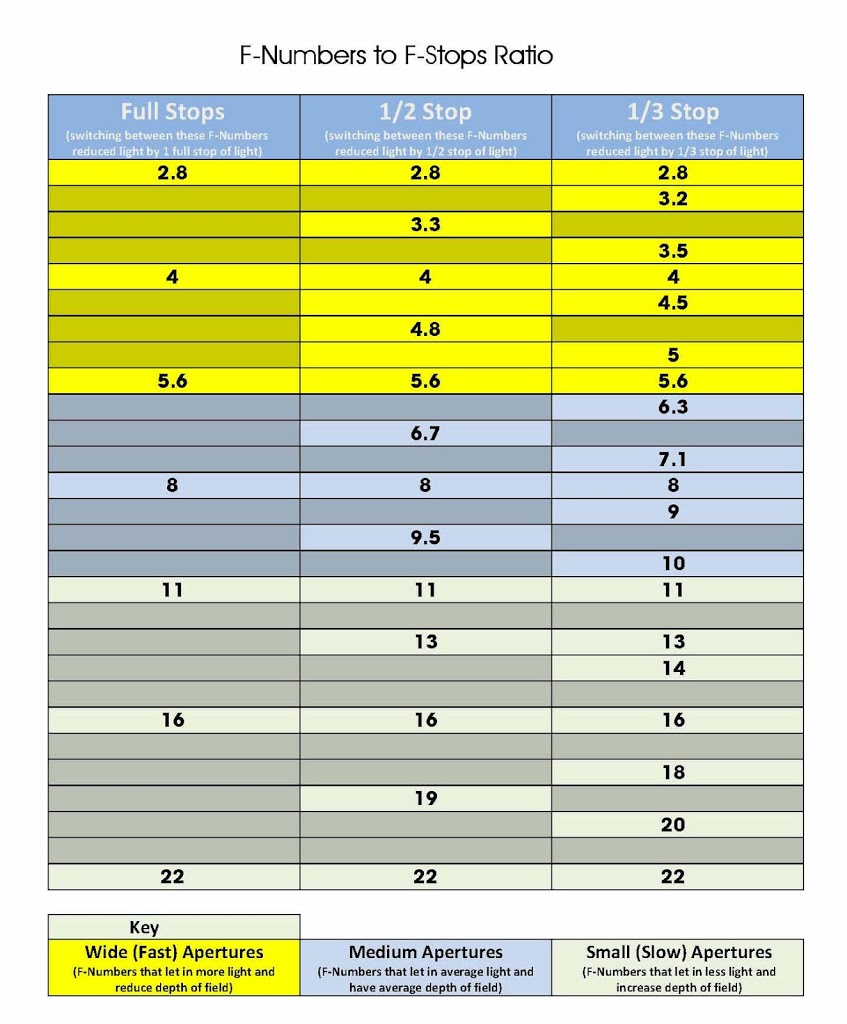
  2. Smaller aperture number = wider aperture which lets more light in
  3. Higher aperture number = smaller aperture which lets less light in
  4. Hgher ISO number will give lighter photos, but also add noise to your shots.

Note when shooting at slow shutter speeds remember to put your camera on a stable platform or tripod

Changing Shutter Speed – Long Exposure

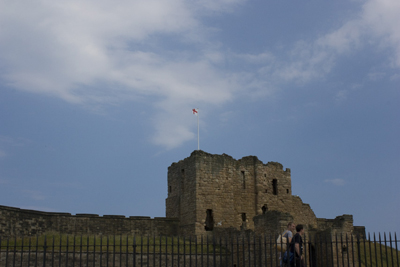
As you can see in the example above by using a slower shutter speed the ambient light can be made to look really cool. So remember that the only limit is your imagination so go nuts.

Artificial Light

When time calls for it and the ambient or available light is insufficient for your needs there are two main choices when it comes to lighting your subject, flash / strobes and continuous lighting.

Flash / Strobes
A flash / strobes is the common term for a portable unit that provides light directly in connection with your camera shutter, these come in all shapes and sizes but have common features and functions which I am going to talk about here.

Ok I will start by giving you an over view of the most common function on modern flash units, I will start at the bottom left of the diagram and work clockwise.
On / Off Switch
This switch is used to turn on or off the flash unit, when switch on the flash will normally make a high pitched sound until it is ready to fire.
Flash Ready / Test
This button has two purposes the first is it will light up when the flash unit is ready for use, the second is that when it is lit up it can be pressed in order to test fire the flash.
Flash Zoom (optional)
This button is used when the flash in in manual mode to zoom or move the flash head inside the flash, this allows the flash to cover either a narrower area or a wider area.

Note Not all flash units are zoom units and have this function, also this option will be controlled by the flash when not in manual mode.
Mode
This is used to switch the flash mode, normally used to select between ETTL (auto) and manual modes.
F/Stop
This button is sometime labelled power and allows you to control the output level of the flash when in manual mode, most units support anything from full power to 1/16 of full power, someother units can step down a bit further to reduce the power up to 1/32 of full power.
Note – the measurement is a percentage of the full output, 1/1 being full power.
ISO (optional)
This allow the light sensitivity of the flash to be change as needed
Alert (optional)
This allows the noise and alerts on the flash to be alerted.
Back light
This turns on and off the flash back light, this is only available on flash units with an LCD screen.
ETTL – Evaluatitive Through The Lens

This indicates that the flash is operating is full auto mode and directly in sync with the camera, this mode is only supported by the flash being connected as follows.

  1. On the camera Hot Shoe connector
  2. Tethered to the Hot Shoe connector via a cord
  3. Connected to the camera via a wireless trigger that supports ETTL.

Note – ETTL simply means that any adjustments made to the camera will be automatically done tot he flash, such as focal length, etc.
Slave / Master Switch (optional)

This changes the flash from being either the main flash unit in the set to the slave unit, simply put if your flash has this option it can be remotely fired by other flash units, there will be a infrared sensor on yoru flash either the side or front that must be in the line of sight of other units. When the other flash unit fires this unit will also fire.
The above is only a guide to the flash units, most work in the same way, but will be laid out differently, but in essence the principles are the same for all.

Ok that concludes the basic workings of your flash, the other things to look for in your flash and to know about is as follows.

Guide Number – this is the effect distance your flash can cover when your camera ISO is set to 100, normally expressed in feet ie 48 feet.

Gels – these are attached to give the flash a colour light rather than the typical white light, if you look at reflector photo above you can see it is back lit in blue, this is done using a gel.

Flash Gels

Continuous Lighting

This is the form of lighting that is always on, it can come from a variety of sources, it is something to play around with and use what ever you have around to light your subject, some of the more common continuous light sources are

  1. Purpose built continuous lights, unlike stobes these do not cycle with your camera.
  2. torch
  3. Anything else you like that gives off light.
Playing around with lighting

The shot above shows use of other forms of continuous lighting, again it is only limited by your imagination.

  • Under : ambient, artificial, available, camera, continuous, flash, guide number, how, iso, light, lighting, long exposure, photo, strobe, subject

  1. DSLR Controls
    1. Front Controls
    2. Back / Rear Controls
    3. Top Controls
    4. Left Controls
  2. Camera Talk
    1. Why Buy a DSLR
    2. Canon or Nikon?
    3. Camera Lens
    4. Canon 7D Soft Focus Fix
  3. Learning Zone
    1. Photography Golden Triangle
    2. Photography Tips
    3. Common Photography Terms
    4. Types of Photography
    5. Lighting
    6. F-Number to F-Stop Chart
Notable Posts
  • How to Reduce Light Stops Entering Camera by Using F-Numbers
  • Using Polarizing Filters to reduce Reflections when shooting through glass
  • How to Setup Canon 7D to take HDR shots / Bracketed Exposure
  • Spofforth Castle Wetherby Fashion Shoot – Jenna Duffin
Recent Posts
  • To Edit or Not To Edit – That is the Question!
  • Photography Tips for Beginners
  • Photography Golden Triangle
  • Reviews
  • Smoke Bombs and High Fashion
Archives
  • February 2019
  • January 2019
  • December 2018
  • November 2018
  • August 2016
  • March 2016
  • October 2015
  • June 2015
  • May 2015
  • July 2014
  • April 2014
  • December 2013
  • May 2013
  • March 2013
  • December 2012
  • November 2012
  • October 2012
  • September 2012
  • July 2012
  • June 2012
  • May 2012
  • April 2012
  • March 2012
  • February 2012
  • January 2012
  • December 2011
  • November 2011
  • October 2011
Privacy Policy
Copyright Sean J Connolly Photography 2018. All Rights Reserved