LATEST SHOOT NEWS: Currently seeking models. Get in touch.
CT Magazine is Relaunching Soon. Get in touch be featured.
LATEST BLOG NEWS: To Edit or Not To Edit – Check it Out Now
Sean J Connolly PhotographySean J Connolly PhotographySean J Connolly PhotographySean J Connolly Photography
  • About Me
  • Portfolio
    • Fashion and Lifestyle Photography
    • Location Photography
    • Event Photography
  • Google + 360 Photography
  • Blog
    • Resources
  • Contact
  • About Me
  • Portfolio
    • Fashion and Lifestyle Photography
    • Location Photography
    • Event Photography
  • Google + 360 Photography
  • Blog
    • Resources
  • Contact

What is the difference between TimeLapse and HyperLapse Photography?

  • 0 comments/
  • March 25, 2016

After posting about doing some TimeLapse photography and my test shots, I had a few people ask me what is the difference between Timelapse and HyperLapse.

So I thought I would answer them in a post, so here goes.

I will start by briefly explaining what the two are in their own right, and hopefully you will be able to see the difference.

What is TimeLapse Photography?

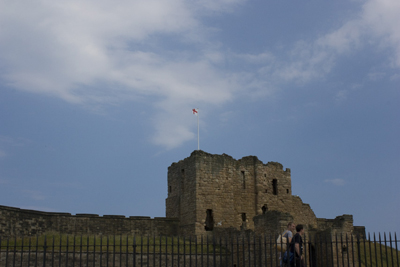
I will start by showing you a simple example of a TimeLapse sequence

As you can see the movement in this shot is done by the lapsing of time, hence the name TimeLapse. Simply put in a TimeLapse shot the camera position is fixed and a shot is taken at set intervals, during each interval time passes, which means when the next shot is taken the scene has changed.

These shots are then stitched together into a moving format, gif, movie or similar.

What is HyperLapse Photography?

Once again I will show you an example of a HyperLapse sequence

This time rather than the camera remaining in a fixed position, the shot is taken by the camera which is then moved between each shot, hence the name HyperLapse. So simply put we get the effect by having a moving camera position and a shot taken at each position, each time the camera is moved to a new position a new shot is taken, (at each shot the camera is fixed and doesn’t move) after each the camera is moved and physical distance has passed, so the next time the shot is taken the scene has changed.
Again these shots are then stitched together into a moving format, gif, movie or similar.

So what is the difference between TimeLapse and HyperLapse?
Now you should already know the difference by to put it simple the difference is
1. Time-lapse photography allows time to pass between each shot, whilst the camera remains fixed.
2. Hyper-lapse photography allows distance to pass between each shot, the camera moves between each shot, but is fixed at the time of taking the shot, after all we are not making a movie here.
NOTE
TimeLapse is often also referred to as Time-lapse or Time Lapse Photography, as HyperLapse is often referred to as Hyper-lapse or Hyper Lapse Photography.

  • Under : 7d, artistic photography, CAnon, cows, hyper-lapse, hyperlapse, movement, richmond, stairs, time-lapse, timelapse, walking, what is hyperlapse photography, what is timelapse photography

How to do Timelapse (Time Lapse) Photography and what is an Intervalometer?

  • 0 comments/
  • May 27, 2015

You may have heard about Timelapse Photography or you may not have. So I will start by telling you what it is.

What is Timelapse Photography?

Timelapse Photography is a similar technique to HDR photography, expect that rather than changing the exposure setting for each shot you change the time, and take a series of images over a set period of time with a fixed interval in between them. All shots have the same exposure settings, and the only changes are the physical changes to the subject in the shot over a period of time.

Simply put, you taken a set of shots, something like 20 shots and in between each shot you have a set gap anything from less than a second to several seconds. You then end up with a set of shots that depict a section in time for your given subject. This can traffic, streets, clouds or anything else you would like to shoot.

Why use Timelapse and Not Video?

The main difference between shooting video and doing a timelapse sequence is in the name, the lapse in time. As when you shoot using video you get a realtime view of the world, so to show the sunset you have to shoot the whole thing, so you may need to shoot a video which is anything from several minutes to several hours long. By using a timelapse technique you skip parts of the time, and only show an interval of the real thing.

This allows you condense something into a few minutes or seconds, when in realtime it happened over several minutes or even hours.

Timelapse can be done using either video techniques or photography techniques, but both end up with the same effect a video showing time elapsed (timelapsed) in a particular scene.

What do I need to do Timelapse Photography

  • The first thing you need is your camera, but you knew that already.
  • A Tripod or steady place to put your camera.
  • The next thing you need is a remote shutter release with an intervalometer or timer.
  • Or a camera with a built in intervalometer. (more on this in another post)
What is an Intervalometer?
An intervalometer is a timer device or built in camera function which takes a fixed set of shots with a given interval in between. For example 20 shots taken at 1 second intervals.

How do I take my first Timelapse?

After you have found a interesting subject to shoot, such as a road, town centre or similar. Ideally for your first timelapse you want something that is fast moving such as people walking in town or cars on a road, as this will let you take a few shots with a small interval between them. For example if shooting a town centre you dont need anymore than 1-3 seconds between your shots.

My advice for your first timelapse is to set the camera to auto focus and let it focus on your chosen subject, once its in focus switch it to manual focus, recheck the focus to make sure its all still in focus. As by setting the focus to manual the camera will not readjust the focus between shots.

Then simply set your timer for the amount of shots you want to take and the interval between then and set the shutter. Remember that a smooth movie is normally shot at 24 frames per second, so for every 24 shots you take, you are in reality only going to get 1 second of timelapse. But give it a try and see how it works.

  • Find a good subject for your timelapse, town centre, road etc (a fasting moving subject is best for your first one)
  • After setting the exposure, set your camera to AutoFocus. Once its found focus on your chosen subject, switch it to Manual focus, recheck the focus and leave it.
  • Set your interval timer to between 1-3 seconds, try 3 seconds to start with if you are shooting town and about 1 second if you are shooting cars. remember a smooth movie is 24 frame per second (24fps) for every 24 shots you get 1 second of timelapse.
  • Set the shutter and sit back and wait.
How do I create my Timelapse movie?
You can create your timelapse movie simply by using either a third party piece of software or import your shots into Photoshop and create a movie (more on this in another post)
Happy Shooting.
  • Under : canon 7d, clouds, fields, how to do timelapse photography, inervalometer, north yorkshire, richmond, rolling, sunset, timelapse, timelapse photography, tripod, what is an intervalometer

  1. DSLR Controls
    1. Front Controls
    2. Back / Rear Controls
    3. Top Controls
    4. Left Controls
  2. Camera Talk
    1. Why Buy a DSLR
    2. Canon or Nikon?
    3. Camera Lens
    4. Canon 7D Soft Focus Fix
  3. Learning Zone
    1. Photography Golden Triangle
    2. Photography Tips
    3. Common Photography Terms
    4. Types of Photography
    5. Lighting
    6. F-Number to F-Stop Chart
Notable Posts
  • How to Reduce Light Stops Entering Camera by Using F-Numbers
  • Using Polarizing Filters to reduce Reflections when shooting through glass
  • How to Setup Canon 7D to take HDR shots / Bracketed Exposure
  • Spofforth Castle Wetherby Fashion Shoot – Jenna Duffin
Recent Posts
  • To Edit or Not To Edit – That is the Question!
  • Photography Tips for Beginners
  • Photography Golden Triangle
  • Reviews
  • Smoke Bombs and High Fashion
Archives
  • February 2019
  • January 2019
  • December 2018
  • November 2018
  • August 2016
  • March 2016
  • October 2015
  • June 2015
  • May 2015
  • July 2014
  • April 2014
  • December 2013
  • May 2013
  • March 2013
  • December 2012
  • November 2012
  • October 2012
  • September 2012
  • July 2012
  • June 2012
  • May 2012
  • April 2012
  • March 2012
  • February 2012
  • January 2012
  • December 2011
  • November 2011
  • October 2011
Privacy Policy
Copyright Sean J Connolly Photography 2018. All Rights Reserved