
How to Setup Canon 7D to take HDR shots / Bracketed Exposure
Ok so you have heard the word HDR, Bracketed Exposure and Auto Exposure Bracketing. But what do they mean and how can you use your Canon 7D to take these sorts of shots.
Ok first things first what is HDR, Bracketed Exposure and Auto Exposure Bracketing.
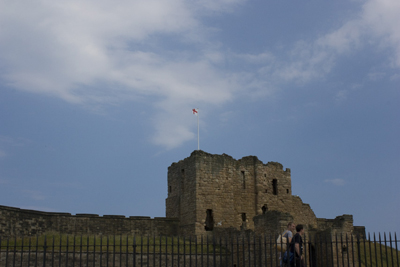
HDR stands for High Dynamic Range, and it is a technique in which you merge several shots together all with a different dynamic range or exposure. HDR is mainly used in landscape photography as it allows you to show light at all levels of the image, bringing out details and colours you would not see in a single shot. These shots are created using software packages such as Adobe Photoshop Elementswhich let you create the HDR effect or final images, check out the excellent video tutorials by Just4Photographers.com on using Photosjop.
One of my favourite HDR photographers has to be Trey RatcliffI think his work is astounding.
A fantastic E-Book I recently bought How to do Trick Photography by Evan Sharboneau is amazing, is really takes some of ym article concepts to a whole new level, adn I recommend downloading and giving it a read, you will not regret it.
Bracketed Exposure is a term used when referring to a set or series of the same image each one taken at a different light stop, in short the first image will normally be dark (under exposed), the second will be “technically” spot on and the third shot will be bright (over exposed).
Auto Exposure Bracketing (AEB) or Auto Bracketing (AB) is the ability of the camera to be setup to take a series of photos all with different exposure levels, this means that you dont have to manually make changes to get your set of Bracketed Exposures, the camera does all the hard work
HDR (High Dynamic Range), Bracketed Exposure, Auto Exposure Bracketing on the Canon 7D
So before we can create any HDR photographs we need to collect a set of images that have a different exposure, and in short the more the merrier. Now there are two ways to do this the Easy way and the Hard way.
Now you are getting to grips with the AEB I recommend checking out Geoff Lawrences guide to Digital Photography you wont regret it
Hard Way to Take Bracketed Exposure Photographs on Canon 7D
Setup your camera with the normal setting you choose to use and take a set of photos, the more the merrier and for each shot alter the shutter speed, normally setting it too high such as 1/400 sec or similar, so that your first shot is too dark, then reduce your shutter speed to say 1/350 sec and take another shot. Then repeat this process until you have a set of images, 5 is a good minimum but like I said before the more the merrier. For some amazing example of the techniques we will cover here please take a look at the International Hall of Fames Terry Day’s work and his course.
You now have a set of bracketed exposure shots.
“Not really all that technical now was it”
“But Sean” I hear you shout “you said there was an Easy way and a Hard way, so whats the easy way?”
Technicall there are two easy ways one is to take a look at the Focus Emagazine as it has loads of tips and snippets for your to use, or follow the tips below.
Easy Way to Take Bracketed Exposure Photographs on Canon 7D
The instruction and guidance here are specifically based around Canon DSLR’s in particular the 7D, all decent DSLR Canon, Nikon, Hassleblad are capable of auto exposure bracketing, but the setup will be different.
Setting up the Canon 7D for auto exposure bracketing (AEB)
There are 3 main steps to taking auto bracketed shots.
- Set the camera drive to High-Speed
Continuous
- Set the Exposure Bracketing Sequence
- Set the Exposure / Auto Exposure Bracketing
1. How to set the Canon 7D camera drive to High Speed Continuous
The first thing we need to do is set the drive speed on the camera to “High Speed Continuous”, this can be done in a variety of ways. My personal choice is to use the button on top of the camera and then set the speed either by using the top screen or the back of the camera. Although for this tutorial I am going to use the quick menu “Q” option.
a. Press the Quick Menu “Q” button on the back of the camera, located to the left of the screen.
b. Using the little joystick, located to the right of the screen. Select the Drive Mode menu and press the set button
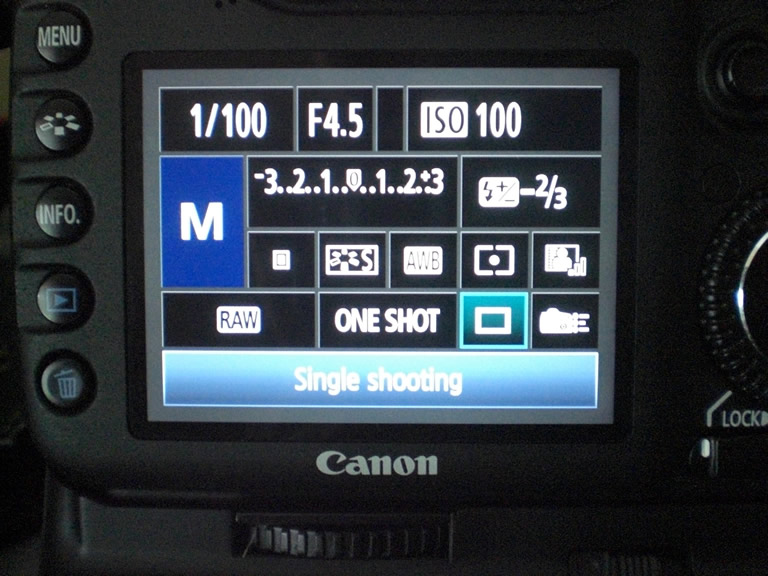
c. Now select the High Speed Continuous option, the second option along on the screen, and press the set button.

2. How to set the Exposure Bracketing Sequence on Canon 7D
The next thing we need to do is change the Bracketing Sequence, this means that our photos will come out in the correct order from dark to light.
a. Click the menu button on the back of the camera (located just to left of the rear screen)
b. From the Custom Function Menu, second from the end in the top row of options in the menu screen, select the Exposure menu (CFn I: Exposure) option and press the set button.

c. Then scroll through the menu options to number 5, Bracketing Sequence, and select the second option, the one marked “-,0,+” and press the set button.

Ok now press the menu button to come of the menu, and you have now set the bracketing sequence. This means that when we take our shots we will get a dark photo, a normal photo and a light photo.
It should be noted that due to a slight limitation on the Canon 7D it is only possible to take 3 auto bracketed shots at once, hence the option of only a dark shot, normal shot and a light shot. But dont worry I will let you in on a little tip later to overcome this.
3. How to Set Auto Exposure Bracketing (AEB) on the Canon 7D
Now we have set the order of out shots we must now set the Auto Bracketing Exposure (AEB)compensation for the shots.
a. Go back into the menu, if you forget where the button is its still located on the back of the camera to the left of the screen.
b. Select the Exposure / Auto Exposure Bracketing (AEB) option, the first option under the second icon along on the menu screen and press the set button to enter the menu

c. Now press the set button and using the small wheel, location on top of the camera, move the indicators apart until you have the indicators either side of the centre pointing at number 1.

d. Press the set button to save the option, then use the menu key to out of the menu.
Ok your camerais now setup to take a set of three shots, each one with a different exposure. Again note that due to the limitation of the Canon 7D you can only take 3 auto bracketed shots at once.
So what you need to do to get a complete set of photos Auto Exposure Bracketed photos for your HDR is take your first set of 3 photos, then go do the following
a. go back into the menu, and yes it is still located on the back of the camera to the left of the screen.
b. Again selected the Exposure / Auto Exposure Bracketing (AEB) option, the first option under the second icon along on the menu screen and press the set button to enter the menu
c. Now this time when you select your Exposure Compensation / Auto Bracketing Sequence (AEB) more the indicators to number 2.

d. Then press set and use the menu key to come out of the menu and take another set of 3 shots. Then redo steps a – c above but this time set the indicators to number 3.

e. And again press set to save and use the menu key to exit the menu and again take your shots.
Now you will have a series of photographs that are all at a different exposure, all you need to do is disregard the two repeated shots from the second two sequences, basically in the first sequence you took photos that were exposured as “-1,0,+1” you then took a set of shots that were exposed as “-2,0,+2” and finally you took shots that were exposed as “-3,0,+3”. As you can see you have 2 repeated shots both at normal exposure or “0”. So you can just deleted these shots from your series or just leave them and let your HDR software worry about them, thats up to you.
You can now simply load the shots into your chosen software package and create your HDR photos. I will post later about how to do this in Photoshop, but there are tons of HDR packages available and even website that can do ti for you.
“But Sean what about your little tip?”
Ok before you send round the heavy’s I have not forgotten about my little tip. So here it is.
When you are using your camera to do any type of Auto Exposure Bracketing, due to a limitation on the Canon 7D it only allows you to do 3 shots at a time, and have a set of 3 photos with different exposure. This means that each time you do any HDR shots of any decent level of AEB photography you are left with insufficient shots, and need to repeat step 3 above, each time change the indicators for each set.
You also don’t want you camera settings to stay on these setting for most of the time you use it, so in order to make life easier heres my little tip.
The Canon 7D has the ability to save camera settings for future use. If you have ever wondered what the C1, C2 and C3 options on the top mode selector control dial are for they allow you to recall preset saved settings simply by turning the dial.

How to Save Custom Camera Setting on Canon 7D
In order to save your setting ready for your next Auto Exposure Bracketing photos, simply follow the steps 1 to 3 above, so that you have the final indicators pointing at number 1. Save the options and come out of the menu. Then do the following
1. Go into the menu using the menu button, that is, yes you guessed it, located on the back of the camera to the left of the screen.
2. Select the third option from the right and select the Camera User Settings Menu

3. In this menu select the Register Option

4. Now select the option for Mode Dial: C1

5 Press the set button and then select OK and click set to save.

Now repeat the setup steps above to setup your camera for Auto Exposure Bracketing, but when you come to step 3 make sure the indicators are pointing at the number 2.. Now repeat the steps here and instead of the Mode Dial: C1 select Mode Dial:C2. Then repeat again making sure the Auto Exposure Bracketing indicator is pointing at 3 and then select Mode Dial: C3.
Once you have done this, you can either reset your camera setting using clear all camera settings, as seen in step 2 just above, or manually put your camera back to your normal settings.
Now each time you want to do any Auto Exposure Bracketing you can simply select C1 on the mode dial, then C2 and finally C3, you camera will do all the work for you and when your finished just return your camera back to what ever mode you normally use.
Doing this little tip allows you to recall the right Auto Exposure Bracketing (AEB) setup without the manual hassle simply by turning the mode dial.
Ok thats it, now go off and take some nice photos and if you are using a mac you may want to try Remo Recover to safe guard your cool new shots.
nice idea.. thanks for sharing..
Thank you for reading, and if you need any help just let me know.
Thanx for the tip it really helped me a lot. More power sir
No problem at all, if you need any help please feel free to drop me an email.
Quick noobish question, how do you compensate for camera shake and movement when switching AEB settings or Custom Functions?
The best way to compensate for camera movement is to use a faster shutter speed, as the faster the shutter speed the more the camera can move without effecting the final shot. Although there are limits to how much movement the camera should make.
The best way to setup the camera is to make sure its always held firm either by hand or on a tripod or similar solid surface.
Hope that helps
Sean
Great tip Sean; *finally* I get something useful to do with my three user slots 🙂
Seriously, thanks for sharing; I'm really only just starting to explore what my 7D can do!
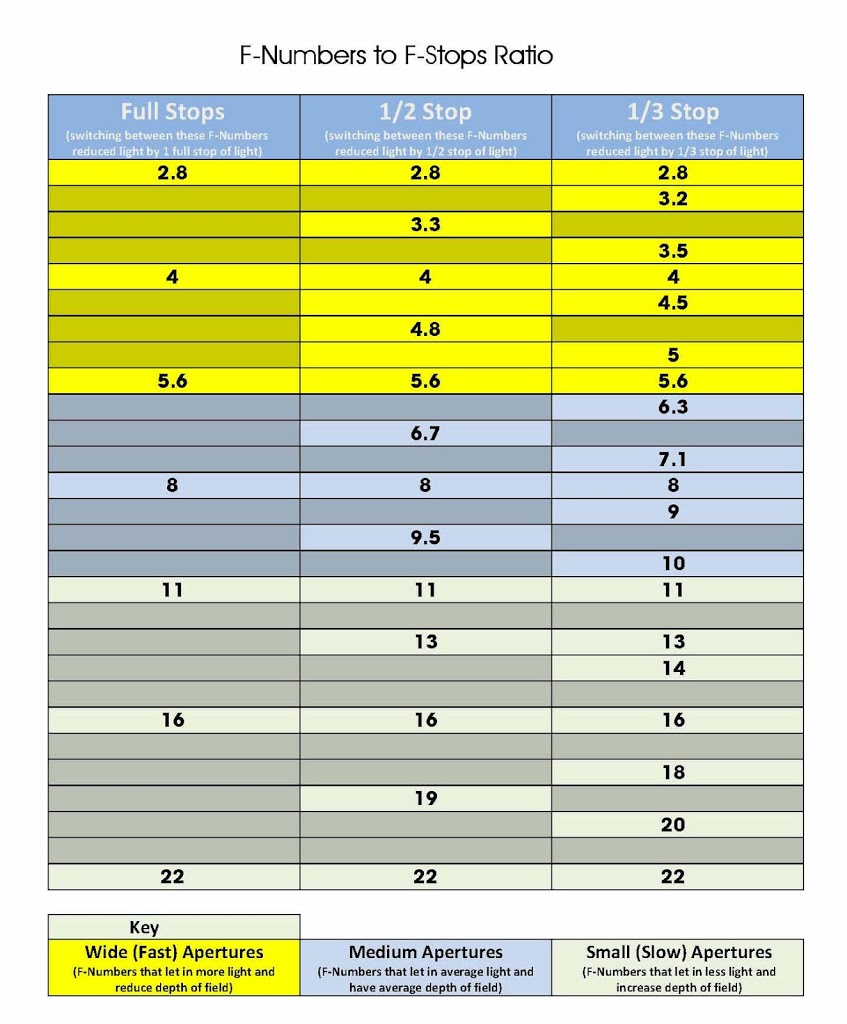
I think it might be a bit easier to leave the bracket gap set to -2/0/+2 and roll the shutter speed +1 stop and shoot the second series.
Leaving you with something like
-2/-1/0/+1/+2/+3
and if you then roll your shutter speed to -0.5 of the original you will end with
-2.5/-2/-1/-0.5/0/+1/+1.5/+2/+3
Thanks Natalie, always welcome additional tips for my readers.
Thank you so much for this–really helpful. Purely by chance I discovered that using the bigger dial on the Canon 7d, I was able to move the bracketing around so that the custom 1, 2 and 3 functions if set properly don't contain any repeats. For instance, by custom one is -3, 2, 1. My two is 0, +1, 2 and my three is +3, 4, 5 (using three I can just shoot one photo and not bother with 4 and 5).
Anyway, this should work, right? I don't see why you need to repeat 0 every time when you can do it this way. I'm sure I'm screwing this up somehow. 🙂
I find many useful things herewithcustom video productions
Hey Realitykidstv.com that was a great idea… And for C3 you can even set it to where it only takes 1 image at the +3 so you don't have to throw away +4 and +5.
Thanks Dave I'm glad someone else thinks this works. I've taken many HDRs this way, the method works until I get around to getting a Mark3 where it will do this without switching custom settings. I tend to keep 4 and 5 on it because occasionally I do use them.
Thanks RealityKids.com and Dave Dinwiddie glad that this post has been a great help to you both, I think that I find in HDR especially the more shots the merrier. Totally agree that you dont need to repeat 0 everytime. Thanks for taking the time to comment and add something to this post.
Would be great to see some of your shots.
Welcome. I'm on flickr, I don't have much of any HDR up there yet just one I think, but I'll be putting a lot more up there as I go along. Would appreciate a follow!
http://www.flickr.com/photos/rrhphotography/
Very helpful! Thank you! 🙂
Great blog & info here, please visit back, thanks
Arbazena Photography – Jasa Foto Murah Untuk Berbagai Kebutuhan & Kegiatan
This is going to sound like a stupid question but I've set the aeb as advised, I took some test shots but I still only see one image when I view them. Also the bracketing icon on the top of camera display just flashes and I am unable to change any settings unless I switch exposure modes say to c2 and then back again. Is this telling me that initially I am under exposing too much and therfore the camera cannot set the bracketing, for the under and over exposed shots
I didn't have high continuous shooting mode saved! All good in the world again.
For other newbies to AEB the reason the AEB icon was flashing and I couldn't change any settings was because I had already started the first exposure(I was on one shot mode remember) I needed to press the shutter twice more to complete the three shots. The continuous shooting mode means you can keep your finger on the trigger and the three shots will all fire off and end one the 3rd exposure. Its details like this that can seem trivial to the experienced but a frustration to newbies.
This comment has been removed by the author.
Hi , very lucid article , nice to follow the flow of settings ..
if i use the AEB directly and i am happy with 3 shots is custom exposure setting required?..
Also i use intervalometer /remote for my shot would Hi- speed continuos shots are required.
have never been able to generate a HDR through multiple shot merger , more of single shot with multiple exposure edits ,
Also is photomatix a good tool ?
guess many queries 🙂
Wonderful work Sean, doing a commercial shoot tonight and will experiment with your formula to see if HDR will throw additional $$$ light on my prospects 🙂
Why can I not change AEB? AEB is greyed out when I go to change it, nothing I can do will fix this
Thanks for review, it was excellent and very informative.
thank you 🙂
Here Comes 7D Technology, Amazing video
Click here: http://halkahoja.com/technology/7d-show-dubai/
Ted, thank be great to see the shots
Seqhael, What setting have you go your camera on, make sure its set to M or P on the dial. Let me know how you get on 🙂
Thanks for your great post. Really I like your post very much and you highlighted many important things. Waiting for your next post.
HDR image editing software
So informative!
Great article! Really got me thinking about what to do with those custom modes! The problem I ran into with it was that in addition to the bracket stop settings, the custom mode saves all of your other settings too like ISO, aperture and shutter speed, so every time I switched between C1, C2 and C3, it would revert to those settings. I found that Natalie Lynx's suggestion above worked great for my purposes. Not only does it keep your settings, but it also allows you to narrow your range of stops if you're so inclined. This is more useful to me because I find that I don't generally use the extreme exposures, 4 stops down or 4 stops up, for HDR editing.
Thanks all for commenting, the only issue I see with Natalies tip is that you dont actually know what one stop of light is in terms of the F Number. Although watch this space as I am writing a post all about it.
Just wondering! Why the High-Speed Continuous?