LATEST SHOOT NEWS: Currently seeking models. Get in touch.
CT Magazine is Relaunching Soon. Get in touch be featured.
LATEST BLOG NEWS: To Edit or Not To Edit – Check it Out Now
Sean J Connolly PhotographySean J Connolly PhotographySean J Connolly PhotographySean J Connolly Photography
  • About Me
  • Portfolio
    • Fashion and Lifestyle Photography
    • Location Photography
    • Event Photography
  • Google + 360 Photography
  • Blog
    • Resources
  • Contact
  • About Me
  • Portfolio
    • Fashion and Lifestyle Photography
    • Location Photography
    • Event Photography
  • Google + 360 Photography
  • Blog
    • Resources
  • Contact

How to Reduce Light Stops Entering Camera by Using F-Numbers

  • 0 comments/
  • August 25, 2016

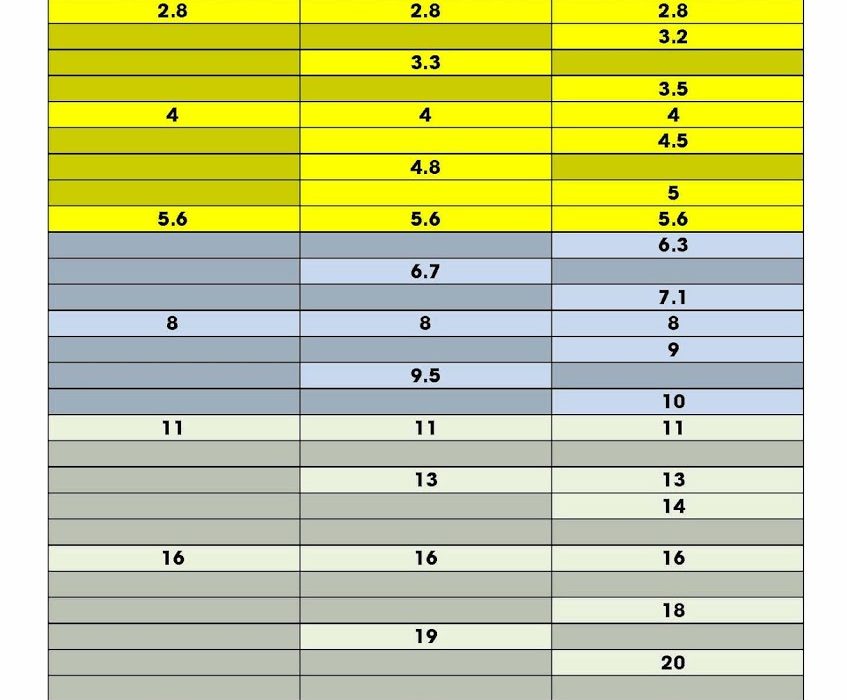
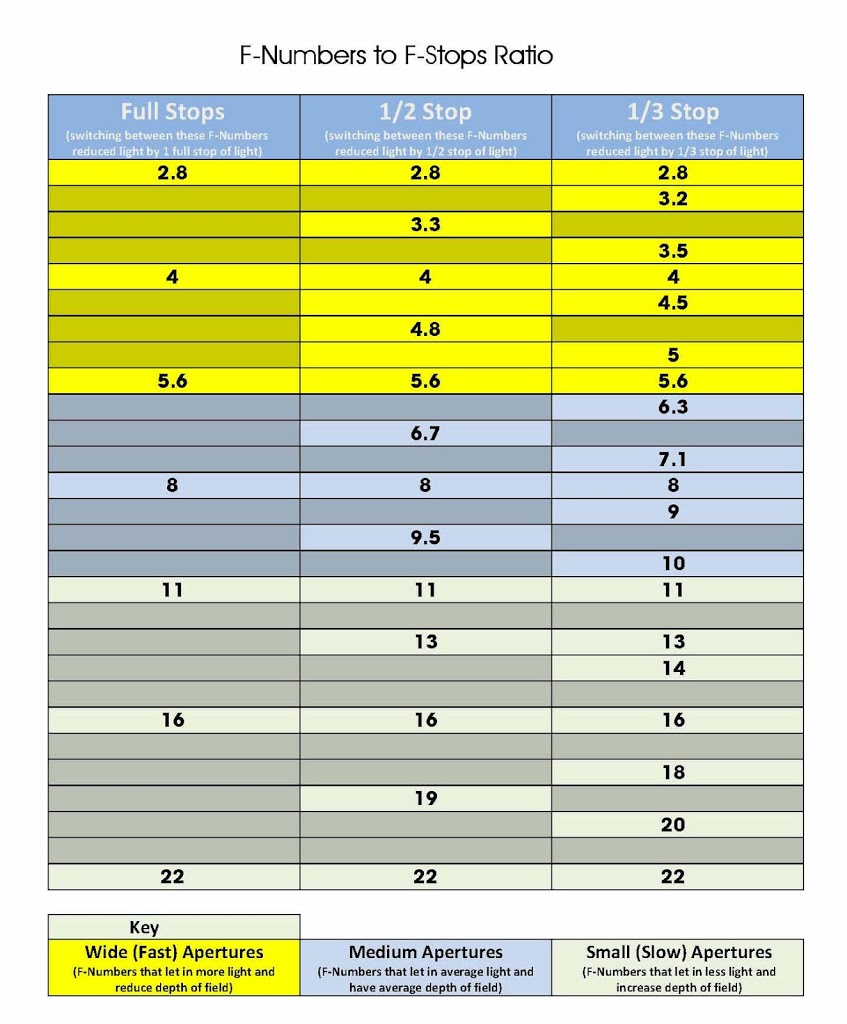
So rather than try to write a description about the numbers I decide to draw up a chart.
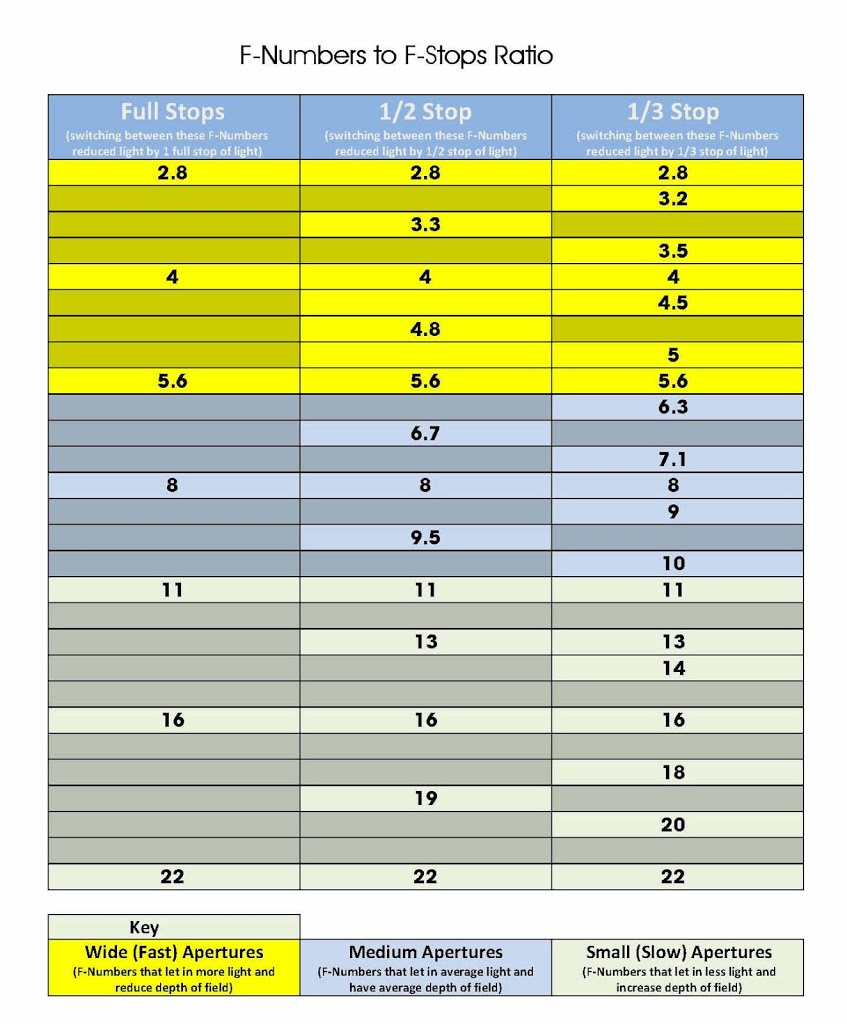
Please feel free to download this chart for your own use, and if you do wish to share it, please credit me. Thanks

How to use the Chart

The chart is pretty simple to understand, along the top are 3 columns, starting with Full Stop, 1/2 Stop then 1/3 Stop, reading down each column you see the camera F Numbers. The gap between the F Numbers is the amount of light you are reducing or increasing into the camera.
Lets say you want to reduce the light by 1 Full Stop of light, simply look at the first column titled Full Stops and switching the F-Number on your camera between these settings will decrease or increase the amount of light accordingly. Using the second column and switching between these F-Numbers will reduce light by 1/2 Stop and finally switching between the F-Numbers in the 3rd column will reduce light by 1/3 Stop.
I hope this all makes sense, any questions just let me know in the comments.
PDF DOWNLOAD
JPG DOWNLOAD
  • Under : camera, CAnon, f number, f stop, how to reduce camera light, lens settings, light, light painting, need to know, photography, ratio

Canon 1DX Now officially launched

  • 0 comments/
  • November 10, 2011

I just thought I would post and make you all aware that the Canon 1DX is now officially launched, and as it is a full frame, 18 meg professional DSLR its going to be a great addition to any photographers tool kit.

The anticipated arrival date in most stores will not be until March next year, although there will be a worldwide roll out between now and then, so you may be able to grab one a bit sooner.

The main features of the Canon 1DX are

  • 18.1 MP full frame CMOS sensor
  • Up to 12fps plus 14fps High speed mode
  • 100-51200 ISO, up to H:204800
  • 61 point AF system
  • 100,000 pixel RGB AE metering
  • Full HD 1080p EOS movie
  • Dual “DIGIC 5+” processors
  • Clear View II 8.11 cm (3.2”) 1,040k LCD
  • Ethernet port
  • for full product information visit the Canon website

    This will definately be on my wish list.

    I think thought that the initial rush to buy this new camera will not only push prices high, for at least the next 12 months, but will also make supplies limited. So if you are lucky enough to get your hands on one, let me know.

    • Under : 1d, 1dx, camera, CAnon, canon 1dx, canon eos-1dx march 2012, dslr, eos, launch, launches

    Lighting

    • 0 comments/
    • October 28, 2011

    As every good photographer will know the word photography actually means “writing with light” and this means that one of the most important things you can get right in order to get a great photograph is the lighting.

    For an excellent video guide please check out this great series of tutorials by the Better Photos Academy

    Lighting comes from two main sources ambient and artificial, and being able to control your lighting is the key to your photos being great rather than good.

    Ambient Light
    This is very simple to understand but difficult to master, ambient light is using the light from available light sources that occur naturally in your environment, this can be light from street lighting, light from the sun, the moon or anything else that is around that you do not have direct control over.
    The simple fact that your do not have direct control over ambient light means that you have to use otherways to bring some form of control to the lighting.
    Reflector

    Multi Purpose Reflector

    The most common way to control ambient light is with a reflector / diffuser, this small or large piece of kit allows you to reflect the light to exactly where you want to, and some reflectors are multi purpose and have an in built diffuser which allows you to scatter the light more evenly across your subject.

    A multi purpose reflector works usually in one of the following ways

    1. Directly reflects the light to where you want it, normally done using the silver side.
    2. Reflects the light but softens its colour, normally done using the white side.
    3. Reflect the slight and adds a gold / yellow tinge to it, normally done with the gold side
    4. Diffuses the light by softening it, normally done by using the internal part
    5. Remove light from your subject by absorbing it, normally done with the black side.
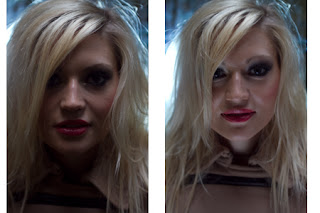
    Without / With Reflector

    As you can see from the above portrait sample shot the image on the left is dark in the front, whilst the image on the right has a nice even lighting

    Now although a reflector is the most common tool used to control ambient lighting, you can pretty much use anything you like to get the desired effect, even closing curtains is a way to control ambient light in fact you can just play around with everday objects to give you the right lighting.

    In Camera
    Althought this may sound obvious the best way to play around with  ambient or available light is to change the camera setting, this may mean using a smaller or larger aperture or changing the shutter speed, by adjusting in camera setting you can also control directly the ambient light entering the camera to get the desired effect.
    The simple rule of thumb is

    1. Slower shutter speed will let more light in / Faster shutter speed will let less light in
    2. Smaller aperture number = wider aperture which lets more light in
    3. Higher aperture number = smaller aperture which lets less light in
    4. Hgher ISO number will give lighter photos, but also add noise to your shots.

    Note when shooting at slow shutter speeds remember to put your camera on a stable platform or tripod

    Changing Shutter Speed – Long Exposure

    As you can see in the example above by using a slower shutter speed the ambient light can be made to look really cool. So remember that the only limit is your imagination so go nuts.

    Artificial Light

    When time calls for it and the ambient or available light is insufficient for your needs there are two main choices when it comes to lighting your subject, flash / strobes and continuous lighting.

    Flash / Strobes
    A flash / strobes is the common term for a portable unit that provides light directly in connection with your camera shutter, these come in all shapes and sizes but have common features and functions which I am going to talk about here.

    Ok I will start by giving you an over view of the most common function on modern flash units, I will start at the bottom left of the diagram and work clockwise.
    On / Off Switch
    This switch is used to turn on or off the flash unit, when switch on the flash will normally make a high pitched sound until it is ready to fire.
    Flash Ready / Test
    This button has two purposes the first is it will light up when the flash unit is ready for use, the second is that when it is lit up it can be pressed in order to test fire the flash.
    Flash Zoom (optional)
    This button is used when the flash in in manual mode to zoom or move the flash head inside the flash, this allows the flash to cover either a narrower area or a wider area.

    Note Not all flash units are zoom units and have this function, also this option will be controlled by the flash when not in manual mode.
    Mode
    This is used to switch the flash mode, normally used to select between ETTL (auto) and manual modes.
    F/Stop
    This button is sometime labelled power and allows you to control the output level of the flash when in manual mode, most units support anything from full power to 1/16 of full power, someother units can step down a bit further to reduce the power up to 1/32 of full power.
    Note – the measurement is a percentage of the full output, 1/1 being full power.
    ISO (optional)
    This allow the light sensitivity of the flash to be change as needed
    Alert (optional)
    This allows the noise and alerts on the flash to be alerted.
    Back light
    This turns on and off the flash back light, this is only available on flash units with an LCD screen.
    ETTL – Evaluatitive Through The Lens

    This indicates that the flash is operating is full auto mode and directly in sync with the camera, this mode is only supported by the flash being connected as follows.

    1. On the camera Hot Shoe connector
    2. Tethered to the Hot Shoe connector via a cord
    3. Connected to the camera via a wireless trigger that supports ETTL.

    Note – ETTL simply means that any adjustments made to the camera will be automatically done tot he flash, such as focal length, etc.
    Slave / Master Switch (optional)

    This changes the flash from being either the main flash unit in the set to the slave unit, simply put if your flash has this option it can be remotely fired by other flash units, there will be a infrared sensor on yoru flash either the side or front that must be in the line of sight of other units. When the other flash unit fires this unit will also fire.
    The above is only a guide to the flash units, most work in the same way, but will be laid out differently, but in essence the principles are the same for all.

    Ok that concludes the basic workings of your flash, the other things to look for in your flash and to know about is as follows.

    Guide Number – this is the effect distance your flash can cover when your camera ISO is set to 100, normally expressed in feet ie 48 feet.

    Gels – these are attached to give the flash a colour light rather than the typical white light, if you look at reflector photo above you can see it is back lit in blue, this is done using a gel.

    Flash Gels

    Continuous Lighting

    This is the form of lighting that is always on, it can come from a variety of sources, it is something to play around with and use what ever you have around to light your subject, some of the more common continuous light sources are

    1. Purpose built continuous lights, unlike stobes these do not cycle with your camera.
    2. torch
    3. Anything else you like that gives off light.
    Playing around with lighting

    The shot above shows use of other forms of continuous lighting, again it is only limited by your imagination.

    • Under : ambient, artificial, available, camera, continuous, flash, guide number, how, iso, light, lighting, long exposure, photo, strobe, subject

    Why Buy a DSLR?

    • 0 comments/
    • October 28, 2011

    Over the last 10 years camera have come on in leaps and bounds, first digital then more and more megapixels and now with consumer cameras which cost under £200 having more mega pixels than some professional DSLRs, alot of people are wondering why do you need to buy a professional DSLR if you get the same results with a consumer level camera.

    Now there are many issues to consider when buying a camera and here are just a few of them
    What is the camera going to be used for?
    This one is simple to answer do you plan to use the camera for work or simply for fun. By work I mean take photos professionally, whether that be at weddings, portraits, events, PR, selling stock photographs or what ever.

    If you plan to use the camera for work then you have to buy a larger DSLR rather than a smaller consumer camera, and although the photo quality will be better, the simple fact that someone is paying you to take photographs means you cant really turn up with a small camera.

    Think of it this way in any professional work environment there are always the professional standard equipment, from kitchens to garages, hair salons to hotels, and photography is no different. You need to invest in your equipment in order to get the best out of your work.

    MegaPixels
    Now at first glance you may think that you can buy a consumer camera with the same amount of mega pixels as DSLR, and whilst on paper this is true in reality it is not, also as you go further up the professional DSLR ranges the amount of mega pixels far exceeds anything of a consumer level, such as Hasselblads having 31 mega pixels.

    Ok getting slightly off point, so back to mega pixels. The thing to remember is that the number of mega pixels is not the only factor to making a good quality photograph, and although it does play a part in the size a photo can be printed at it is not the end of the story.

    Think of it this way a truck has an engine size of around 10 litres with 800 bhp, whilst a car may only have a 2 litre engine with around 200 bhp, but which is faster? yes the car but it has less bhp and litres. This is the same rule that goes into photography, the whole camera makes the picture not just the amount or size of the sensor, component type and quality (including the sensor) all go into making the final photograph.

    If you look  at my post about Canon vs Nikon the sample shot on that post way taken with a 5 mega pixel camera, nothing by todays standard but it was a professional level DSLR, and I printed that shot at well over A1 size without any problems at all. How you may be asking yourself, simple all the components worked together to make the final photo a higher qaulity shot that I would get with a higher mega pixel consumer camera.
    Also another issue with using mega pixels as a guide is that mega pixel is an indication of the size of the sensor, but not the amount of information it can hold, such as in a medium or large format camera.

    Lenses

    Firstly every single photographer on the planet knows that the most important thing in taking a good photograph is the glass (lens) you use, the better glass = better picture, after all everything in your photo is made up of light which has to go through the lens before getting to the camera sensor.

    Whilst there are some consumer cameras with interchangable lenses, most have a lens that cant be changed, which means you are limited to the speed and focal length of the in built lens, not to mention the quality.  This one factor alone is enough to warrant buying a DSLR the variety of lenses out there means everyone will be able to get something for the type of photography they do.

    Whilst this choice is great it also allows the introduction of lenses of a more professional standard, such as Canon L series lens, you can also get lenses which are better in low light, known as faster lenses, you can buy longer range zoom lenses. Infact the world is your oyster and you are limited only by budget and your imagination.

    Selection of Canon Lenses
    EF or EF-S
    Canon has two current types of lens fittings EF and EF-S, EF is the full sized fitting used on all professional lenses, EF-S is the longer lenses used on non professional lenses. Higher end Canon cameras will only take EF lenses whilst the prosumer and below will normally take both EF and EF-S.
    This is due to the shorter mirror on prosumer models as the EF-S lenses back protrudes out more than the EF lenses.
    Size
    Now although size is not everything, if you plan to do any form of medium or large format photography, that is shots that you plan to print at a very large scale something over 1m x 1m then this is impossible with consumer cameras.
    Both medium and large format cameras require a sensor either larger than or to contain more information than a 35mm frame and you cant get this with consumer cameras.
    • Under : buy, camera, cameras, consumer, digital, dslr, format.medium, hasselblad, large, mega, photogher, pixels, printer, professional, why, work

    1. DSLR Controls
      1. Front Controls
      2. Back / Rear Controls
      3. Top Controls
      4. Left Controls
    2. Camera Talk
      1. Why Buy a DSLR
      2. Canon or Nikon?
      3. Camera Lens
      4. Canon 7D Soft Focus Fix
    3. Learning Zone
      1. Photography Golden Triangle
      2. Photography Tips
      3. Common Photography Terms
      4. Types of Photography
      5. Lighting
      6. F-Number to F-Stop Chart
    Notable Posts
    • How to Reduce Light Stops Entering Camera by Using F-Numbers
    • Using Polarizing Filters to reduce Reflections when shooting through glass
    • How to Setup Canon 7D to take HDR shots / Bracketed Exposure
    • Spofforth Castle Wetherby Fashion Shoot – Jenna Duffin
    Recent Posts
    • To Edit or Not To Edit – That is the Question!
    • Photography Tips for Beginners
    • Photography Golden Triangle
    • Reviews
    • Smoke Bombs and High Fashion
    Archives
    • February 2019
    • January 2019
    • December 2018
    • November 2018
    • August 2016
    • March 2016
    • October 2015
    • June 2015
    • May 2015
    • July 2014
    • April 2014
    • December 2013
    • May 2013
    • March 2013
    • December 2012
    • November 2012
    • October 2012
    • September 2012
    • July 2012
    • June 2012
    • May 2012
    • April 2012
    • March 2012
    • February 2012
    • January 2012
    • December 2011
    • November 2011
    • October 2011
    Privacy Policy
    Copyright Sean J Connolly Photography 2018. All Rights Reserved