LATEST SHOOT NEWS: Currently seeking models. Get in touch.
CT Magazine is Relaunching Soon. Get in touch be featured.
LATEST BLOG NEWS: To Edit or Not To Edit – Check it Out Now
Sean J Connolly PhotographySean J Connolly PhotographySean J Connolly PhotographySean J Connolly Photography
  • About Me
  • Portfolio
    • Fashion and Lifestyle Photography
    • Location Photography
    • Event Photography
  • Google + 360 Photography
  • Blog
    • Resources
  • Contact
  • About Me
  • Portfolio
    • Fashion and Lifestyle Photography
    • Location Photography
    • Event Photography
  • Google + 360 Photography
  • Blog
    • Resources
  • Contact

What does the F Stand for in F Number and F Stop?

  • 0 comments/
  • October 23, 2015

The F in F Number, F Ratio or F Stop stands for Focal Length. 

(it should be noted that in terms of F Stop the F can also just be Focal when viewing light not through a lens)

Focal length is simply the size of a lens or a given point on a tele-photo lens such as 50mm, 100mm, 300mm.

What are F Number / F Ratio and F Stop?


Although many people use the these to mean the same thing,  they are in fact different things all together. To put it simply they are.

F Number / F Ratio

F Number / F Ratio is simply the ratio of light entering the lens aperture to the focal length of the lens.

“The diameter of  the lens opening and the amount of light entering, expressed as a fraction of the focal length of the lens” Ansel Adams

For Example

A 300mm lens with an aperture diameter of 75mm has an F Number of  4 or f/4
Or 300mm / 75mm = 4
A 50mm lens with an aperture diameter of 25mm has an F Number of 2 of f/2
Or 50mm / 25mm = 2

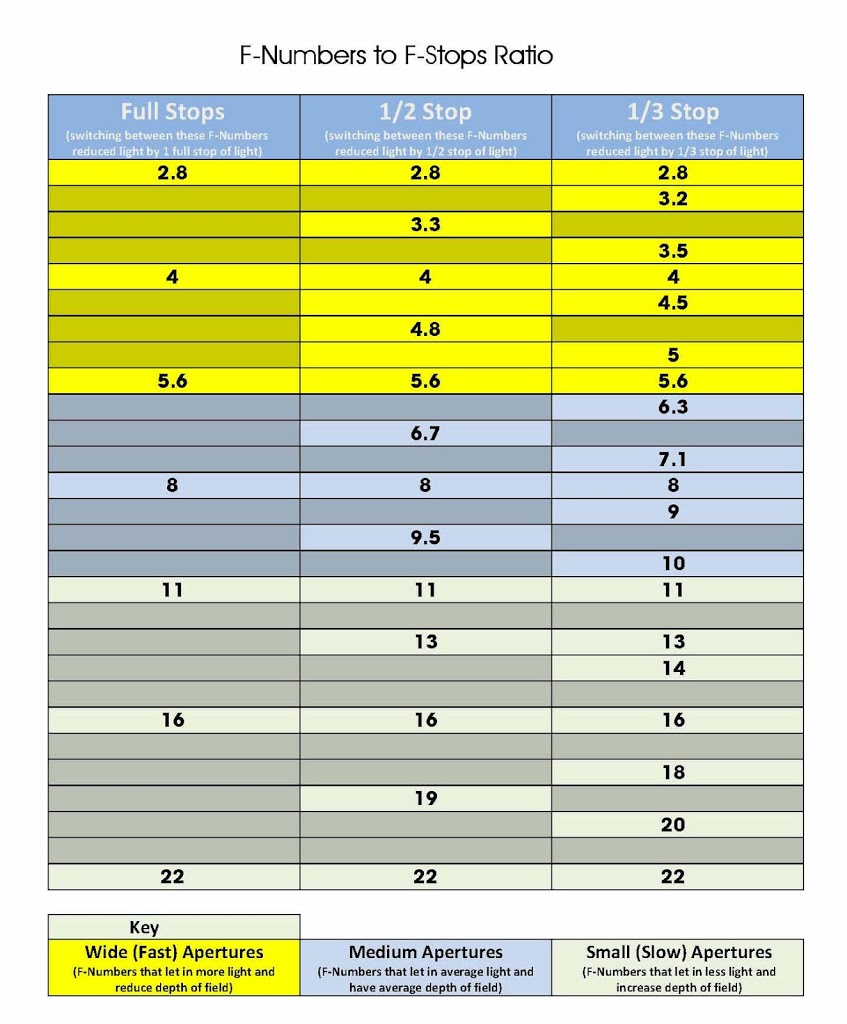
So in order to gauge the F Number and the size of the aperture and available light, just divide the open aperture with the focal length of the lens.

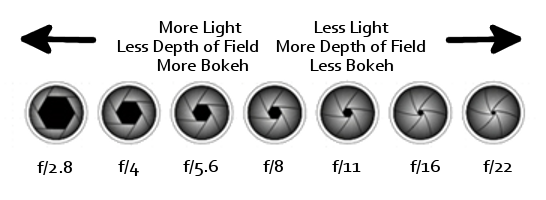
As you can see from the diagram above, the larger the F Number the less light allowed to enter the lens and the more depth of field you get (more of the frame will be in focus and less Bokeh).

F Stop

A measurement of light, the current light level in your situation is always classed as 0, reducing the light level is known as stopping down, so if you decrease the amount of light by the same amount of light available, you have stopped the light down by 1.

  • Under : aperture, bokeh, CAnon, depth of field, f number, f ratio, f stop, fast lens, focal length, focus, how to get bokeh, light, nikon, what does the f stand for in f number, what does the f stand for in f stop

Canon 7D Soft Focus and How it Fix It

  • 35 comments/
  • November 26, 2011

Ok so you have just bought your nice new Canon 7D, and whilst it works great you are finding that some of the shots you take using the Autofocus (AF) are not quite  in focus, they look soft. So is it the camera or is it you?

First off it’s possible it could be either or both, you or the camera, so I am going to address the latter here, the camera.

Now there are two things to try to fix this issue without the need to send your camera off to the shop for recalibration.

Remove the 2 camera batteries

Open the battery compartment on your camera and take out the main camera battery, now remove the system battery. This battery is the one that is responsible for storing your user setting, dates, etc.

The system battery is located inside the battery compartment on the left, if you hold the camera upside down with the lens facing you and the battery compartment on the top, you will see the system battery holder inside to the left of the main battery compartment.

Now leave both batteries out of the camera for at least 10 minutes, this will allow the camera to completely discharge.

Now reinsert the system battery and the main battery. Hopefully your autofocus problems will be solved.

However if they are not, you may need to use the inbuilt Micro Auto Focus Adjustment functions, now whilst there are lots of different way to make change to the camera Auto Focus system. I am going to concentrate on the one that is fairly straight forward and doesn’t require you to buy anything additional to do the testing and adjustments.

This technique is known as Moire Fringing.
 
Moire Fringing

In order to make changes to the camera Auto Focus system using Moire Fringing there are a few things you need to have or know before your get started.

1.      The Moire Fringing Chart, you can download it here

2.      An available computer and enough room in front of it to be able to mount your camera on a tripod / stable surface and get the entire screen in the frame.

3.      Know where to find the Auto Focus Micro Adjustment settings on your cameras

a.      On the Canon 7D the settings for Auto Focus Micro Adjustment are located in the Fifth option in the third Custom Functions (CIII) Menu (Auto Focus / Drive)

            i.      Press the Menu button on the back of the camera

            ii.      Use the top scroll wheel to scroll to the Custom Functions Menu (the second to last icon on the menu list)

            iii.      Use the Main Scroll wheel on the back of the camera to scroll down to C Fn III then press the set button

               iv.      Use the Main Scroll wheel on the back of the camera to scroll to the fifth option, so number 5 is shown at the top right.

              v.      You should now be in the C.Fn III Autofocus/Drive AF Microadjustment screen

To find out more about Moire Fringing and some other great techniques I recommend you take a look at the video by Jared aka Fro Knows Best

Camera Testing Setup

1.      Download the Moire Fringing chart, if you have not already done so, and load it up on your computer full screen, so it completely fills the monitor or as near as you can get. NOTE you cannot print the Moire Fringing chart for use as it’s the viewing it via your monitor that gives us the effect we need.

2.      Attach a lens to your camera that you wish to test and adjust, we are going to make adjustments to the lenses individually so pick anyone, or just the one you think is focusing a bit soft.

3.      Mount your camera on a tripod or other stable surface in front of your monitor.  The camera ideally has to be a far enough away from your monitor as possible so that when you zoom your camera lens to its furthers zoom, i.e 300mm on a 300mm lens the whole of the Moire Fringing chart can be seem in the view finder. Now in practice this is not really possible, unless you happen to live in a castle or other equally long room. So in reality just make sure your camera is as far as possible from your monitor as you can get it, and then use the furthest zoom possible to fill the view finder with the Moire Fringing chart. Try to avoid fully zooming your lens to its widest point i.e if you have a 28-300mm lens try to get as close to 300mm as you can whilst keeping the chart in the view finder.

4.      Please note you can use which ever mode on your camera you normally use, Full Auto, Full Manual, AV, TV, P but just make sure what ever setting you use you can clearly see the full Moire Fringing chart in the view finder. Unless you are noticing that your photos are soft at a particular F Stop (F8, etc) in that case choose either Full Manual or AV and set the camera to the required aperture you feel is soft. But again make sure you can clearly see the chart in your view finder.

5.      I also recommend using either a centre focus or spot focus for testing, and focus on the centre of the chart.

 Testing

Ok first off the idea behind the Moire Fringing chart is to try to get as many concentric circles in your view finder as you can.

The correctly focused image should look something like the one below

 Ok so lets get started with the testing and adjustments. I am going to list the process of testing and adjustment in order to hopefully make it easier for you to understand and follow.

1.      Set your camera to Manual Focus and focus manually on your monitor with the Moire Fringing chart loaded and your camera at a distance to allow for the complete chart to be visible in the view finder, you are trying to get an image similar to the one above showing the Moire Fringing chart and several concentric circles on it. Now take a photo

2.      Next switch your camera to Auto Focus and set your focus point on the centre of the chart of take a photo.

3.      Now go into the C.FnIII Autofocus / Drive AF Microadjustment menu (as described above) and select the Adjust by lens option (we are selecting this option as not all lenses focus the same and you can repeat the process for each lens you are having problems with), to select the option simply press the set button, then use the big scroll wheel to select the option then press the INFO button. You should now be on the following screen

4.      Make sure that the Marker on the bar is set to 0, then press the set button and then use the menu button to exit the system menus. Now take a photo again making sure you are using Auto Focus and you are focusing on the centre of the chart.

5.      Next go back into the screen, as shown in figure 4, and using the scroll wheel move the marker to +5, then exit the menu and take another photo. Now continue this process and each time you enter the AF Microadjustment menu change the marker in increments of 5,  so start with it +5 then take a photo at  +10, +15 and +20 and each time exit the menu system and take a photo. After this set of shots you should have taken 5 photos, one for each increment starting with 0 then +5, +10, +15, + 20 in order.

6.      Now do the same this time starting at -5 and take a photo at the same increments, -5, -10, -15, -20.

7.      You should now have a total of 10 photos on your camera, one taken using manual focus and 9 taken using Auto Focus and at each increment along the AF Microadjustment scale.

Adjustment

Now you have a set of 10 photos taken on your camera, and you have made adjustments after each shot, you should have a set of shots similar to the ones below. If you took the shots in the order as advised above starting with Manual Focus, then starting with 0 doing the + adjustment then working through the – adjustments your shots will be in the order below.


You now need to do the follow

1.      Load the first shot you took your computer and view it at 100%. (the one your took using manual focus)

2.      Now load the other shots in turn onto your computer and compare each shot to the one first shot you took using manual focus. You are trying to find the shot that matches as close to this one as possible, showing the same amount of concentric circle as the Manual focused shot. The shots you took will be different slightly, and this different is normally very slight but can make all the difference between soft focus and tack sharp shots.

3.      If you look at the sample shot above, click on it to enlarge it, you can see that the there are two shots that are very similar to the manual focused shot and these are shots with adjustments of +5 and -5. You will notice that unlike the other shots taken at other adjustments you can clearly see the concentric circles around the centre of the shot.

4.      Ok so now you have your adjustment setting you need to go back into the camera AF Microadjustment menu (shown below) and set the marker to the number you think is the closest shot to your manually focused shot.

If the adjustment number is 0, this means that your lenses is focusing fine and doesn’t need any Micro adjustment.


Conclusion

If you use more than one lens on your camera simply repeat the steps above for each lens, you can make the same adjustment for all the lenses, but I recommend doing it for each lens, as I found that my Canon kit lens needed no changes at all by my Sigma lens did, also one other word of caution do not take any more shots than the 10 shots your need for testing as this will throw out your order and you won’t know which shot is done at which setting.

One final thought if you find that doing the above does not result in sharper images, you should firstly try to work on your camera holding technique or try tour camera using the timer and a tripod, but if this fails you may need to send your camera off to Canon for recalibration. However thankfully I was able to solve my own soft focus issues using the above technique.

  • Under : auto, canon 7d, canon 7d soft focus, fix, focus, focus problems with canon 7D, fringing, how, moire, moire fringing, sharp, soft focus, tack, to

DSLR Controls – Back / Rear Controls

  • 0 comments/
  • October 28, 2011

I must start first off by saying that the shots in this post are of my Canon 7D and whilst most Canon cameras all have the same layout, Nikons do not. This does not really make a lot of difference as the operation of most DSLR cameras are the same, and whilst the buttons may not be in the same place, they do operate in the same or similar way.
Also another important note is that you can program the buttons on most DSLR to do different functions as you prefer, the diagrams and descriptions although are correct for the functions may not operate the same as your camera as these layouts are the default layouts.

The way this will work is I will cover each side of the camera in turn, Back, Front ,Top and left. I am not going to mention stupid things like where the batteries go, or how to attach a strap but the more necessary things as well as somethings that when I first started I just could not figure out. Also I have changed the names slightly to help you make more sense of things and not be too technical.

Back of DSLR

Back / Rear of Canon 7D


The rear of most DSLR consist of a large screen and to the side the main image selector wheel. I will start at the bottom left of the picture and work clockwise, ok here goes

Playback / Live View Screen
The large screen on the back of your DSLR serves two purposes. One is very simply it allows you to view shots you have taken after you press the Playback button, and by using the Adjust / Scroll wheel you can view your shots and then zoom in or out using the Zoom in or Zoom Out buttons on the right above the big wheel.
Note when you zoom into an photo and view it on the screen you can use the View Joystick to move around the image.
The other use for this screen and hence why I have named it the Live View Screen is that when you are taking photos with your camera it is possible to see a variety of different things on this screen and not just what you are taking a photo of. These include a Quick Menu, a Camera Level, Shot histogram and information and of course Live View (basically what the camera sees). Most of these are accessed by using the Info button. (more on this later)
How to Access to Live View on DSLR
HUGE note to get Live View to work on the LCD screen you actually press the Start / Stop button during shooting mode, just make sure the little outer ring around the Start / Stop is pointing at the white camera.
If Live view fails to operate you need to enable it as follows

  1. Press the System Menu Button
  2. Use the Little Wheel on the top of the camera and scroll to menu option 4
  3. Use the big wheel to select live view
  4. Press the Set / Enter button then select enable to activate live view, press the Set / Enter button.
  5. Press the System Menu button to come out of the system menu.

Live view is now working

Delete
Does exactly what it says on the tin, deletes your photos.
Playback
Go on guess, yes it shows you photos you have taken on the big Live View screen, not quite 3D IMAX but at least you know what you shot.

Info /Level / Quick Menu

When in shooting mode this button allows you to do 1 of 4 things

  1. On first press you see the information about the shot your are taking, such as colour temp, white balance as well as how much space you have on your card and how many shots you can take.
  2. On pressing again you get a camera level indicator, showing if the camera is level or not, a solid green line indicates your camera is level (note this is not available on all DSLR’s)
  3. On a third press you get the Quick menu, a quick over view of your current settings such as Aperture and shutter speed. (Note this is a view only option and in order to make changes you need to use the Quick Menu button)
  4. On a fourth press you turn off the back LCD screen all together.

When in playback mode this button gives your either on screen info about the shot or pressed again gives you more detailed shot information.

Picture Style

This button allows you to change how your photo will turn out whether you are shooting a landscape, portait or want to change the sharpness.

System Menu

This is the main menu button on your camera and gets you into the main system menu, where you can change all sorts of good things and some not so good things.

Quick Menu

This button gives you access to the quick menu, where you can quickly change many camera settings. To scroll around the screen use the Qucik Menu / View Joystick and then use the main dial or Adjust / scroll wheel to make changes.
Instant Raw + Jpeg

This is a kinda cool button it allows you to quickly set you camera to take both a RAW and Jpeg photo at the same time, can save you alot of time. Although my advice is to always shoot in RAW.

Viewfinder

D’oH  this shows you what you are taking a photo of, that is unless you are using the Live View Mode.

Word of caution if you are using Mirror Lock after your shot you will not be able to see through the View Finder

Still / Video Recording (outer ring)

The little outer ring switch to the right of the view finder is the selector to set the camera to either shoot still photographs or record HD video, white for photos red for video.

Video Record Start / Stop / Live View

The button marked start /stop to the right of the view finder is the button that does one of two things.

  1. If the camera is set to record video it starts and stop the video
  2. If the camera is set to take still photographs this button shows / turns on Live View on the LCD screen.  (see note above about how to enable live view)

Auto Focus Button
This button starts the camera focussing, it does not take a shot it simply gets the camera in focus ready to take a photo. Great for use if you are taking shots of things that will move.

AE Lock Button / Zoom In

This button allows you to lock the exposure for a given shot, simply press the button and the green light in the viewfinder will show to show you exposure is locked, when you take a photo it will be taken with this exposure setting.
This button also acts as a zoom in or magnify button during playback.

Focus Mode / Zoom Out

This button lets you select the area to focus on when used in conjunction with the Main Dial on top of the camera. Simply press the Focus Mode button them use the Main Dial to select the area to focus using the view finder.
This button also lets you change the focus mode and lets you scroll through the active modes on your cameras to change focus mode.
How to select Focus Mode and Focus Point on DSLR

  1. Press the Focus Mode / Zoom Out button
  2. Look through the view finder and press the Multi Function / Manual Focus Select button on top of the camera (next to the shutter release), for each press of this button you will see the focus point and mode change in the viewfinder. Just keep pressing it until you see the desired Focus Point / Mode in the view finder.
  3. Once you find the desired mode, simply use the Main Dial on top of the camera to move the point to where you want to focus.

Quick Menu / View Joystick

When in quick menu after press the Quick Menu button this joystick allows you to select the option you wish to adjust.
Whilst in playback this joystick allows you to navigate around a photograph after pressing the Zoom In button.
This joystick can also be set to allow you to select a focus point on the screen.
Set / Enter

This is kinda like the save button, pressing it selects menu options.

Adjust / Scroll Wheel

This is the companion to the main dial, it allows you to change camera settings, as well as being used to scroll through photos during playback.

Activity light

This shows when the camera is doing something, such as writing to the card, cleaning the sensor, etc.
Wheel Function Lock

This switch when pushed to the right stops you from accidently making camera setting changes.

NOTE the quick menu adjustment and on screen options still work with this in the Lock position, the main purpose of this switch is during shooting as it stops you making adjustments via the top LCD screen.
Light Sensor

There is a small light sensor just to the left of the big adjust / scroll wheel this is used by the camera for taking light readings. It is mainly used during exposure setting in non manual modes and in auto mode it also sets the LCD screen brightness.

Final Note
Most of the camera buttons have a dual function and in order to make adjustments you need to use either the rear dial or the top dial depending on what you want to change.
  • Under : access, controls, dial, dslr, enable, focus, how, live, live view, lock, on, photo, photos, point, rear, select, take, to, turn, view

  1. DSLR Controls
    1. Front Controls
    2. Back / Rear Controls
    3. Top Controls
    4. Left Controls
  2. Camera Talk
    1. Why Buy a DSLR
    2. Canon or Nikon?
    3. Camera Lens
    4. Canon 7D Soft Focus Fix
  3. Learning Zone
    1. Photography Golden Triangle
    2. Photography Tips
    3. Common Photography Terms
    4. Types of Photography
    5. Lighting
    6. F-Number to F-Stop Chart
Notable Posts
  • How to Reduce Light Stops Entering Camera by Using F-Numbers
  • Using Polarizing Filters to reduce Reflections when shooting through glass
  • How to Setup Canon 7D to take HDR shots / Bracketed Exposure
  • Spofforth Castle Wetherby Fashion Shoot – Jenna Duffin
Recent Posts
  • To Edit or Not To Edit – That is the Question!
  • Photography Tips for Beginners
  • Photography Golden Triangle
  • Reviews
  • Smoke Bombs and High Fashion
Archives
  • February 2019
  • January 2019
  • December 2018
  • November 2018
  • August 2016
  • March 2016
  • October 2015
  • June 2015
  • May 2015
  • July 2014
  • April 2014
  • December 2013
  • May 2013
  • March 2013
  • December 2012
  • November 2012
  • October 2012
  • September 2012
  • July 2012
  • June 2012
  • May 2012
  • April 2012
  • March 2012
  • February 2012
  • January 2012
  • December 2011
  • November 2011
  • October 2011
Privacy Policy
Copyright Sean J Connolly Photography 2018. All Rights Reserved