LATEST SHOOT NEWS: Currently seeking models. Get in touch.
CT Magazine is Relaunching Soon. Get in touch be featured.
LATEST BLOG NEWS: To Edit or Not To Edit – Check it Out Now
Sean J Connolly PhotographySean J Connolly PhotographySean J Connolly PhotographySean J Connolly Photography
  • About Me
  • Portfolio
    • Fashion and Lifestyle Photography
    • Location Photography
    • Event Photography
  • Google + 360 Photography
  • Blog
    • Resources
  • Contact
  • About Me
  • Portfolio
    • Fashion and Lifestyle Photography
    • Location Photography
    • Event Photography
  • Google + 360 Photography
  • Blog
    • Resources
  • Contact

HDR (High Dynamic Range) – Good or Evil?

  • 3 comments/
  • May 28, 2012

Ok as most of my work involves the fashion side of life, I dont really take many HDR shots. But I decided to try out some of a few places just to see if firstly I could get it right and secondly what it would look like. I would highly recommend the Expert Video Guide to help you improve your photography skills

So what is HDR or High Dynamic Range

If you dont know HDR standard for High Dynamic Range, and its a technique that by combining multiple of shots you get to have a broader range of exposure and colours than a single shot. What this means is that you get more details in your shots, as you may have experienced when you take a shot and some of your subject is in the shadows, if you expose for the shadows the rest of the shot is over exposed, if you expose for the rest of the shot the shadows are under exposed and lack detail.
This is where HDR comes it, by combining shots taken at different brackets (or exposures) into a single image you get the best of both world shadows have detail and high lights are not over exposed.

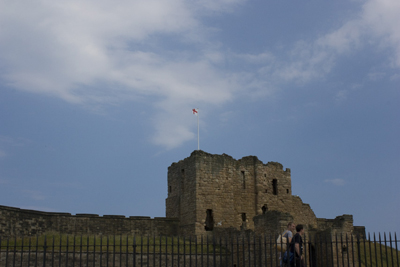
If you look at the two shots below, you can see that the one on the left is exposed for the sky, which has meant that the grass is too dark or under exposed. The shot on the right is exposed for the grass, which means the sky is too bright or over exposed.

Ok so in order to get the perfect shot, we have the option of using filters such as Polarizing or Neutral Density to correct the exposure. OR and this is where HDR come in we can combine the two shots and produce a single perfect image.

Now you can see that the detail in this final HDR shot is way better than either of the two shots above, by making the HDR we have been able to combine both sides of the dynamic range to get a better shot.

“But this shot looks surreal”

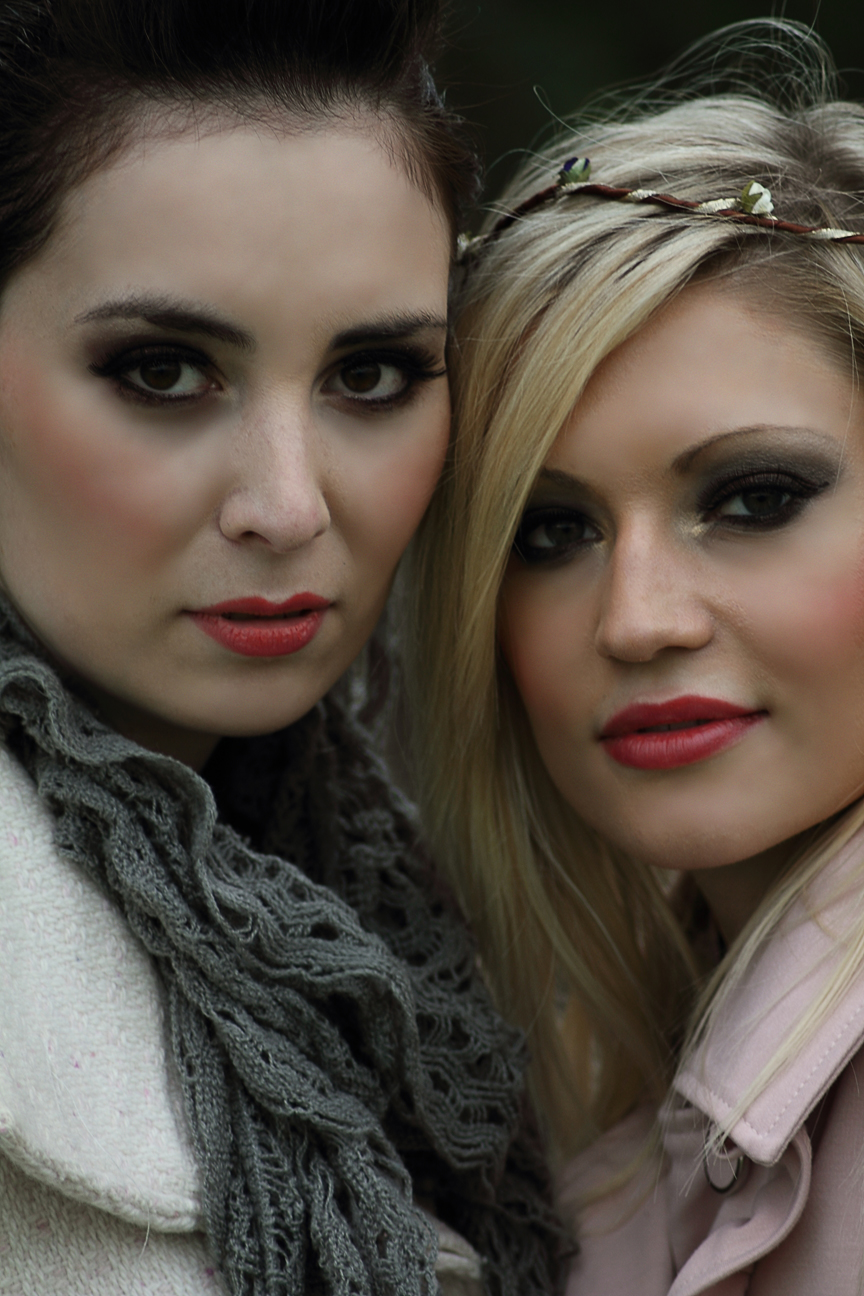
One of the problems you can get with HDR is that the end shot doesn’t look real, and I personally quite like this look in some shots. I think it adds something. But you don’t always have to be so extreme when producing an HDR shot, you can get a result that looks just like a normal shot. Just with more detail.

As you can see the shot above is perfectly exposed across the whole shot, and yet it looks just like a normal photograph.

So is HDR Good or Evil?

So is HDR good or evil? I like the extreme colours thats come with HDR and that surreal feeling it can give an otherwise boring shot particularly of night time shots, yet I love the way it can make a shot look perfect without any bells and whistle, simply correcting the exposure.

If you are still hungry for more take a look at Tony Pages Tool Box for everything you could ever want to make your shots creative.

  • Under : canon 7d, correcting exposure, exposed, hdr, HDR photography, High Dynamic Range, how to fit over exposed, how to fix under exposed, over, photography, summer, under

How to Setup Canon 7D to take HDR shots / Bracketed Exposure

  • 32 comments/
  • April 6, 2012

Ok so you have heard the word HDR, Bracketed Exposure and Auto Exposure Bracketing. But what do they mean and how can you use your Canon 7D to take these sorts of shots.
Ok first things first what is HDR, Bracketed Exposure and Auto Exposure Bracketing.

HDR stands for High Dynamic Range, and it is a technique in which you merge several shots together all with a different dynamic range or exposure. HDR is mainly used in landscape photography as it allows you to show light at all levels of the image, bringing out details and colours you would not see in a single shot. These shots are created using software packages such as Adobe Photoshop Elementswhich let you create the HDR effect or final images, check out the excellent video tutorials by Just4Photographers.com on using Photosjop.

One of my favourite HDR photographers has to be Trey RatcliffI think his work is astounding.

A fantastic E-Book I recently bought How to do Trick Photography by Evan Sharboneau is amazing, is really takes some of ym article concepts to a whole new level, adn I recommend downloading and giving it a read, you will not regret it.

Bracketed Exposure is a term used when referring to a set or series of the same image each one taken at a different light stop, in short the first image will normally be dark (under exposed), the second will be “technically” spot on and the third shot will be bright (over exposed).

Auto Exposure Bracketing (AEB) or Auto Bracketing (AB) is the ability of the camera to be setup to take a series of photos all with different exposure levels, this means that you dont have to manually make changes to get your set of Bracketed Exposures, the camera does all the hard work

HDR (High Dynamic Range), Bracketed Exposure, Auto Exposure Bracketing on the Canon 7D

So before we can create any HDR photographs we need to collect a set of images that have a different exposure, and in short the more the merrier. Now there are two ways to do this the Easy way and the Hard way.

Now you are getting to grips with the AEB I recommend checking out Geoff Lawrences guide to Digital Photography you wont regret it

Hard Way to Take Bracketed Exposure Photographs on Canon 7D

Setup your camera with the normal setting you choose to use and take a set of photos, the more the merrier and for each shot alter the shutter speed, normally setting it too high such as 1/400 sec or similar, so that your first shot is too dark, then reduce your shutter speed to say 1/350 sec and take another shot. Then repeat this process until you have a set of images, 5 is a good minimum but like I said before the more the merrier. For some amazing example of the techniques we will cover here please take a look at the International Hall of Fames Terry Day’s work and his course.

You now have a set of bracketed exposure shots.

“Not really all that technical now was it”

“But Sean” I hear you shout “you said there was an Easy way and a Hard way, so whats the easy way?”

Technicall there are two easy ways one is to take a look at the Focus Emagazine as it has loads of tips and snippets for your to use, or follow the tips below.

Easy Way to Take Bracketed Exposure Photographs on Canon 7D

The instruction and guidance here are specifically based around Canon DSLR’s in particular the 7D, all decent DSLR Canon, Nikon, Hassleblad are capable of auto exposure bracketing, but the setup will be different.

Setting up the Canon 7D for auto exposure bracketing (AEB)

There are 3 main steps to taking auto bracketed shots.

  1. Set the camera drive to High-Speed Continuous
  2. Set the Exposure Bracketing Sequence
  3. Set the Exposure / Auto Exposure Bracketing
Note – these instructions are done with the camera set to full manual or M mode.

1. How to set the Canon 7D camera drive to High Speed Continuous

The first thing we need to do is set the drive speed on the camera to “High Speed Continuous”, this can be done in a variety of ways. My personal choice is to use the button on top of the camera and then set the speed either by using the top screen or the back of the camera. Although for this tutorial I am going to use the quick menu “Q” option.

a. Press the Quick Menu “Q” button on the back of the camera, located to the left of the screen.
b. Using the little joystick, located to the right of the screen. Select the Drive Mode menu and press the set button

c. Now select the High Speed Continuous option, the second option along on the screen, and press the set button.

2. How to set the Exposure Bracketing Sequence on Canon 7D

The next thing we need to do is change the Bracketing Sequence, this means that our photos will come out in the correct order from dark to light.

a. Click the menu button on the back of the camera (located just to left of the rear screen)
b. From the Custom Function Menu, second from the end in the top row of options in the menu screen, select the Exposure menu (CFn I: Exposure) option and press the set button.

c. Then scroll through the menu options to number 5, Bracketing Sequence, and select the second option, the one marked “-,0,+” and press the set button.

Ok now press the menu button to come of the menu, and you have now set the bracketing sequence. This means that when we take our shots we will get a dark photo, a normal photo and a light photo.

It should be noted that due to a slight limitation on the Canon 7D it is only possible to take 3 auto bracketed shots at once, hence the option of only a dark shot, normal shot and a light shot. But dont worry I will let you in on a little tip later to overcome this.

3. How to Set Auto Exposure Bracketing (AEB) on the Canon 7D

Now we have set the order of out shots we must now set the Auto Bracketing Exposure (AEB)compensation for the shots.

a. Go back into the menu, if you forget where the button is its still located on the back of the camera  to the left of the screen.
b. Select the Exposure / Auto Exposure Bracketing (AEB) option, the first option under the second icon along on the menu screen and press the set button to enter the menu

c. Now press the set button and using the small wheel, location on top of the camera, move the indicators apart until you have the indicators either side of the centre pointing at number 1.

d. Press the set button to save the option, then use the menu key to out of the menu.

Ok your camerais now setup to take a set of three shots, each one with a different exposure. Again note that due to the limitation of the Canon 7D you can only take 3 auto bracketed shots at once.

So what you need to do to get a complete set of photos Auto Exposure Bracketed photos for your HDR is take your first set of 3 photos, then go do the following

a. go back into the menu, and yes it is still located on the back of the camera to the left of the screen.
b. Again selected the Exposure / Auto Exposure Bracketing (AEB) option, the first option under the second icon along on the menu screen and press the set button to enter the menu

c. Now this time when you select your Exposure Compensation / Auto Bracketing Sequence (AEB) more the indicators to number 2.

d. Then press set and use the menu key to come out of the menu and take another set of 3 shots. Then redo steps a – c above but this time set the indicators to number 3.

e. And again press set to save and use the menu key to exit the menu and again take your shots.

Now you will have a series of photographs that are all at a different exposure, all you need to do is disregard the two repeated shots from the second two sequences, basically in the first sequence you took photos that were exposured as “-1,0,+1” you then took a set of shots that were exposed as “-2,0,+2” and finally you took shots that were exposed as “-3,0,+3”. As you can see you have 2 repeated shots both at normal exposure or “0”. So you can just deleted these shots from your series or just leave them and let your HDR software worry about them, thats up to you.

You can now simply load the shots into your chosen software package and create your HDR photos. I will post later about how to do this in Photoshop, but there are tons of HDR packages available and even website that can do ti for you.

“But Sean what about your little tip?”

Ok before you send round the heavy’s I have not forgotten about my little tip. So here it is.

When you are using your camera to do any type of Auto Exposure Bracketing, due to a limitation on the Canon 7D it only allows you to do 3 shots at a time, and have a set of 3 photos with different exposure. This means that each time you do any HDR shots of any decent level of AEB photography you are left with insufficient shots, and need to repeat step 3 above, each time change the indicators for each set.

You also don’t want you camera settings to stay on these setting for most of the time you use it, so in order to make life easier heres my little tip.

The Canon 7D has the ability to save camera settings for future use. If you have ever wondered what the C1, C2 and C3 options on the top mode selector control dial are for they allow you to recall preset saved settings simply by turning the dial.


How to Save Custom Camera Setting on Canon 7D

In order to save your setting ready for your next Auto Exposure Bracketing photos, simply follow the steps 1 to 3 above, so that you have the final indicators pointing at number 1. Save the options and come out of the menu. Then do the following

1. Go into the menu using the menu button, that is, yes you guessed it, located on the back of the camera to the left of the screen.
2. Select the third option from the right and select the Camera User Settings Menu

3. In this menu select the Register Option

4. Now select the option for Mode Dial: C1

5 Press the set button and then select OK and click set to save.

Now repeat the setup steps above to setup your camera for Auto Exposure Bracketing, but when you come to step 3 make sure the indicators are pointing at the number 2.. Now repeat the steps here and instead of the Mode Dial: C1 select Mode Dial:C2. Then repeat again making sure the Auto Exposure Bracketing indicator is pointing at 3 and then select Mode Dial: C3.

Once you have done this, you can either reset your camera setting using clear all camera settings, as seen in step 2 just above, or manually put your camera back to your normal settings.

Now each time you want to do any Auto Exposure Bracketing you can simply select C1 on the mode dial, then C2 and finally C3, you camera will do all the work for you and when your finished just return your camera back to what ever mode you normally use.

Doing this little tip allows you to recall the right Auto Exposure Bracketing (AEB) setup without the manual hassle simply by turning the mode dial.

Ok thats it, now go off and take some nice photos and if you are using a mac you may want to try Remo Recover to safe guard your cool new shots.


  • Under : AEB, auto exposure bracketing, bracketed exposure, c1, c2, c3, canon 7d, hdr, HDR photography, how to set up canon 7D for Auto Exposure Bracketing, Mode dial, need to know, saving custom setting Canon 7D

Welcome to the new Photography Blog on the block

  • 0 comments/
  • October 26, 2011

First off thank you for visiting my new blog.

The idea of this blog is to share both my knowledge of photography, everything from cameras, bags, lighting, locations, shutters to studios and everything in between. So if you have anything you are not sure about in the world of photography dont be afraid to ask I am here to help.

I am also going to share some information which I found hard to find when I started in photography and hopefully put everything in one easy to find place for you to enjoy and share.
Also I am going to share experiences from my photo shoots, both with and without models, on location, in studios and what ever else I get up to.
Put simply this is a blog about my journey and experience in photography, as I learn more stuff I will share that with you, as I do stuff I will share that too.
Another point to remember I work with a Canon 7D camera and being a Canon certified professional means I will be bias towards Canon, but everything in general is the same on DSLR’s whether its Canon, Nikon, Sony, Hassleblad or what ever else you use.
Ok so lets get this party started.
Who am I
I am Sean J Connolly and I work as a professional Advertising Photographer specialising in advertising, editorial, fashion photography, I am based in Richmond, North Yorkshire and cover all Yorkshire, North East and anywhere else I am needed.
I have worked professionally full time now for about 2 years, but have been in photography for about 10 years. I must say I love the challenge it brings, as there are lots of good and bad photos out there, so taking that special shot is something I pride myself on.

You can find out more about me from any of the following links.

  1. www.seanjconnollyphotography.co.uk  (my main website)
  2. www.facebook.com/seanjconnollyphotography (photography facebook page)
  3. http://www.flickr.com/photos/seanjc/ (my flickr account)
  4. http://www.modelmayhem.com/seanjconnollyphotography (model mayhem portfolio)

Feel free to get in touch, whether you are a fellow photographer, make up artist, model, stylist or looking for a photographer. I promise I wont bite.

Thanks for reading
Enjoy

  • Under : afd micro adjustment, blog, cameras, CAnon, dslr, filters, hdr, hyper focal distance, nikon, photo, photography, sean j connolly

  1. DSLR Controls
    1. Front Controls
    2. Back / Rear Controls
    3. Top Controls
    4. Left Controls
  2. Camera Talk
    1. Why Buy a DSLR
    2. Canon or Nikon?
    3. Camera Lens
    4. Canon 7D Soft Focus Fix
  3. Learning Zone
    1. Photography Golden Triangle
    2. Photography Tips
    3. Common Photography Terms
    4. Types of Photography
    5. Lighting
    6. F-Number to F-Stop Chart
Notable Posts
  • How to Reduce Light Stops Entering Camera by Using F-Numbers
  • Using Polarizing Filters to reduce Reflections when shooting through glass
  • How to Setup Canon 7D to take HDR shots / Bracketed Exposure
  • Spofforth Castle Wetherby Fashion Shoot – Jenna Duffin
Recent Posts
  • To Edit or Not To Edit – That is the Question!
  • Photography Tips for Beginners
  • Photography Golden Triangle
  • Reviews
  • Smoke Bombs and High Fashion
Archives
  • February 2019
  • January 2019
  • December 2018
  • November 2018
  • August 2016
  • March 2016
  • October 2015
  • June 2015
  • May 2015
  • July 2014
  • April 2014
  • December 2013
  • May 2013
  • March 2013
  • December 2012
  • November 2012
  • October 2012
  • September 2012
  • July 2012
  • June 2012
  • May 2012
  • April 2012
  • March 2012
  • February 2012
  • January 2012
  • December 2011
  • November 2011
  • October 2011
Privacy Policy
Copyright Sean J Connolly Photography 2018. All Rights Reserved