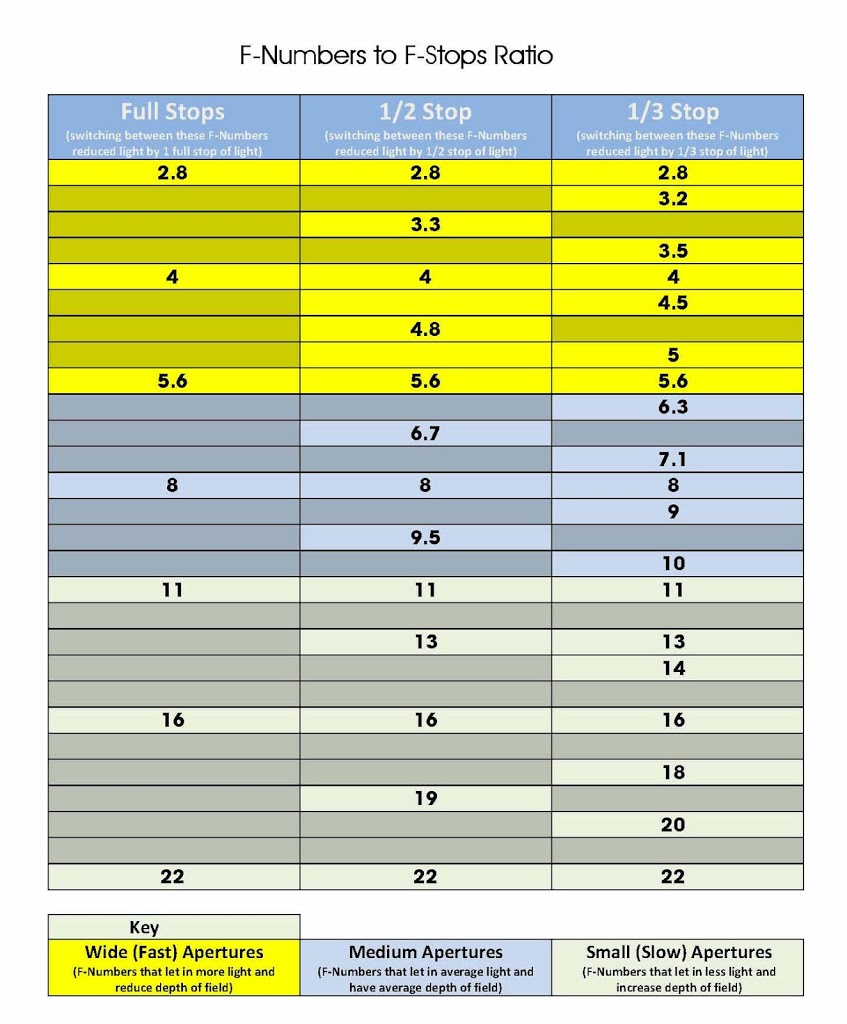
Camera Lens
OK there is lots that can be said about camera lenses, good bad and ugly. It is not my aim on my blog to get really techical about lenses I am simply going to help you by giving you some basic necessary information to help you out, and in most cases this info applies to both video cameras as well as DSLR.
Again the shots used are based on Canon, but all DSLR lenses work the same work, only slight differences are connected to two areas
- All telephoto or zoom lenses have a zoom ring, but on some makes of lense the ring turns in a different direction to others, noticably Sigma lenses turn the opposite way to Canon lenses in order to zoom.
- NOT all lenses have a form of Image Stabilizer on them, and on some its called something different such as VR on Tamron lenses.
DSLR Lens Controls
 |
| Canon IS Lens |
Again for this I will start at the bottom left of the diagram and work clockwise.
Image Stabilzer Switch (IS) Switch
This switch is used to turn on or off the image stablizing functions of the lens, again remember this switch may be called something different on your lens but will work in the same way.
Switching this on will give you a bit of assistance when hand holding the camera, normal this is around 1 stop of light, but put simply means you can shoot in a slower shutter speed or narrower aperture than without using it, lettginy ou take more professional shots. I would highly recommend taking a look at David Petersons Book as it is full of very useful tips and tricks to get more out of your photography.
NOTE – remember when using a lens with built in stabilzation that when ever you mount the camera on a firm surface or a tripod turn off the IS in order to avoid it interferring with your shots.
Lens Mount Indicator
The is the mark that you line up with the matching mark on your camera body to mount your lens. In canon lenses it also indicates the of lens. EF lenses are RED and EF-S lenses are white.
-
Remove the lens cover and lens cap from your lens.
-
Line up the white or red mark at the base of your lens with the white or red mark on the lens mount on the camera.
-
If the marks are lined up correctly the lens will just slip onto the camera, do not try to force it, if it does not just slip on you have not lined it up correctly.
-
Now turn the lens, normally clockwise, until it clicks. Your lens is now on your camera.
-
With one hand press the Lens release button (normally to the side / left of the lens)
-
Now with the other hand turn the lens, normally counter clockwise, until it comes of the camera. It does not take any force to remove the lens so if it feel stuck make sure you have pressed the release button. Your lens is now off your camera
Auto / Manual Focus Switch
This is the switch you use to switch the lens between Auto and Manual Focus. Again remember that no matter what settings are on your camera it will not fiocus if this switch is set to Manual. To manually focus your lens after switching this to manual use the Focus Ring.
Focus Ring
This is used to focus your camera on yoru subject, only works after you switch the Auto / Manual Focus Switch to manual. Then simply turn the ring as you look through the view finder or at the Live View screen to focus.
Zoom Ring (only on Tele-Photo / Zoom Lenses)
This ring is used to bring your subject closer or further away. Please note that some lenses work in the opposite direction to zoom in or out.
Filters
I thought I would briefly touch on the use of filters with your lens, filters are a way to change the light entering the camera and can be used to simply add colour, or to control the light entering the camera in a variety of different ways, the most common filters for controlling light are known as an ND or neutral density filter and a polarizing filter.
Although filters are more common in landscape photos they can be used in any environment to enhance your shots.
UV Filter
My first suggestions and HUGE piece of advise which I am happy to repeat is to fit a screw on UV filter to your lenses, this will not change anything in your photographs but will protect your lens from getting scratched, and being that it is cheaper to replace a screw on UV filter than your lens this makes sense and is exactly what I do.
Filters are generally attached to the front of your lens as either a dual threaded screw on fitting which simply screws directly onto your lens front, or in filter holder arrangement such as Cokin holders, these attach to your lens by an adapter ring screwing onto your lens, on this is attached the filter holder into which you put your filters.
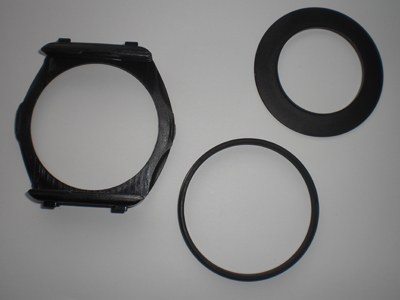 |
| Cokin P Filter Holder and Adapter Rings |
The Cokin filters are all the same size for the holder normally A or P size, the filters simply slide into the holder and you use the same filter for each lens, and you only need to buy different size adapter rings as per the thread size fo your lenses.
 |
| Cokin P Size ND Filter |
So in short buy and keep a screw on UV filter on your lens, then buy a Cokin P filter holder and adapter ring, and simply buy cokin P filters as you need then, cokin filters are numbered so for example a P164 is a Circular Polarizing filter.
Neutral Density ND Filter
A very useful tool in your photography arsenal is a set of ND filters. An ND filter will block out light entering the lens without effecting the colours of the photograph, these are normally number and the higher the number is more light will get blocked by the filter, yet at all times retaining the colour of your photograph.
 |
| Shot taken without ND Filter |
As you can see from the above shot trying to capture some scenes during strong daylight is impossible and you end up with a very over exposed shot.
 |
| Shot taken with ND Filter |
Now if we look at the second shot by adding an ND filter, you can clearly see that the light in greatly reduced but the colours remain.
Circular Polarizing Filters CPL
Circular Polarizing Filters known as CPL filters reduce the amount of reflective light in your photo as they do this by removing white light from the photo they are also used to enhance the sky or to remove the reflection from a pond, glass or anything else.
 |
| Shot taken without Polarizing Filter |
As you can see in the above shot, although the colours are generally ok the sky is totally washed out and we cant make out the clouds.
 |
| Shot taken with Polarizing Filter |
Now if we look at the second shot the colours are less washed out and we can now make out the detail and clouds in the sky.
Remember though when using a polarizing filter it will effect your whole image and unlike ND filters they do have an effect on the colour of your shot.
NOTE – with modern DSLR cameras make sure to use a Circular Polarizing Filter CPL and NOT a Linear Polarizing Filter LPL, as the Linear filter can have an adverse effect on your cameras auto focus, although if you intend to only use manual focus you can use either filters