LATEST SHOOT NEWS: Currently seeking models. Get in touch.
CT Magazine is Relaunching Soon. Get in touch be featured.
LATEST BLOG NEWS: To Edit or Not To Edit – Check it Out Now
Sean J Connolly PhotographySean J Connolly PhotographySean J Connolly PhotographySean J Connolly Photography
  • About Me
  • Portfolio
    • Fashion and Lifestyle Photography
    • Location Photography
    • Event Photography
  • Google + 360 Photography
  • Blog
    • Resources
  • Contact
  • About Me
  • Portfolio
    • Fashion and Lifestyle Photography
    • Location Photography
    • Event Photography
  • Google + 360 Photography
  • Blog
    • Resources
  • Contact

Whether to take Photo With or Without a Reflector

  • 0 comments/
  • January 9, 2012

Although I have spoke of this in another post, loads of people have asked me if they really do need a reflector and why.

The first thing to remember is the most important thing in photography, and that is light. Without light you dont have any shot at all, so getting the right light is crucial. There are several ways of getting the light right, and playing around with it, everything from using the light available to you, known as the ambient light or using flashes and strobes, known as artificial light.

What is a Reflector

A reflectors main purpose is to reflect available light in order fill in any area you are missing light, the actual light you choose to reflect is up to you.

The benefit of a reflector over another light source is in the name it simply reflects available light onto an area you wish to light up on your subject, without being too over bearing.

When to use a Reflector

A basic rule as to whether you need to use a reflector or not is to ask yourself. “is your subject lit up enough for the look you are going for?”, remember although there is such as thing as a technically perfectly lit shot, you know the one the histogram being right in the middle, there is no reason to always aim for this. Remember photography is an art and if you want to shoot different images from perfection and thats your style thats fine.

Using the reflector to just create a bit of a catchlight is fine, you dont always need to use it to completely light up your subject.

Reflector Technique

So you may be thinking now you know what a reflector is for, but when do you use it. The simple rule of thumb is you need to use a reflector when part of your subject are dark, this darkness can be solved by using another light, but this can be over powering on your subject, by using a reflector you are only ever reflecting back available light, and as such it will always be less powerful than the original source.

A quick tip is to remember the further away the reflector is from either your subject or the light you are reflecting the less intense the effect, also remember that by tilting you reflector you can also reduce the effect on your subject.

There is also an added bonus in that is it way cheaper to buy a reflector than it is to buy another light.

Practical Example

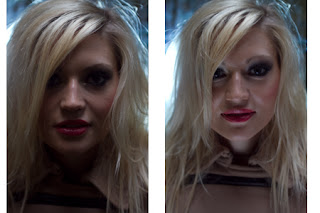
Photo Taken with and without reflector

If you look at the shot on the left above you can see that although you can see most of the face, it just looks too dark. Now if I used another light the subject would be too lit up and I would lose the effect of the image, so the solution is to use a reflector.

Now if you look at the image on the right you can clearly see that by using a reflector we can now see the subject more clearly without the light being too over powering on the face.

Big thank you to Jenna for being so patient during this shoot.

Final Thoughts

So I would suggest that even if you are just starting out, go and buy a reflector as they make your job as a photographer a whole lot easier, and remember to buy a 5in1 reflector that way you get the ability to not only reflect white light but also gold and add that something special to your shots.

  • Under : CAnon, how to use a reflector, lighting, photo, photo with reflector and without, photography, photography reflector, reflector

Newcastle Fashion Photo Shoot – Aaron Kah

  • 2 comments/
  • November 7, 2011

Model : Aaron Kah
Location : City Centre, Newcastle
Type : Fashion

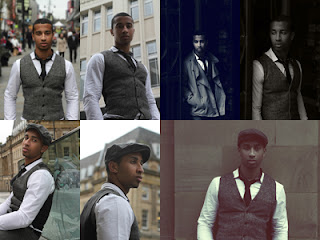
This shoot was to be one of the shoots that has come so close to happening in the past that I almost thought it would never happen, sometimes I couldn’t make it sometime Aaron couldn’t.

But I am really happy that Aaron got back in touch about this shoot, as the end results are just amazing.

For this shoot I had a clear idea of the kind if thing I was looking for, I wanted a city centre location to shoot a very high fashion set of shots, with Aarons look I knew this would work well. So after many months of conversations, we finally arranged the date for the shoot and it was all systems go.

Location

As I wanted there to be a clear image for this shoot of city environment, I knew just the right place. Newcastle city centre, having grown up in Whitley Bay and gone to college and university in the city I knew it was just the place to do this shoot.

The great thing about Newcastle is it has a great mix of old and new, and the council have cleaned up the city so gone are the old dirty buildings, instead its now clean buildings, although still old. Mixed with new modern developments, glass, metal, etc.

Newcastle is just a great city if you are looking to do a photo shoot and capture old and new in the same place.

The Shoot

We met at the Haymarket metro station, and headed straight down Northumberland Street, and thankfully my idea for the first set of shots were crowds of people and a busy street, which we got in abundance. The only problem is that when you want to shoot crowds, people are well mannered and tend to shy away from the camera. What this means is that when you take the shot, you get the crowd of people further away, and an actual space of empty around your model, not exactly the look I was going for.

In order to play with this, it required me lying on the floor shooting at a different angle, capturing the crowds and people from this angle makes the shots just work.

However, when Aaron and I were shooting we got approach by a group of girls asking to be in the shots, so we said yeah why not, they then kinda stayed in the background for a couple of shots, we almost had our our extras for our shoot, only problem was that they chose to wave at the camera, we I could not use the shots with them in. I think Aaron liked it though as he felt like he had his own entourage with him on the shoot.

We them decided to change location and went around to the entrance of the new Monument Mall, we decided to shoot in the doorway, as I knew it would give me great light and high fashion feel I was after. So we did a few shots in the doorway, and there were two problems with this location. One was the mannequin in the window, which I had to photoshop out of the final shots. And two a busy body cleaner who decided to radio security about us doing a shoot in the doorway. But thankfully we had all the shots we needed before any security staff turned up and went on our merry way.

Have to be honest, not sure why this cleaner chap had such a problem, we weren’t even in the main mall, just in the doorway outside the doors. Some people!

The next set of shots were taken a bit further down the road and made use of a new bench, like I said this modern bench looks really good in the old city environment, we also took some shots against the old buildings.

This shoot was one of the quickest shoots I have done, and thanks to the professionalism of Aaron I got all the shots I could ever want, and he was an absolute pleasure to work with and took direction perfectly.

I think I have proven in this shoot that its not about shooting off loads of shots, but more about taking your time composing your shots right and taking the shot only when you are happy, this shoot lasted about 1 hour and I came out with easily 14 good shots. So again huge thanks to Aaron for this shoot, I would recommend him to anyone looking for models to shoot with.

But like I always say, you can be the judge of the shots for yourself.

Sample shots from Newcastle City Centre Photo Shoot

To see some of these shots in full size please visit my gallery on my website http://seanjconnollyphotography.co.uk/photography_gallery.htm
  • Under : aaron, black, centre, city, coat, fashion, high, kah, newcastle, photo, photo shoot, sean j connolly, shoot, white

Newcastle Quayside Editorial Photo Shoot – Jade Slavin

  • 0 comments/
  • November 7, 2011

Model : Jade Slavin
Location : Quayside, Newcastle
Type : Editorial

At first this shoot took a while to organise getting both the location and people available, but once everything was set and after several emails about the shoot, look, feel etc it was all systems go.

This shoot was to be one of an Editorial feel although Jade is really tall and has a great figure for fashion, I thought making use of her look would fit excellent into my editorial / fashion portfolio.

Location

This shoot was to be done at the newcastle quayside, although this shoot was to be a more urban shoot so it meant staying at the Millennium bridge end.

This time I was going to make use of the existing businesses, steps, etc around the bridge to give me a set of shots that were clearly set in a city urban setting.

The Shoot

Now as it is just typical on a shoot of the location variety you cant control the weather, and yes you guessed it, for this shoot it was raining. There was a point before the shoot when it was almost called off, but I know the weather and decided to go ahead with the shoot, which worked out well as all we got was a minor shower.

Have to say I was really impressed by Jade and the fact she was happy to work in this weather, and although it didn’t rain too heavy, it did rain. So a huge thank you to Jade for working through it.

At the start of the shoot we met at the Pitcher and Piano near the millennium bridge, we then set out trying to find the best location for the shots, without either of us getting too wet.

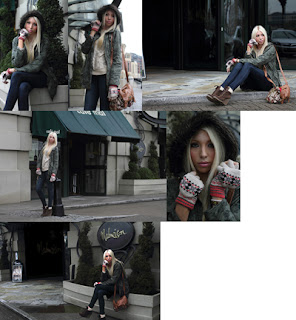
I decided that the best place for these shots would be around the entrance to the Mal Maison, with Jade sitting down and go for a more editorial feel than on the fashion side.

We did this and got some great shots.

We then decided to try some more adventurous shots, Jade walking and due to her figure and height this meant that these shots worked well. Althought to be honest I need a little bit more practise with this style, but the idea is there and I will continue to work on it.

Some of the best shots of the shoot were with Jade standing against bollards, posts etc, this is due to how tall she is as it is such a good contrast. We got some good shots of her standing, with a kinda waiting around feel to them. This was also due to the fact that there is a Taxi rank near the shoot so this is used in some of the shots.

We did manage to also take some close up beauty shots, and again although the weather was wet Jade was happy to stand around so we could get these shots. So all in all this was a good shoot, I got some shots I can use, definately more on the editorial side but good shots that I am happy with.

But again you can be the judge of the shots.

Sample shots from Newcastle Quayside Photo Shoot
To see some of these shots in full size please visit my gallery on my website http://seanjconnollyphotography.co.uk/photography_gallery.htm
  • Under : bridge, editorial, fashion, jade, mal maison, millennium, newcastle, photo, photo shoot, quayside, shoot, slavin

Newcastle Quayside Editorial Photo Shoot – Natalie Locke

  • 0 comments/
  • November 7, 2011

Model : Natalie Locke
Location : Quayside, Newcastle
Type : Editorial

This photo shoot was one I decided to do in an area I have done lots of landscape and location work, but not many fashion or editorial shoots.

After several emails and conversations with Natalie it was decided that this shoot would be themed on a more casual fashion / editorial look, something that can fit into either area as fashion or editorial. That way the otufits could be easy to put together and makeup would not require a Make Up Artist.

As Natalie has a figure typical of a fashion model, the look, location and feel for this shoot would just work well and all three hopefully would make a good set of shots.

Location

On arriving at the location we met just next to the millennium bridge, and as Natalie had done a few shoots in this area before she suggested we shoot at the far end of the quayside near the trees. This sounded like a good plan, only problem was as it turned out the trees were about a hundred miles away (well not quite, but you know what I mean).

However, when we got to the trees the location was great and well worth the walk, there is a jetty to use and the tree line looks ace, so well done Natalie for this great location.

The Shoot

Now to say we had fun on this shoot must be the understatement of the year, Natalie was fun to work with and as mad as a brush. She was happy to try all sorts of shots.

The first set of shots we took were on the little jetty thing, these required Natalie to lie on the ground, which she never complained once about, she was happy to move to where I needed her for the shots. We took some shots on the jetty and got some shots that really worked.

Now the next set of shots were taken near the tree line, and again this is where the shoot became such fun. As we thought it would be a good idea to try to get some shots with leaves blowing in the wind, and as there were not leaves around, Natalie and Becky set about collecting handfuls of leaves from the nearby bushes. Once we had enough leaves, it was Becky’s job to throw them in Natalies direction at the right time, and again Natalie was happy to try this, bascially happy to have leaves throw at her. Now not many models would be happy with that. We tried these shots and as you can guess, they just didn’t work, but at least it was fun.

I them put on my serious photographer head and decided to use the trees properly, and this time we got some great images, we them decided to use the leaves in the shot, this meant Natalie holding a leaf over her face, and with a few test shots and lighting changes we got an amazing shot.

We them decided to walk further down the Quayside back towards the Millennium bridge, again Natalie was a pleasure to work with, she was climbing on roundabouts, railings, sitting on steps, in fact anything and everything to try to get the right shots.

By this time the sun was setting and the light was just looking amazing, and we got some amazing shots using the sun as a backlight with Natalie facing the camera, and these shots just worked (I liked some of these so much I had a hard time picking just one).

So all in all this was a really fun shoot, and again the model Natalie was a pleasure to work with she is happy to try anything and brings some great ideas to the table.

But as for the shots, only you can be the judge of whether you like them or not.


Sample shots from Newcastle Quayside Photo Shoot


To see some of these shots in full size please visit my gallery on my website http://seanjconnollyphotography.co.uk/photography_gallery.htm
  • Under : bridge, fashion, locke, millennium, natalie, newcastle, photo, photo shoot, quayside, sean j connolly, shoot

Durham Editorial Photo Shoot – Emma Wright

  • 0 comments/
  • November 7, 2011

Model : Emma Wright
Location : Riverside, Durham
Type : Editorial

This shoot was one that I decided to do to add to more the editorial side of my portfolio, thinking with more of the advertising and editorial theme.

After some emails and discussions with Emma it was decided that Durham was a good location for both of us and the concept for the shoot would be centred around bright clothing, in particular tights. So it was agree that in order to get a few different looks, Emma could bring different outfits that all centred around her figure and bright tights.

This sounded great to me as the good thing about Emma as a model is she has a great figure for fashion modelling, typical tall and slim.

Location

The location was to be Durham City and as I know Durham quite a bit I decided to do the shoot down on the river bank, this is a great location as not only do you get the urban city environment, but you can also get the countryside rural feel.

We arranged to meet on at the pub just at the beginning of the bridge. Its always a bit nerve racking when you meet someone for the first time, I always worry that I will go up to the wrong person, but Emma stood out from the crowd and we made our way down to the riverside.

The weather was not too bad for a shoot, not too hot and not too cold, and with the light being difussed by the cloud at times meant that I could get some great lit shots as well as some sunny shots. We finally decided on the location of the little house thing on the riverside, great location and kinda quiet which I was surprised about.

The Shoot

We started the shoot and the first sets of shots were to be Emma wearing a more formal outfit in a long coat, shots taken in and around the entrance. Emma was an absolute pleasure to work with she took direction well and in most cases was already in the right pose before I even started composing the shot.

The main problem on this shoot was lighting, the area was dark, yet I didn’t want to make it too artificial by using lights. So I decided to use the reflector to throw a bit of extra natural light onto the shots, this worked great. We got some great shots around the steps, and after a quick change into a more casual look we took some more great shots.

Again Emma was great fun to work with and the shots turned out great.

After this very static shooting we decided to step it up a bit and take some moving shots, Emma was game to try these shots. So I climbed up on the wall to get a high view as Emma walked passed, and the first set of these just ended up looking like some peeping tom taking photos.

So we decided a more level approach was better, and although these shots were better the Emma walking towards the camera shot really never worked all that well, but when she got closer the light fell perfectly and we got the money shot. Great over exposed shot that uses the light just right, and with the expression she made for this shot makes the shot just pop.

We then tried more of the walking shots, this time with Emma walking away, and again due to her style and figure these shots just look great, and again she took direction well and looked in the right direction just at the right time to give us the great shot. (although this shot needed alot of post production to it due to the councils lack of upkeep on the path)

We then made our way back to the bridge and decided to try something a bit different and have a little play on the bridge, lets just say the shots are still in the experimental arena and need more work to perfect this style.

Really enjoyed this shoot, and Emma was an absolute pleasure to work with, and she was happy to try anything, even some of my stupid ideas.

I just hope you like these shots.

Sample shots from Durham Photo Shoot
To see some of these shots in full size please visit my gallery on my website http://seanjconnollyphotography.co.uk/photography_gallery.htm
  • Under : county, durham, editorial, emma, fashion, lighting, photo, photo shoot, reflector, riverside, sean j connolly, style, wright

Lighting

  • 0 comments/
  • October 28, 2011

As every good photographer will know the word photography actually means “writing with light” and this means that one of the most important things you can get right in order to get a great photograph is the lighting.

For an excellent video guide please check out this great series of tutorials by the Better Photos Academy

Lighting comes from two main sources ambient and artificial, and being able to control your lighting is the key to your photos being great rather than good.

Ambient Light
This is very simple to understand but difficult to master, ambient light is using the light from available light sources that occur naturally in your environment, this can be light from street lighting, light from the sun, the moon or anything else that is around that you do not have direct control over.
The simple fact that your do not have direct control over ambient light means that you have to use otherways to bring some form of control to the lighting.
Reflector

Multi Purpose Reflector

The most common way to control ambient light is with a reflector / diffuser, this small or large piece of kit allows you to reflect the light to exactly where you want to, and some reflectors are multi purpose and have an in built diffuser which allows you to scatter the light more evenly across your subject.

A multi purpose reflector works usually in one of the following ways

  1. Directly reflects the light to where you want it, normally done using the silver side.
  2. Reflects the light but softens its colour, normally done using the white side.
  3. Reflect the slight and adds a gold / yellow tinge to it, normally done with the gold side
  4. Diffuses the light by softening it, normally done by using the internal part
  5. Remove light from your subject by absorbing it, normally done with the black side.
Without / With Reflector

As you can see from the above portrait sample shot the image on the left is dark in the front, whilst the image on the right has a nice even lighting

Now although a reflector is the most common tool used to control ambient lighting, you can pretty much use anything you like to get the desired effect, even closing curtains is a way to control ambient light in fact you can just play around with everday objects to give you the right lighting.

In Camera
Althought this may sound obvious the best way to play around with  ambient or available light is to change the camera setting, this may mean using a smaller or larger aperture or changing the shutter speed, by adjusting in camera setting you can also control directly the ambient light entering the camera to get the desired effect.
The simple rule of thumb is

  1. Slower shutter speed will let more light in / Faster shutter speed will let less light in
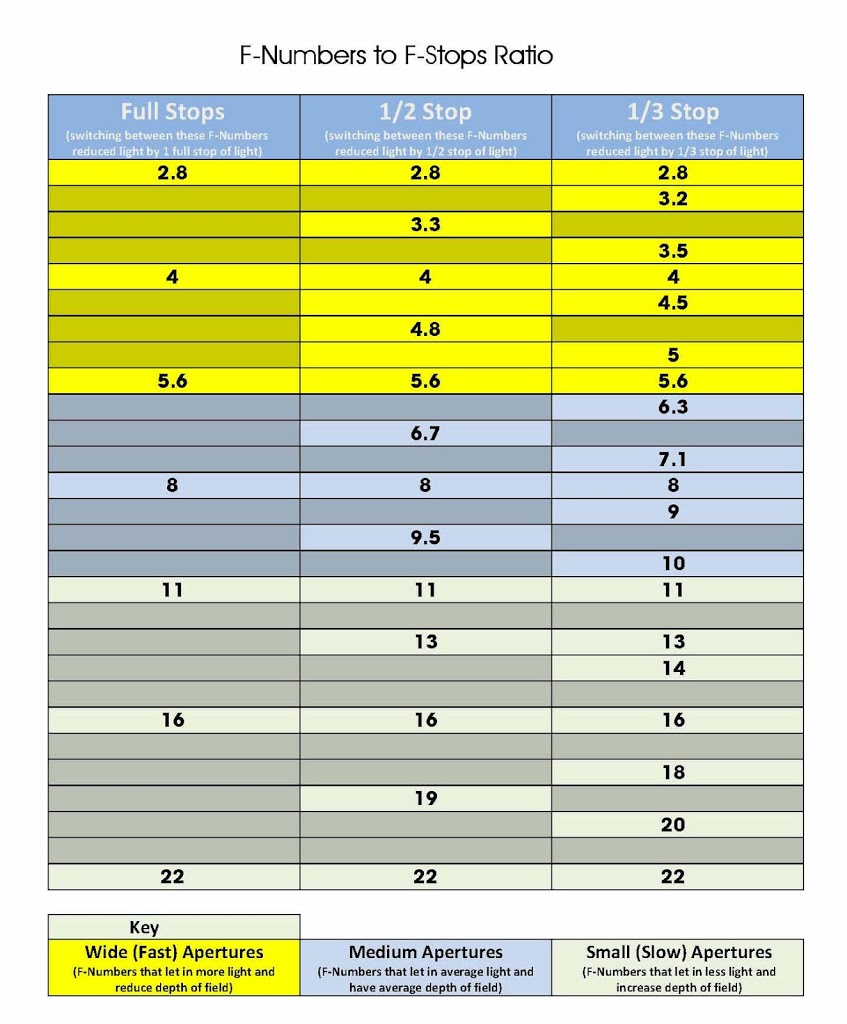
  2. Smaller aperture number = wider aperture which lets more light in
  3. Higher aperture number = smaller aperture which lets less light in
  4. Hgher ISO number will give lighter photos, but also add noise to your shots.

Note when shooting at slow shutter speeds remember to put your camera on a stable platform or tripod

Changing Shutter Speed – Long Exposure

As you can see in the example above by using a slower shutter speed the ambient light can be made to look really cool. So remember that the only limit is your imagination so go nuts.

Artificial Light

When time calls for it and the ambient or available light is insufficient for your needs there are two main choices when it comes to lighting your subject, flash / strobes and continuous lighting.

Flash / Strobes
A flash / strobes is the common term for a portable unit that provides light directly in connection with your camera shutter, these come in all shapes and sizes but have common features and functions which I am going to talk about here.

Ok I will start by giving you an over view of the most common function on modern flash units, I will start at the bottom left of the diagram and work clockwise.
On / Off Switch
This switch is used to turn on or off the flash unit, when switch on the flash will normally make a high pitched sound until it is ready to fire.
Flash Ready / Test
This button has two purposes the first is it will light up when the flash unit is ready for use, the second is that when it is lit up it can be pressed in order to test fire the flash.
Flash Zoom (optional)
This button is used when the flash in in manual mode to zoom or move the flash head inside the flash, this allows the flash to cover either a narrower area or a wider area.

Note Not all flash units are zoom units and have this function, also this option will be controlled by the flash when not in manual mode.
Mode
This is used to switch the flash mode, normally used to select between ETTL (auto) and manual modes.
F/Stop
This button is sometime labelled power and allows you to control the output level of the flash when in manual mode, most units support anything from full power to 1/16 of full power, someother units can step down a bit further to reduce the power up to 1/32 of full power.
Note – the measurement is a percentage of the full output, 1/1 being full power.
ISO (optional)
This allow the light sensitivity of the flash to be change as needed
Alert (optional)
This allows the noise and alerts on the flash to be alerted.
Back light
This turns on and off the flash back light, this is only available on flash units with an LCD screen.
ETTL – Evaluatitive Through The Lens

This indicates that the flash is operating is full auto mode and directly in sync with the camera, this mode is only supported by the flash being connected as follows.

  1. On the camera Hot Shoe connector
  2. Tethered to the Hot Shoe connector via a cord
  3. Connected to the camera via a wireless trigger that supports ETTL.

Note – ETTL simply means that any adjustments made to the camera will be automatically done tot he flash, such as focal length, etc.
Slave / Master Switch (optional)

This changes the flash from being either the main flash unit in the set to the slave unit, simply put if your flash has this option it can be remotely fired by other flash units, there will be a infrared sensor on yoru flash either the side or front that must be in the line of sight of other units. When the other flash unit fires this unit will also fire.
The above is only a guide to the flash units, most work in the same way, but will be laid out differently, but in essence the principles are the same for all.

Ok that concludes the basic workings of your flash, the other things to look for in your flash and to know about is as follows.

Guide Number – this is the effect distance your flash can cover when your camera ISO is set to 100, normally expressed in feet ie 48 feet.

Gels – these are attached to give the flash a colour light rather than the typical white light, if you look at reflector photo above you can see it is back lit in blue, this is done using a gel.

Flash Gels

Continuous Lighting

This is the form of lighting that is always on, it can come from a variety of sources, it is something to play around with and use what ever you have around to light your subject, some of the more common continuous light sources are

  1. Purpose built continuous lights, unlike stobes these do not cycle with your camera.
  2. torch
  3. Anything else you like that gives off light.
Playing around with lighting

The shot above shows use of other forms of continuous lighting, again it is only limited by your imagination.

  • Under : ambient, artificial, available, camera, continuous, flash, guide number, how, iso, light, lighting, long exposure, photo, strobe, subject

DSLR Controls – Back / Rear Controls

  • 0 comments/
  • October 28, 2011

I must start first off by saying that the shots in this post are of my Canon 7D and whilst most Canon cameras all have the same layout, Nikons do not. This does not really make a lot of difference as the operation of most DSLR cameras are the same, and whilst the buttons may not be in the same place, they do operate in the same or similar way.
Also another important note is that you can program the buttons on most DSLR to do different functions as you prefer, the diagrams and descriptions although are correct for the functions may not operate the same as your camera as these layouts are the default layouts.

The way this will work is I will cover each side of the camera in turn, Back, Front ,Top and left. I am not going to mention stupid things like where the batteries go, or how to attach a strap but the more necessary things as well as somethings that when I first started I just could not figure out. Also I have changed the names slightly to help you make more sense of things and not be too technical.

Back of DSLR

Back / Rear of Canon 7D


The rear of most DSLR consist of a large screen and to the side the main image selector wheel. I will start at the bottom left of the picture and work clockwise, ok here goes

Playback / Live View Screen
The large screen on the back of your DSLR serves two purposes. One is very simply it allows you to view shots you have taken after you press the Playback button, and by using the Adjust / Scroll wheel you can view your shots and then zoom in or out using the Zoom in or Zoom Out buttons on the right above the big wheel.
Note when you zoom into an photo and view it on the screen you can use the View Joystick to move around the image.
The other use for this screen and hence why I have named it the Live View Screen is that when you are taking photos with your camera it is possible to see a variety of different things on this screen and not just what you are taking a photo of. These include a Quick Menu, a Camera Level, Shot histogram and information and of course Live View (basically what the camera sees). Most of these are accessed by using the Info button. (more on this later)
How to Access to Live View on DSLR
HUGE note to get Live View to work on the LCD screen you actually press the Start / Stop button during shooting mode, just make sure the little outer ring around the Start / Stop is pointing at the white camera.
If Live view fails to operate you need to enable it as follows

  1. Press the System Menu Button
  2. Use the Little Wheel on the top of the camera and scroll to menu option 4
  3. Use the big wheel to select live view
  4. Press the Set / Enter button then select enable to activate live view, press the Set / Enter button.
  5. Press the System Menu button to come out of the system menu.

Live view is now working

Delete
Does exactly what it says on the tin, deletes your photos.
Playback
Go on guess, yes it shows you photos you have taken on the big Live View screen, not quite 3D IMAX but at least you know what you shot.

Info /Level / Quick Menu

When in shooting mode this button allows you to do 1 of 4 things

  1. On first press you see the information about the shot your are taking, such as colour temp, white balance as well as how much space you have on your card and how many shots you can take.
  2. On pressing again you get a camera level indicator, showing if the camera is level or not, a solid green line indicates your camera is level (note this is not available on all DSLR’s)
  3. On a third press you get the Quick menu, a quick over view of your current settings such as Aperture and shutter speed. (Note this is a view only option and in order to make changes you need to use the Quick Menu button)
  4. On a fourth press you turn off the back LCD screen all together.

When in playback mode this button gives your either on screen info about the shot or pressed again gives you more detailed shot information.

Picture Style

This button allows you to change how your photo will turn out whether you are shooting a landscape, portait or want to change the sharpness.

System Menu

This is the main menu button on your camera and gets you into the main system menu, where you can change all sorts of good things and some not so good things.

Quick Menu

This button gives you access to the quick menu, where you can quickly change many camera settings. To scroll around the screen use the Qucik Menu / View Joystick and then use the main dial or Adjust / scroll wheel to make changes.
Instant Raw + Jpeg

This is a kinda cool button it allows you to quickly set you camera to take both a RAW and Jpeg photo at the same time, can save you alot of time. Although my advice is to always shoot in RAW.

Viewfinder

D’oH  this shows you what you are taking a photo of, that is unless you are using the Live View Mode.

Word of caution if you are using Mirror Lock after your shot you will not be able to see through the View Finder

Still / Video Recording (outer ring)

The little outer ring switch to the right of the view finder is the selector to set the camera to either shoot still photographs or record HD video, white for photos red for video.

Video Record Start / Stop / Live View

The button marked start /stop to the right of the view finder is the button that does one of two things.

  1. If the camera is set to record video it starts and stop the video
  2. If the camera is set to take still photographs this button shows / turns on Live View on the LCD screen.  (see note above about how to enable live view)

Auto Focus Button
This button starts the camera focussing, it does not take a shot it simply gets the camera in focus ready to take a photo. Great for use if you are taking shots of things that will move.

AE Lock Button / Zoom In

This button allows you to lock the exposure for a given shot, simply press the button and the green light in the viewfinder will show to show you exposure is locked, when you take a photo it will be taken with this exposure setting.
This button also acts as a zoom in or magnify button during playback.

Focus Mode / Zoom Out

This button lets you select the area to focus on when used in conjunction with the Main Dial on top of the camera. Simply press the Focus Mode button them use the Main Dial to select the area to focus using the view finder.
This button also lets you change the focus mode and lets you scroll through the active modes on your cameras to change focus mode.
How to select Focus Mode and Focus Point on DSLR

  1. Press the Focus Mode / Zoom Out button
  2. Look through the view finder and press the Multi Function / Manual Focus Select button on top of the camera (next to the shutter release), for each press of this button you will see the focus point and mode change in the viewfinder. Just keep pressing it until you see the desired Focus Point / Mode in the view finder.
  3. Once you find the desired mode, simply use the Main Dial on top of the camera to move the point to where you want to focus.

Quick Menu / View Joystick

When in quick menu after press the Quick Menu button this joystick allows you to select the option you wish to adjust.
Whilst in playback this joystick allows you to navigate around a photograph after pressing the Zoom In button.
This joystick can also be set to allow you to select a focus point on the screen.
Set / Enter

This is kinda like the save button, pressing it selects menu options.

Adjust / Scroll Wheel

This is the companion to the main dial, it allows you to change camera settings, as well as being used to scroll through photos during playback.

Activity light

This shows when the camera is doing something, such as writing to the card, cleaning the sensor, etc.
Wheel Function Lock

This switch when pushed to the right stops you from accidently making camera setting changes.

NOTE the quick menu adjustment and on screen options still work with this in the Lock position, the main purpose of this switch is during shooting as it stops you making adjustments via the top LCD screen.
Light Sensor

There is a small light sensor just to the left of the big adjust / scroll wheel this is used by the camera for taking light readings. It is mainly used during exposure setting in non manual modes and in auto mode it also sets the LCD screen brightness.

Final Note
Most of the camera buttons have a dual function and in order to make adjustments you need to use either the rear dial or the top dial depending on what you want to change.
  • Under : access, controls, dial, dslr, enable, focus, how, live, live view, lock, on, photo, photos, point, rear, select, take, to, turn, view

Welcome to the new Photography Blog on the block

  • 0 comments/
  • October 26, 2011

First off thank you for visiting my new blog.

The idea of this blog is to share both my knowledge of photography, everything from cameras, bags, lighting, locations, shutters to studios and everything in between. So if you have anything you are not sure about in the world of photography dont be afraid to ask I am here to help.

I am also going to share some information which I found hard to find when I started in photography and hopefully put everything in one easy to find place for you to enjoy and share.
Also I am going to share experiences from my photo shoots, both with and without models, on location, in studios and what ever else I get up to.
Put simply this is a blog about my journey and experience in photography, as I learn more stuff I will share that with you, as I do stuff I will share that too.
Another point to remember I work with a Canon 7D camera and being a Canon certified professional means I will be bias towards Canon, but everything in general is the same on DSLR’s whether its Canon, Nikon, Sony, Hassleblad or what ever else you use.
Ok so lets get this party started.
Who am I
I am Sean J Connolly and I work as a professional Advertising Photographer specialising in advertising, editorial, fashion photography, I am based in Richmond, North Yorkshire and cover all Yorkshire, North East and anywhere else I am needed.
I have worked professionally full time now for about 2 years, but have been in photography for about 10 years. I must say I love the challenge it brings, as there are lots of good and bad photos out there, so taking that special shot is something I pride myself on.

You can find out more about me from any of the following links.

  1. www.seanjconnollyphotography.co.uk  (my main website)
  2. www.facebook.com/seanjconnollyphotography (photography facebook page)
  3. http://www.flickr.com/photos/seanjc/ (my flickr account)
  4. http://www.modelmayhem.com/seanjconnollyphotography (model mayhem portfolio)

Feel free to get in touch, whether you are a fellow photographer, make up artist, model, stylist or looking for a photographer. I promise I wont bite.

Thanks for reading
Enjoy

  • Under : afd micro adjustment, blog, cameras, CAnon, dslr, filters, hdr, hyper focal distance, nikon, photo, photography, sean j connolly

  1. DSLR Controls
    1. Front Controls
    2. Back / Rear Controls
    3. Top Controls
    4. Left Controls
  2. Camera Talk
    1. Why Buy a DSLR
    2. Canon or Nikon?
    3. Camera Lens
    4. Canon 7D Soft Focus Fix
  3. Learning Zone
    1. Photography Golden Triangle
    2. Photography Tips
    3. Common Photography Terms
    4. Types of Photography
    5. Lighting
    6. F-Number to F-Stop Chart
Notable Posts
  • How to Reduce Light Stops Entering Camera by Using F-Numbers
  • Using Polarizing Filters to reduce Reflections when shooting through glass
  • How to Setup Canon 7D to take HDR shots / Bracketed Exposure
  • Spofforth Castle Wetherby Fashion Shoot – Jenna Duffin
Recent Posts
  • To Edit or Not To Edit – That is the Question!
  • Photography Tips for Beginners
  • Photography Golden Triangle
  • Reviews
  • Smoke Bombs and High Fashion
Archives
  • February 2019
  • January 2019
  • December 2018
  • November 2018
  • August 2016
  • March 2016
  • October 2015
  • June 2015
  • May 2015
  • July 2014
  • April 2014
  • December 2013
  • May 2013
  • March 2013
  • December 2012
  • November 2012
  • October 2012
  • September 2012
  • July 2012
  • June 2012
  • May 2012
  • April 2012
  • March 2012
  • February 2012
  • January 2012
  • December 2011
  • November 2011
  • October 2011
Privacy Policy
Copyright Sean J Connolly Photography 2018. All Rights Reserved