LATEST SHOOT NEWS: Currently seeking models. Get in touch.
CT Magazine is Relaunching Soon. Get in touch be featured.
LATEST BLOG NEWS: To Edit or Not To Edit – Check it Out Now
Sean J Connolly PhotographySean J Connolly PhotographySean J Connolly PhotographySean J Connolly Photography
  • About Me
  • Portfolio
    • Fashion and Lifestyle Photography
    • Location Photography
    • Event Photography
  • Google + 360 Photography
  • Blog
    • Resources
  • Contact
  • About Me
  • Portfolio
    • Fashion and Lifestyle Photography
    • Location Photography
    • Event Photography
  • Google + 360 Photography
  • Blog
    • Resources
  • Contact

How to Reduce Light Stops Entering Camera by Using F-Numbers

  • 0 comments/
  • August 25, 2016

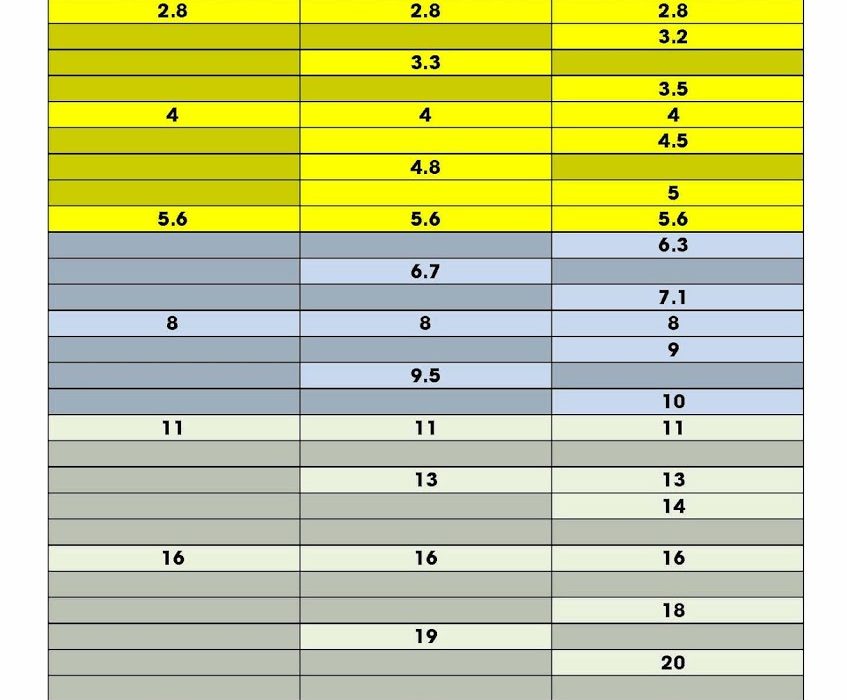
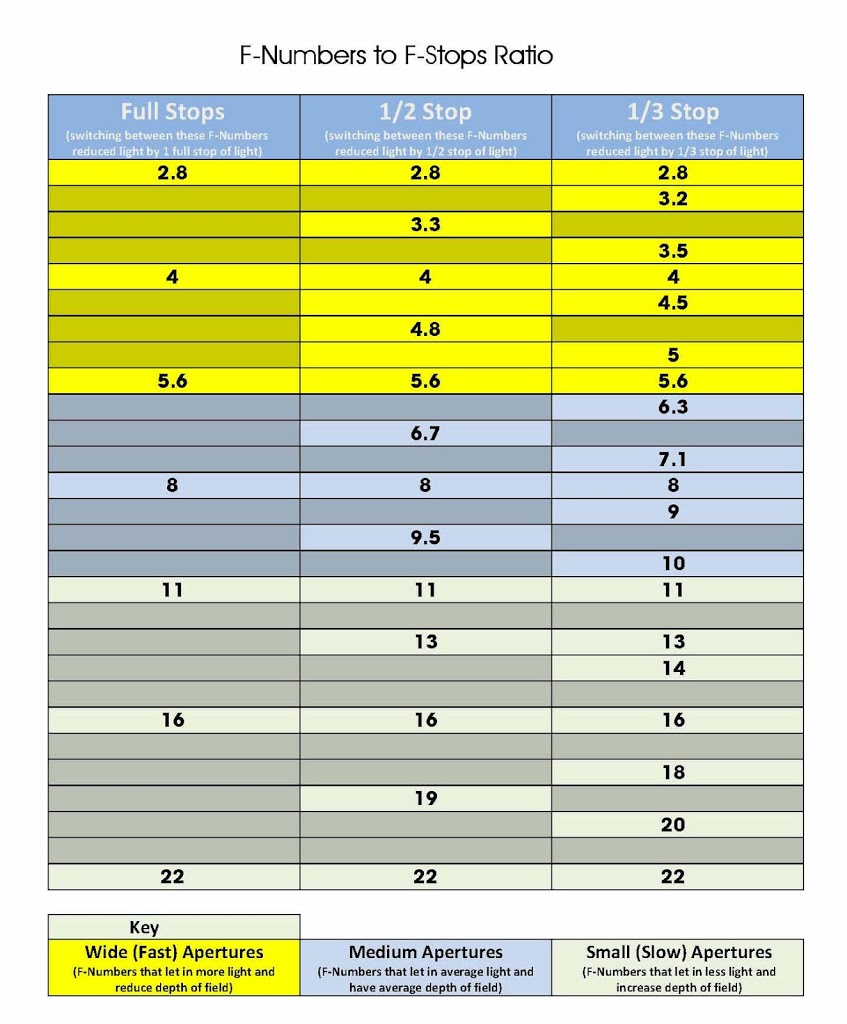
So rather than try to write a description about the numbers I decide to draw up a chart.
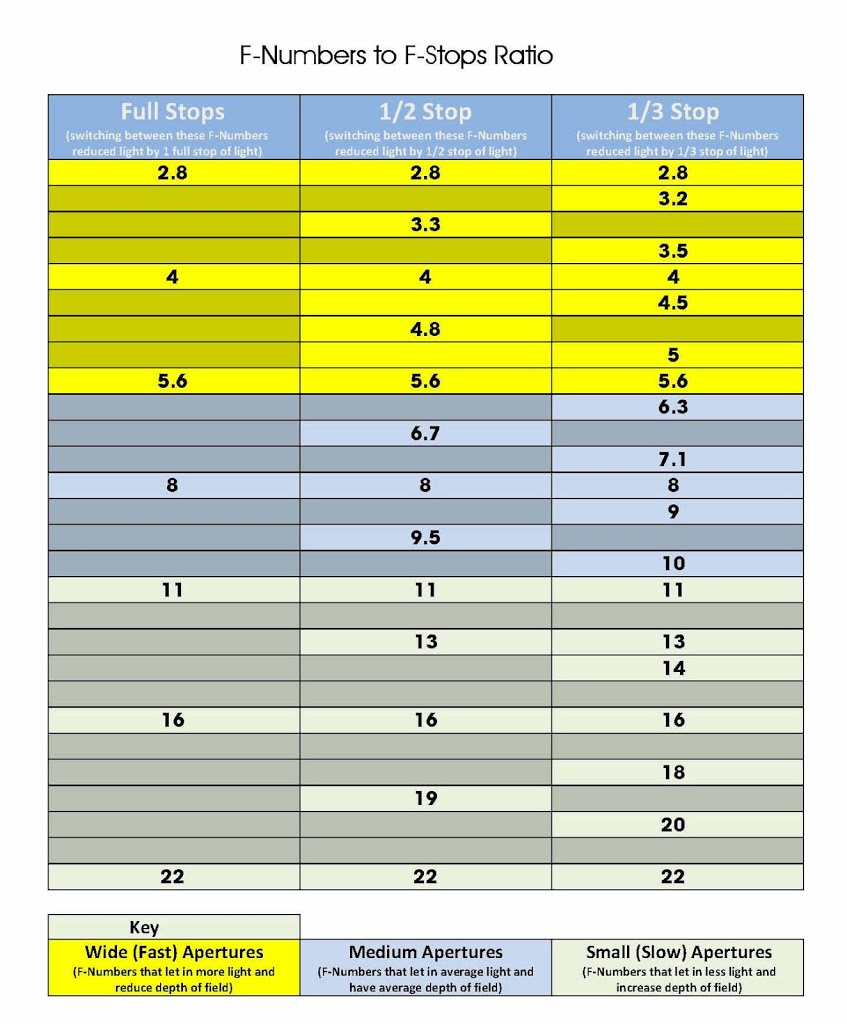
Please feel free to download this chart for your own use, and if you do wish to share it, please credit me. Thanks

How to use the Chart

The chart is pretty simple to understand, along the top are 3 columns, starting with Full Stop, 1/2 Stop then 1/3 Stop, reading down each column you see the camera F Numbers. The gap between the F Numbers is the amount of light you are reducing or increasing into the camera.
Lets say you want to reduce the light by 1 Full Stop of light, simply look at the first column titled Full Stops and switching the F-Number on your camera between these settings will decrease or increase the amount of light accordingly. Using the second column and switching between these F-Numbers will reduce light by 1/2 Stop and finally switching between the F-Numbers in the 3rd column will reduce light by 1/3 Stop.
I hope this all makes sense, any questions just let me know in the comments.
PDF DOWNLOAD
JPG DOWNLOAD
  • Under : camera, CAnon, f number, f stop, how to reduce camera light, lens settings, light, light painting, need to know, photography, ratio

Why your Mobile Phone is not as good as a Real Camera

  • 3 comments/
  • October 24, 2015

Being the photographer that I am, I get a lot of people asking me what type of camera they should get, and more often in todays climate, why should they even buy a camera at all. Especially when their mobile phone has a camera and it has a massive? 21 mega pixels, where as a DSLR may only have 16 mega pixels.

On the face of it, you may think they are right. Surely having 21 mega pixles or 21 million pixels is better than only having 16 mega pixels or 16 million pixels!!

The answer is a very simple NO!!

The problem is with the two main elements that are the basis of photography and these are light and drawing as in the word itself.

Photo (light) graphy (drawing)

So having a good quality photograph requires that you maximise the elements involved to produce the best results.

Light

In order to get a good photograph you need the right amount of hitting the sensor (more on the sensor in a bit). This means having a lens that allows the most light in so it can create your photo. This is where one of the mistakes people make in comparing mobile phones with actual cameras comes in and that is the F Number of the lens (check out my article about F Numbers).

In most cases in order to maximise the light into the lens you need a large aperture and a fast lens, this usually takes the form of a lens with a low F Number something like an f/2.8 on the new iPhone 6s. So you will be thinking, thats great my new iPhone has the same F Number as a more expensive camera lens, so why do I need to buy a camera.

Simple – Not all lens are the physically the same size.

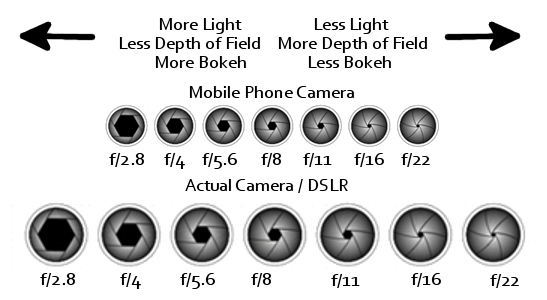
As you can see from the diagram above, the F Numbers on the mobile phone cameras can be the same as those on a DSLR camera, However as you can clearly see the actual lens opening (aperture)  is different. Put simply the DSLR lens has a larger diameter and as such even set to the same F Number will allow a lot more light in and therefore a lot more lights hits the sensor.

In simple terms fully open the lens on your mobile will be a few millimetres maximum, where as fully open the lens on a DSLR will be a few centimetres. (this is also why some lens can allow more light to enter compared to a faster lens at the lower F Number)

Drawing

The next important element in taking a good photograph is the drawing (graphy) or information stored during exposure.

This leads to one of the biggest mistakes in comparing mobile phone cameras and DSLR cameras, and that is mega pixels.

A mega pixels is simple an area of 1 million pixels that captures the information during exposure of a photography, so generally the more mega pixels the more details and the higher resolution the shot you will take.

This is where it gets interesting, not mega pixel is either the same quality or the same size. The sensors used in most modern mobile phones are way smaller than those used in modern DSLR cameras.

As you can see from the simple diagram above. If we take a 4 mega pixels mobile phone camera and compare it to a 4 mega pixel DSLR you can clearly see the size of each mega pixel is larger and in turn the size of the pixels inside are larger. So we get 4 million larger pixels in our DSLR as opposed to 4 million smaller ones in the mobile phone.

This means that we get more information stored and more detail in the photograph by the DSLR compared with a mobile phone.

In Closing

In modern day mobile phones and DSLR the technology has dramatically improved, this means it is possible to take decent photos on a mobile phone in low light, this is due to additional factors such as the actual sensor type and camera chips used in processing the photos. However, the same rules apply, no matter how much jiggery pokery you get from technology, the DSLR will always produce better photos.

However even the sensors in DSLR cameras are of a difference type and size, but more on that later.

  • Under : aperture, apple, CAnon, dslr, iPhone 6s, lens, light, mega pixels, opening, photography, sony, why your mobile phone is not as good as a real camera

CT Magazine Issue 1 – available in print on Magcloud

  • 0 comments/
  • March 12, 2013
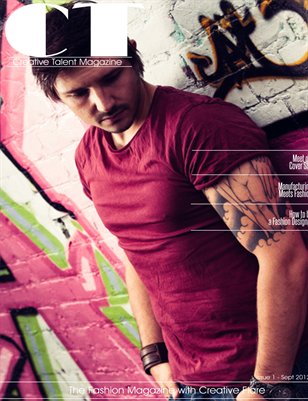
CT Magazine - Issue 1

CT Magazine – Issue 1
CT Magazine brings you the latest from the world of fashion, with a unique twist, we showcase the hidden talents behind the shots. Everyone from photographers, models, make up artists, designers to writers and editors.
Find out more on MagCloud
  • Under : fashion, fashion magazine, fashion world, get published in fashion magazine, hidden talent, magazine, magazine feature, make up artist, models, photography, photos, showcase, talent, writers

CT Magazine and Darlington College

  • 1 comments/
  • October 12, 2012

As you may have noticed recently one of my current projects is a new magazine publication called CT magazine or Creative Talent Magazine, now I have started a new partnership with Darlington College and I am really excited about it.

What is CT Magazine

CT Magazine is a new magazine which is aimed at showcasing the hidden talents behind the fashion photography that we seen everyday.  The idea for the magazine came about after working on a variety of different shoots for clients and I noticed that although there is always a huge team of people involved in putting together and taking these shots, only a small amount of them ever get credit for their artistic work.

I mean have you every looked at a model in a magazine and thought I would love to work with them, but dont know who they are. Well with CT magazine the idea is to show everyone off to their full potential and give full credit for their work.

So every image published in the magazine is accompanied by full credit, including contact details and in some cases a bit of editorial about them, giving you an insight into their world and how they got where they are today.

To check out CT Magazine please go visit the website www.ctmagazine.co.uk and read the latest issue and find out more about the magazine.

Get Involved

So by now you are probably thinking that a great idea and how do I get involved. The first thing to do is to go and give the FaceBook page a like www.facebook.com/ctfashionmagazine and get in touch either via facebook or email at getinvolved@ctmagazine.co.uk

Darlington College Fashion /  Art & Design Students

As the idea behind CT magazine is to promote the hidden and unknown talent of people in the fashion industry, I thought that it would be a great idea to work with the local college to showcase the excellent work done by the students, and at the same give the students both an idea of what its like to work on a professional brief as well as helping promote their work.

I was asked by Darlinton College to come in and speak to the students about CT Magazine and the possibility of them being involved. So on Thursday I went along to Darlington College and was planning on talking to maybe a couple of students about the whole idea. “drum roll please…”

However, after talking to a senior lecturer I was asked if I would be happy to talk to all the students on the course at once, so in total I was talking to about 50 students at once. This may sound scary but I am more than happy to talk to large groups of people and the response I got was amazing. The students are all really excited about being part of CT Magazine, and although the talk was initially about the magazine, I decided to open the floor to questions and kinda opened the flood gates to all sorts of questions about what I do, and about photography in general. I have to say this was really cool, I really believe in education and think that in this digital world it is way to easy to buy a camera and call yourself a photographer, or buy a software package and call yourself a designer. So passing on advice to students and the true value of what they are doing was amazing.

So after my talk I had a further meeting with the lecturers and they came up with the idea of setting the work for CT Magazine as part of the students course work, and that way they can add it to their portfolios and help them get into uni. This to me is a great idea, as I love the thought of being able to help people get on in life, and showing students just how things work in the real world. Kinda helping them to bridge the gap between theory and practise.

I find this a really good idea as its too easy to learn something and not see it truely applied in a real world context, and get a shock when you get out into the world, but combining CT magazine and Darlington College students allows the magazine to showcase their amazing talents, as well as helping them to gain valuable industry experience they simply would not get anywhere else.

So I have managed to go back to college and come away with some homework, a thing I have not done in quite a few years. But I am so looking forward to working with Darlington College and the amazing students that go there.

If you want some more info on the work of Darlington College please check out their website http://www.darlington.ac.uk/ or follow them on twitter www.twitter.com/darlingtonfe and remember to say that I sent you.

So watch this space for exciting development with both CT magazine and Darlington College…

  • Under : art and design, ct magazine, darlington college, design, designer, fashion, fashion magazine, featuring, partnership, photography, putting theory into practise, students, working to a brief

Models Bringing Chaperones to Photo Shoots

  • 0 comments/
  • July 19, 2012

Ok this is one of those subjects that pop up time and time again, the subject of chaperones, whether that is the model, mua, stylist or photographer bringing someone with them to a photoshoot.
First off I will start by saying as a photographer I don’t have any problems with anyone bringing someone with them on the shoot, I would rather have someone happy on the shoot and if that means being having someone with them, thats cool with me.

Now the reason I don’t have a problem with this is that on most of my shoots, there are normally a lot of people on set, or if its a location shoot and a public place, of course there will be people around.

I don’t have a problem with it because when I am taking photos I am only concerned with what I can see through the camera, and as I am professional and my concentration is on this, people around me aren’t a problem and don’t effect my photography.

I find it really hard to believe that anyone has a problem with someone else bringing someone with them on a shoot, especially if the shoot is something like lingerie, implied, topless or nude. I mean you have to look out for yourself, and if you are unhappy on a shoot not only will you have a horrible shoot, but your photos will be effected, but it just amazes me that some people throw their toy out of the pram when a model turns up with someone, even more so when they say they will be fine if the escort was female but have a problem if its a man, my question to them is “why do you have a problem?” and “why is it different is someone brings a woman?” my only conclusion is that your are either up to something you shouldn’t be or you are not confident in your work to have someone watch you while you do it.

So in closing I will finish with this, if you want to shoot with me and you want to bring someone with you, thats fine with me. I am even happy with it, when someone turns up with a chaperone and I was unaware of them coming to the shoot, as my feelings on this is that, the shoot is about everyone, not just me as the photographer. Every must be happy and feel relaxed on the shoot in order to get the best results.  So a little message to my fellow photographers, keep in mind that your job is to take photos, and if you cant do that with someone watching your in the wrong job or at least the wrong type of photography, remember the shoot is not just about you, its also about anyone else involved models, make up artists, stylists and anyone else.

Without the whole team there can be no shots.

  • Under : chaperones, model bringing chaperone to photoshoot, model chaperone, model escort, pervert photographers, photography, professional photographers, safe photoshoot

Thank you for supporting my Blog

  • 0 comments/
  • June 21, 2012

Just thought I would say a Huge thank you to everyone for reading, sharing and commenting on my blog. I always love sharing my knowledge with others and being social in general.

Now on the subject of being social I was thinking my readers must have their own blogs ro being on social media websites so why dont we share with each other our blogs, social network profiles, twitter handles, etc.

So I will start, you know the url of my blog already as this is what you are reading, but here are my other social networking presences.

Twitter – @SeanJC
FaceBook – @SeanJConnollyPhotography

So please follow me on twitter and give me a like on FaceBook. Once you have done that please add your own social network presences and blog links in the comments. After all thats what social media is all about.

And once again thank you for reading and supporting my blog
TTFN
Sean

  • Under : facebook, followers, media, more, photography, sharing, social, twitter

HDR (High Dynamic Range) – Good or Evil?

  • 3 comments/
  • May 28, 2012

Ok as most of my work involves the fashion side of life, I dont really take many HDR shots. But I decided to try out some of a few places just to see if firstly I could get it right and secondly what it would look like. I would highly recommend the Expert Video Guide to help you improve your photography skills

So what is HDR or High Dynamic Range

If you dont know HDR standard for High Dynamic Range, and its a technique that by combining multiple of shots you get to have a broader range of exposure and colours than a single shot. What this means is that you get more details in your shots, as you may have experienced when you take a shot and some of your subject is in the shadows, if you expose for the shadows the rest of the shot is over exposed, if you expose for the rest of the shot the shadows are under exposed and lack detail.
This is where HDR comes it, by combining shots taken at different brackets (or exposures) into a single image you get the best of both world shadows have detail and high lights are not over exposed.

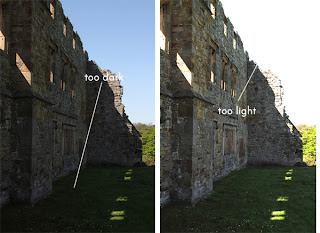
If you look at the two shots below, you can see that the one on the left is exposed for the sky, which has meant that the grass is too dark or under exposed. The shot on the right is exposed for the grass, which means the sky is too bright or over exposed.

Ok so in order to get the perfect shot, we have the option of using filters such as Polarizing or Neutral Density to correct the exposure. OR and this is where HDR come in we can combine the two shots and produce a single perfect image.

Now you can see that the detail in this final HDR shot is way better than either of the two shots above, by making the HDR we have been able to combine both sides of the dynamic range to get a better shot.

“But this shot looks surreal”

One of the problems you can get with HDR is that the end shot doesn’t look real, and I personally quite like this look in some shots. I think it adds something. But you don’t always have to be so extreme when producing an HDR shot, you can get a result that looks just like a normal shot. Just with more detail.

As you can see the shot above is perfectly exposed across the whole shot, and yet it looks just like a normal photograph.

So is HDR Good or Evil?

So is HDR good or evil? I like the extreme colours thats come with HDR and that surreal feeling it can give an otherwise boring shot particularly of night time shots, yet I love the way it can make a shot look perfect without any bells and whistle, simply correcting the exposure.

If you are still hungry for more take a look at Tony Pages Tool Box for everything you could ever want to make your shots creative.

  • Under : canon 7d, correcting exposure, exposed, hdr, HDR photography, High Dynamic Range, how to fit over exposed, how to fix under exposed, over, photography, summer, under

Types of Photography

  • 3 comments/
  • February 17, 2012

With this age of digital technology and the ever increasing advancement of photography. I thought I would touch on the main areas of photography as I see it. I am not going to cover every single type or area of photography, nor I am going to cover all techniques.

Its my intention to give you a bit of an overview of the key areas and why they are different in an aim to help you find success in your photography.

Fashion Photography

The area of fashion photography has to be one of the most popular areas of photography, yet many people still don’t understand the two key areas of this industry.

Although it can be said that pin-up, glamour and beauty can also be classed as fashion, in my view the main two areas of fashion are Advertising Photography / Advertorial Photography and Editorial Photography.

Advertising  Photography / Advertorial Photography

The main thing in the advertising area of fashion photography is that the shots should be about the clothing, shoes, or what ever else fashion you are trying to show off.

If you look at the following photograph, you can clearly see that the main focus in the image are the boots and tights, and although the model is posing in a good way, which makes the shot work, your key focus is on the clothing.

<><></>

Fashion Advertising Photograph

As you can see the aim of this shot is to sell the fashion, its not about the lighting, the model, the hair or anything else.
So in short any shot that is intended to be used for anything such as an advertising campaign or an advertising article (advertorial) should be done to showcase the intended subject in such a way to highlight the fashion / product being advertised.

Editorial

Now editorial photograph can be a bit tricky, as its often difficult to get the shot to be simple enough to be used as part of a story. Which is the whole essence of editorial photography, your photo is meant to tell a story, arouse the imagination, leave the viewer in wonder. Editorial shots should be done in such a way that the shot is not focusing on one thing in the picture, but focuses on many aspects, which all work together to tell a story.
If you look at the photograph below you can see it leaves you wondering, it doesn’t focus too much on any one thing. Leaving not only the end use, but the intrepretation up to the end viewer.

<><></>

Editorial Photograph

Pin-Up / Glamour

Now when you hear the word Pin-up and Glamour most people immediately start to think of women with their boobs out simply on show. In my view this is not the correct use or way to see either Pin-up or Glamour, as you must remember that the word glamour is short for glamorous, and Pin-up photography is actually taken from the use of the final shots. Such as in terms of posters, calendars, etc.

One of the most famous Pin-Up models of all time was of course Bettie Page and if you look at her work it was done with an air of tease about it, it was not done in an erotic way. That is the whole essence of not only Pin-up but Glamour. Showing a model off in a way that is glamourous not sleazy.

Both Pin-up and Glamour shots can be done in a variety of different ways, wearing a variety of different clothing, although this is typically stockings, high heels, nipple tassels and in general clothes that are revealing, whether than be cleavage, boobs, bum, legs the choice is yours.

I tend to think of decent Pin-up shots in the same vein as Glamour, as both done correctly should be done to tease, so showing a bit of cleavage or wearing tassels is meant to be done is a way that produces art NOT porn, the key to this is both the outfit and the pose, for a great guide to poses check out posing secrets.

If you want to take a shot of a woman with her boobs out, then you are either getting into the realms of erotic photography or porn. Don’t try to pass off the shots as Glamour, but if the end shot makes the woman look good (and not just because she is topless), such as in lads mags then thats Glamour.

Simply put if you would be happy to hang the final shots on your wall at home then you have created art, however, if the only place you ever see your shots is either on your computer or office wall then thats not art.

To show my point if you look at the shot below, you can clearly see that, although the model is wearing very few clothes, it is done in a way that is artistic and done with the pin-up style in mind (and before my fellow pin-up togs start shouting, yes I know its not true pin-up its more fashion) whilst making the model look glamorous and not erotic or pornographic.

Pin-up style Mermaid Shoot

Boudoir

Now this area of photography seems to be a bit misunderstood, firstly I will start of by reminding you what Boudoir means.

“Bedroom or Ladies Private Room”
Boudoir does not mean someone in their underwear, nor does it mean sexy. In my view the best way to think of a good boudoir shot, is that its kind of like a fly on the wall shot of somewhere you would not normally get to see.

Imagine hiding in a cupboard and seeing a woman in her bedroom wearing underwear,getting dressed or simply relaxing. In short the shots you take that are Boudoir should be done with an air of sensuality to them yet not simply be a photo of someone in her underwear. You need to add feeling and the almost cheese factor to the shot to make it work, just as if you caught the lady in her bedroom undressing.
So to take a boudoir shot, don’t simply take a shot of someone in her underwear but add something to the photo by adding the “caught in the act” element to it, without adding the erotic element and you wont go far wrong.

Portrait / Beauty / Hair

If you concentrate your photography on taking head and shoulder shots, this is most commonly know as portrait, beauty or hair photography. This is a very popular area of photography as it shows off the work of everyone involved including the model and make up artist, its not just about the photographer.
Typically beauty shots are used either in models portfolio or in hair and beauty campaigns, as the level of close detail is unmatched by any other form of photography.

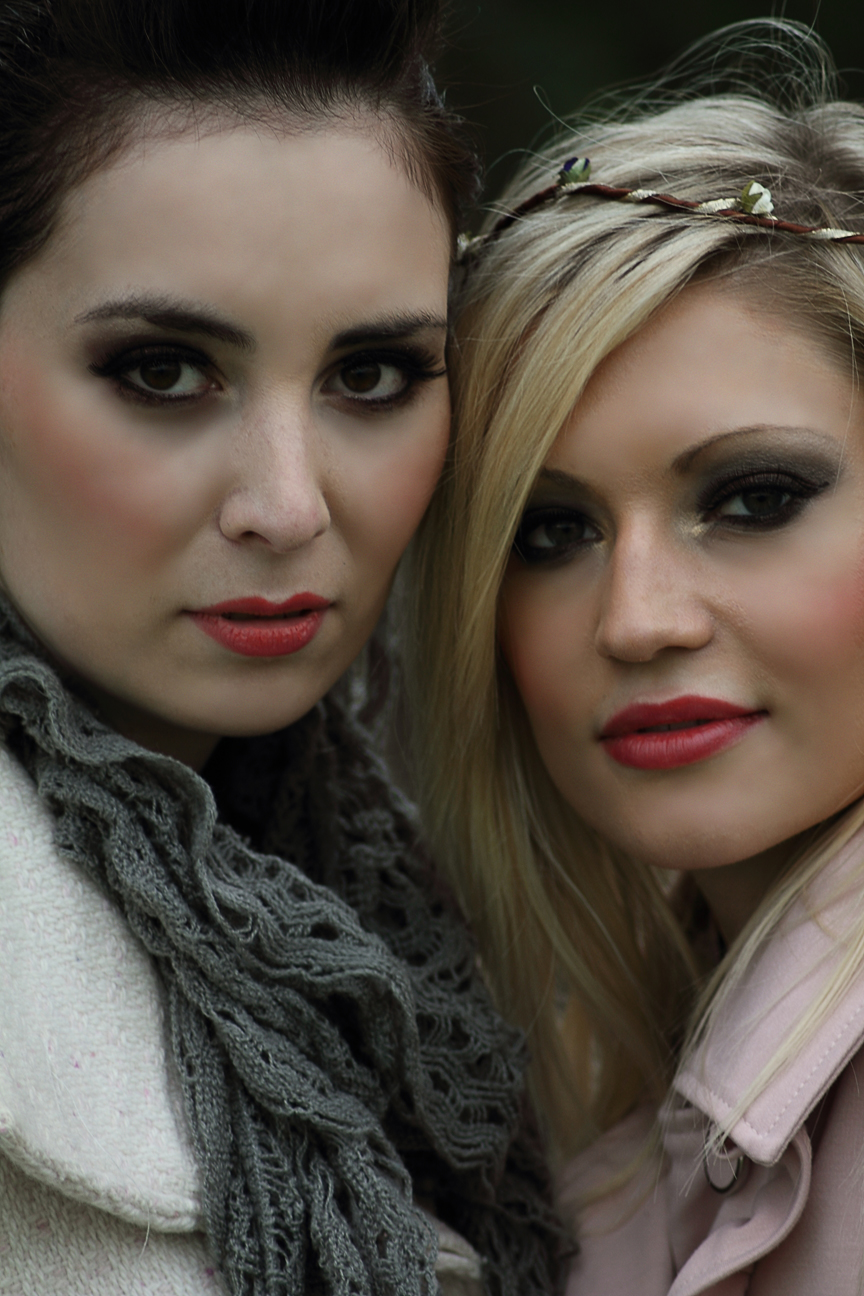
Close up Beauty Photograph

Now there is one thing to remember when taking close up photographs, and that is that as the eyes are the windows to the soul, they should be in focus, so start with the eyes in focus and you cant go far wrong. As for lighting, make up, hair thats for you to play with and decide what you want from your shots.

Landscape / Architectural

Ok moving away from people slightly and onto the wonderful world around us and what is Landscape and Architectural photography. This area of photography like so many is easy to do, yet hard to master.

Capturing the world we see everyday in such as way that makes your shots stand out.

So a true decent landscape or architectural photographer tends to see the world in a different light and in a different way, in most cases that means being able to see how a shot will turn out after it has been through post production. As you have probably guessed landscape photography is simply the art of taking photos of the landscape and buildings around us, whether thats in the city, the countryside or the coast.

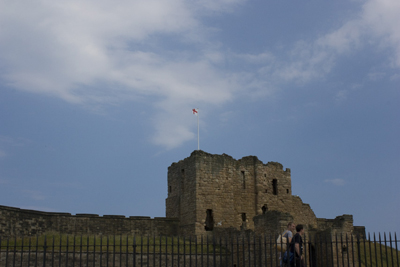
Typcial Landscape Photograph

Final Thought

I have only attempted to touch on a few of the major areas of photography, it was not my intention to cover every area of the photography industry, but more of a point to clear up the differences between the areas of photography. Educating people on exactly what each area is and what its used for helping them to make better use of their talent and become more successful in their photography business.

So no matter what aspect of photography you choose, just make sure that you keep to that area and be the best you can be at it. After all just because a decorator paints walls, doesn’t mean he also paints boats, cars or anything else.

  • Under : advertising, advertorial, boudoir, editorial, fashion, fashion photography, glamour, landscape, mermaid, nipple tassels, photography, pin-up, pinup, pinup photography, types of photography, what is boudoir

Whether to take Photo With or Without a Reflector

  • 0 comments/
  • January 9, 2012

Although I have spoke of this in another post, loads of people have asked me if they really do need a reflector and why.

The first thing to remember is the most important thing in photography, and that is light. Without light you dont have any shot at all, so getting the right light is crucial. There are several ways of getting the light right, and playing around with it, everything from using the light available to you, known as the ambient light or using flashes and strobes, known as artificial light.

What is a Reflector

A reflectors main purpose is to reflect available light in order fill in any area you are missing light, the actual light you choose to reflect is up to you.

The benefit of a reflector over another light source is in the name it simply reflects available light onto an area you wish to light up on your subject, without being too over bearing.

When to use a Reflector

A basic rule as to whether you need to use a reflector or not is to ask yourself. “is your subject lit up enough for the look you are going for?”, remember although there is such as thing as a technically perfectly lit shot, you know the one the histogram being right in the middle, there is no reason to always aim for this. Remember photography is an art and if you want to shoot different images from perfection and thats your style thats fine.

Using the reflector to just create a bit of a catchlight is fine, you dont always need to use it to completely light up your subject.

Reflector Technique

So you may be thinking now you know what a reflector is for, but when do you use it. The simple rule of thumb is you need to use a reflector when part of your subject are dark, this darkness can be solved by using another light, but this can be over powering on your subject, by using a reflector you are only ever reflecting back available light, and as such it will always be less powerful than the original source.

A quick tip is to remember the further away the reflector is from either your subject or the light you are reflecting the less intense the effect, also remember that by tilting you reflector you can also reduce the effect on your subject.

There is also an added bonus in that is it way cheaper to buy a reflector than it is to buy another light.

Practical Example

Photo Taken with and without reflector

If you look at the shot on the left above you can see that although you can see most of the face, it just looks too dark. Now if I used another light the subject would be too lit up and I would lose the effect of the image, so the solution is to use a reflector.

Now if you look at the image on the right you can clearly see that by using a reflector we can now see the subject more clearly without the light being too over powering on the face.

Big thank you to Jenna for being so patient during this shoot.

Final Thoughts

So I would suggest that even if you are just starting out, go and buy a reflector as they make your job as a photographer a whole lot easier, and remember to buy a 5in1 reflector that way you get the ability to not only reflect white light but also gold and add that something special to your shots.

  • Under : CAnon, how to use a reflector, lighting, photo, photo with reflector and without, photography, photography reflector, reflector

To Post Edit or Not To Post Edit That is the Question?

  • 0 comments/
  • November 29, 2011

Well over the years the debate of whether you should post edit your shots or leave them as they come out of the camera, has been one that provokes a bit of a mixed reaction. Some photographers are all for post editing and some photographer are heavily against post editing.

Myself I sit kinda on the fence a bit, I believe that it is possible to get a great shot straight from your camera and it not to need any post editing at all. However I think this mainly applies to certain areas of photography such as landscape photography, as you can take a shot that just works and although you can add something using post editing techniques, landscapes can look best just left alone.

NOW

When it comes to getting and being published and in particular fashion and portfolio work, this is where I think that post editing is almost a must. Put it this way if you are taking shots of a model for their portfolio, you want them to look their best and this although possible to do straight from camera, is best done with some form of post editing, and although most editing I do is minor I feel it adds to the shot, and in my view the best editing is, particularly high fashion, when you dont know and cant tell the shot it edited, and in any publication you buy the shots will have had some form of edit to make them work.

One area that always users post editing is that used by digital retouchers and digital artists, who can take an ordinary shot and make it into something spectacular, and this is where post editing really shows its worth, this can also be recovering old photos to their past glory.

OK so there are some people out there who say that they never edit, and I know that I can take a shot that looks great straight out of the camera, after all thats the art of photography, but as I always shoot in RAW I am required to use post editing to make the shots usable. So anyone who shoots using RAW format will always post edit their shots.

What does Air Brushing Mean?

You may have heard the term “air brushed” used in the press and on TV and have always wondered what it means, well its simple really its the term used when an image has been altered using post production tools such as PhotoShop, so other common terms are photoshopped but in essence they are all the same.

OK now for an example

If you take a look at the shots below, do you think these are straight out of the camera?

Did you guess right, these shots look just fine and you may be thinking, yes these look good so why do you need to post edit. Now look at the shots below.

Now you can clearly see why I think, particularly in fashion photography, post editing is a must. I agree that the best editing is done so that the shots look like they have not been touched, and this is what I hopefully achieved in the finished shots. Oh in case you cant guess the first two are the finished edited versions.

So it is my view that post editing techniques are something that are required in any professional photography, its kinda like the polishing stage. Its not to say that their is anything wrong with the shots before post editing, its just that without this finishing you are not giving the model, makeup artist, stylist and client the best they can get.

Now I admit that I am not a digital retoucher I am a photographer, I just know enough to make my images work, I think that if you want that something extra in your shots such as fantasy, special effects, etc its better to get a professional digital artist / retoucher than to do it yourself. So my photoshopping limits go as far as smartening up my shots and thats it, if I need anything else I use a digital retoucher and you should too. Remember there is a huge difference between simply making minor tweaks to your photos and digital retouching, so dont let anyone tell you anything different.

Bit of an Update

After getting loads of people talking about editing, and after spending a bit of time trawling the web, I thought I would see if I could find a good resource for editing and a basic how to. Thankfully this wonderful web comes up trumps some times and I found a great site by Evan Sharboneau with loads of tips on how to create great photos by editing. Please go and take a look and get a copy of his great E-Book now

  • Under : air brushed, photography, photoshop, photoshopped, post editing, post production, skin retouching in photographs, to post edit or not

12
  1. DSLR Controls
    1. Front Controls
    2. Back / Rear Controls
    3. Top Controls
    4. Left Controls
  2. Camera Talk
    1. Why Buy a DSLR
    2. Canon or Nikon?
    3. Camera Lens
    4. Canon 7D Soft Focus Fix
  3. Learning Zone
    1. Photography Golden Triangle
    2. Photography Tips
    3. Common Photography Terms
    4. Types of Photography
    5. Lighting
    6. F-Number to F-Stop Chart
Notable Posts
  • How to Reduce Light Stops Entering Camera by Using F-Numbers
  • Using Polarizing Filters to reduce Reflections when shooting through glass
  • How to Setup Canon 7D to take HDR shots / Bracketed Exposure
  • Spofforth Castle Wetherby Fashion Shoot – Jenna Duffin
Recent Posts
  • To Edit or Not To Edit – That is the Question!
  • Photography Tips for Beginners
  • Photography Golden Triangle
  • Reviews
  • Smoke Bombs and High Fashion
Archives
  • February 2019
  • January 2019
  • December 2018
  • November 2018
  • August 2016
  • March 2016
  • October 2015
  • June 2015
  • May 2015
  • July 2014
  • April 2014
  • December 2013
  • May 2013
  • March 2013
  • December 2012
  • November 2012
  • October 2012
  • September 2012
  • July 2012
  • June 2012
  • May 2012
  • April 2012
  • March 2012
  • February 2012
  • January 2012
  • December 2011
  • November 2011
  • October 2011
Privacy Policy
Copyright Sean J Connolly Photography 2018. All Rights Reserved