LATEST SHOOT NEWS: Currently seeking models. Get in touch.
CT Magazine is Relaunching Soon. Get in touch be featured.
LATEST BLOG NEWS: To Edit or Not To Edit – Check it Out Now
Sean J Connolly PhotographySean J Connolly PhotographySean J Connolly PhotographySean J Connolly Photography
  • About Me
  • Portfolio
    • Fashion and Lifestyle Photography
    • Location Photography
    • Event Photography
  • Google + 360 Photography
  • Blog
    • Resources
  • Contact
  • About Me
  • Portfolio
    • Fashion and Lifestyle Photography
    • Location Photography
    • Event Photography
  • Google + 360 Photography
  • Blog
    • Resources
  • Contact

Whether to take Photo With or Without a Reflector

  • 0 comments/
  • January 9, 2012

Although I have spoke of this in another post, loads of people have asked me if they really do need a reflector and why.

The first thing to remember is the most important thing in photography, and that is light. Without light you dont have any shot at all, so getting the right light is crucial. There are several ways of getting the light right, and playing around with it, everything from using the light available to you, known as the ambient light or using flashes and strobes, known as artificial light.

What is a Reflector

A reflectors main purpose is to reflect available light in order fill in any area you are missing light, the actual light you choose to reflect is up to you.

The benefit of a reflector over another light source is in the name it simply reflects available light onto an area you wish to light up on your subject, without being too over bearing.

When to use a Reflector

A basic rule as to whether you need to use a reflector or not is to ask yourself. “is your subject lit up enough for the look you are going for?”, remember although there is such as thing as a technically perfectly lit shot, you know the one the histogram being right in the middle, there is no reason to always aim for this. Remember photography is an art and if you want to shoot different images from perfection and thats your style thats fine.

Using the reflector to just create a bit of a catchlight is fine, you dont always need to use it to completely light up your subject.

Reflector Technique

So you may be thinking now you know what a reflector is for, but when do you use it. The simple rule of thumb is you need to use a reflector when part of your subject are dark, this darkness can be solved by using another light, but this can be over powering on your subject, by using a reflector you are only ever reflecting back available light, and as such it will always be less powerful than the original source.

A quick tip is to remember the further away the reflector is from either your subject or the light you are reflecting the less intense the effect, also remember that by tilting you reflector you can also reduce the effect on your subject.

There is also an added bonus in that is it way cheaper to buy a reflector than it is to buy another light.

Practical Example

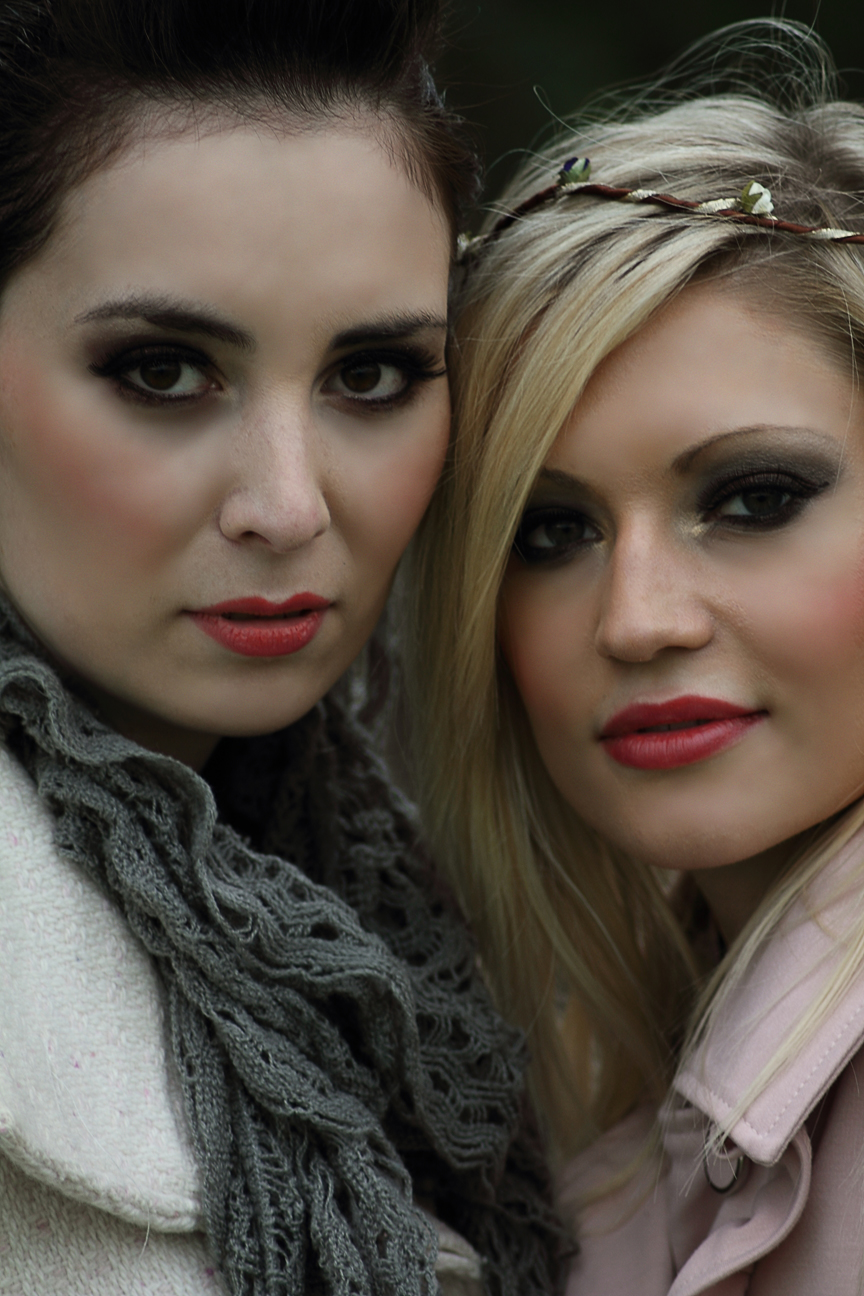
Photo Taken with and without reflector

If you look at the shot on the left above you can see that although you can see most of the face, it just looks too dark. Now if I used another light the subject would be too lit up and I would lose the effect of the image, so the solution is to use a reflector.

Now if you look at the image on the right you can clearly see that by using a reflector we can now see the subject more clearly without the light being too over powering on the face.

Big thank you to Jenna for being so patient during this shoot.

Final Thoughts

So I would suggest that even if you are just starting out, go and buy a reflector as they make your job as a photographer a whole lot easier, and remember to buy a 5in1 reflector that way you get the ability to not only reflect white light but also gold and add that something special to your shots.

  • Under : CAnon, how to use a reflector, lighting, photo, photo with reflector and without, photography, photography reflector, reflector

Durham Editorial Photo Shoot – Emma Wright

  • 0 comments/
  • November 7, 2011

Model : Emma Wright
Location : Riverside, Durham
Type : Editorial

This shoot was one that I decided to do to add to more the editorial side of my portfolio, thinking with more of the advertising and editorial theme.

After some emails and discussions with Emma it was decided that Durham was a good location for both of us and the concept for the shoot would be centred around bright clothing, in particular tights. So it was agree that in order to get a few different looks, Emma could bring different outfits that all centred around her figure and bright tights.

This sounded great to me as the good thing about Emma as a model is she has a great figure for fashion modelling, typical tall and slim.

Location

The location was to be Durham City and as I know Durham quite a bit I decided to do the shoot down on the river bank, this is a great location as not only do you get the urban city environment, but you can also get the countryside rural feel.

We arranged to meet on at the pub just at the beginning of the bridge. Its always a bit nerve racking when you meet someone for the first time, I always worry that I will go up to the wrong person, but Emma stood out from the crowd and we made our way down to the riverside.

The weather was not too bad for a shoot, not too hot and not too cold, and with the light being difussed by the cloud at times meant that I could get some great lit shots as well as some sunny shots. We finally decided on the location of the little house thing on the riverside, great location and kinda quiet which I was surprised about.

The Shoot

We started the shoot and the first sets of shots were to be Emma wearing a more formal outfit in a long coat, shots taken in and around the entrance. Emma was an absolute pleasure to work with she took direction well and in most cases was already in the right pose before I even started composing the shot.

The main problem on this shoot was lighting, the area was dark, yet I didn’t want to make it too artificial by using lights. So I decided to use the reflector to throw a bit of extra natural light onto the shots, this worked great. We got some great shots around the steps, and after a quick change into a more casual look we took some more great shots.

Again Emma was great fun to work with and the shots turned out great.

After this very static shooting we decided to step it up a bit and take some moving shots, Emma was game to try these shots. So I climbed up on the wall to get a high view as Emma walked passed, and the first set of these just ended up looking like some peeping tom taking photos.

So we decided a more level approach was better, and although these shots were better the Emma walking towards the camera shot really never worked all that well, but when she got closer the light fell perfectly and we got the money shot. Great over exposed shot that uses the light just right, and with the expression she made for this shot makes the shot just pop.

We then tried more of the walking shots, this time with Emma walking away, and again due to her style and figure these shots just look great, and again she took direction well and looked in the right direction just at the right time to give us the great shot. (although this shot needed alot of post production to it due to the councils lack of upkeep on the path)

We then made our way back to the bridge and decided to try something a bit different and have a little play on the bridge, lets just say the shots are still in the experimental arena and need more work to perfect this style.

Really enjoyed this shoot, and Emma was an absolute pleasure to work with, and she was happy to try anything, even some of my stupid ideas.

I just hope you like these shots.

Sample shots from Durham Photo Shoot
To see some of these shots in full size please visit my gallery on my website http://seanjconnollyphotography.co.uk/photography_gallery.htm
  • Under : county, durham, editorial, emma, fashion, lighting, photo, photo shoot, reflector, riverside, sean j connolly, style, wright

Most Common Photography Terms

  • 0 comments/
  • October 28, 2011

Ok so I have given a little insight into how to mount your lens and what its buttons do, I am also going to give you an quick overview of the most common terms you will hear in connection to photography. Dont worry its not going to be too indepth or technical and definately not going to go on for ever, its just a simple guide to help you with you photography success.

And before you start go saying “what about this and what about that”, this page is only meant to give the most common terms you will encounter when starting and working in advertising, fashion, editorial or commercial photography. It is not meant to be a full list of every lens type or every photography term on the planet.

The first thing to remember is the DSLR standard for Digital Single Lens Reflex, as is there is a single motion in the lens to take the shot, and its digital. This differs from how cameras in your mobile phone work, such as your iPhone, although it is still possible to take some great photos or movies on your mobile

DSLR Camera Lens Terms

Glass

This is a common term used to simply mean the lens, this comes from the simply fact that lenses contain glass and the better lens you use the better glass it has inside.

 Lens Speed

This is one of the most common terms you will hear about lenses and at first hearing you assume it must be to do with the speed a lens can take a photo. Wrong.

Lens speed is the term used to indicate how much light gets into the lens via the aperture, the larger the aperture the fast the lens. For example a 2.8 lens is faster than a 4.0 lens as it has a larger aperture opening to let more light in.

Generally lenses classed as fast are aperture values 2.8 and lower.

Aperture

Thought mentioning this made sense after the lens speed thing above. When discussing the aperture we are talking about how open the lens gets and how much light is allowed to get into the camera.

This is a little confusing as we talk about higher aperture, which means a larger lens opening but in actual fact the aperture value will be less, as 2.8 is a faster more open aperture than 4.0. Simply put the lower the number the more light enters the camera and the faster the lense.

Aperture values are expressed as f numbers such as f2.8, this is because the aperture value is actually a fraction of the focal length of the lens. (not going to bore you with maths)

So just remember smaller aperture value or f number means faster lens and more light entering the camera.

Focal Length

This is normally expressed in mm such as 70-200mm lens for example and is simply how far the lens will zoom in and out.

Lens Types

Telephoto / Zoom lens

Lenses that do not have a fixed focal length, this lens can be zoomed in and out.

Prime Lens

Lenses that have a fixed focal length, typically used in portrait photography. This lens does not move and cannot be zoomed in or out.

Wide Angle Lens

A lens which can capture a wider field of view, simply it can show you more of the scene when at its widest setting typically 28mm or lower.

Tilt and Shift

This is a type of lens that can shoot a photograph with a single area in focus but the rest of the image slightly out of focus

Useful Photography Terms
F Stop

This is an expression of the amount of given light falling onto a subject, typically for each number the light is reduced by 1.

NOTE the f numbers used to describe the aperture of a lens are not the same are F Stop numbers used to describe the amount of light.

Crop Sensor

This is the terms used when a DSLR camera has a sensor size less than that of a 35mm film frame, typically expressed in terms of numbers such as 1.6 which is the crop factor compared to a full frame.

Full Frame

This is the term used when a camera has a sensor the same size of that of a 35mm film frame

Medium Format

This is a term used for a camera which is capable of taking shots that can be printed at a large size and that have a sensor larger than a standard 35mm film frame

Large Format

This is the terms used for cameras than can take photos that can be printed at 1m x 1m or large, this size is commonly used when selling your shots for use in large billboard or posters.

Reflector
Something used to reflect light onto or away from your subject.

Filters

Attachments to the lens to change available light, add effects and many other things. They normally come in either screw on or holder types, filters can be used to create some great shots and add something to your shots that you would normally do in Photoshop. For an example of what you can do with and without filters I recommend this EBook series

Stock Photos / Stock Photography

This is the art of taking a photo that has a multitude of uses, and is normally sold to a Stock Agency to be resold. Images that are Stock as things like a picture of a person reading, something ona  desk or anything else that is generic in nature. For a bit for on this and how to make a living out of Stock Photo check out this great EBook by Nick Stubbs

  • Under : aperture, crop sensor, f stop, focal length, full frame, lens, lens speed, medium format, most common photography terms, prime, reflector, tilt shift, zoom

  1. DSLR Controls
    1. Front Controls
    2. Back / Rear Controls
    3. Top Controls
    4. Left Controls
  2. Camera Talk
    1. Why Buy a DSLR
    2. Canon or Nikon?
    3. Camera Lens
    4. Canon 7D Soft Focus Fix
  3. Learning Zone
    1. Photography Golden Triangle
    2. Photography Tips
    3. Common Photography Terms
    4. Types of Photography
    5. Lighting
    6. F-Number to F-Stop Chart
Notable Posts
  • How to Reduce Light Stops Entering Camera by Using F-Numbers
  • Using Polarizing Filters to reduce Reflections when shooting through glass
  • How to Setup Canon 7D to take HDR shots / Bracketed Exposure
  • Spofforth Castle Wetherby Fashion Shoot – Jenna Duffin
Recent Posts
  • To Edit or Not To Edit – That is the Question!
  • Photography Tips for Beginners
  • Photography Golden Triangle
  • Reviews
  • Smoke Bombs and High Fashion
Archives
  • February 2019
  • January 2019
  • December 2018
  • November 2018
  • August 2016
  • March 2016
  • October 2015
  • June 2015
  • May 2015
  • July 2014
  • April 2014
  • December 2013
  • May 2013
  • March 2013
  • December 2012
  • November 2012
  • October 2012
  • September 2012
  • July 2012
  • June 2012
  • May 2012
  • April 2012
  • March 2012
  • February 2012
  • January 2012
  • December 2011
  • November 2011
  • October 2011
Privacy Policy
Copyright Sean J Connolly Photography 2018. All Rights Reserved