LATEST SHOOT NEWS: Currently seeking models. Get in touch.
CT Magazine is Relaunching Soon. Get in touch be featured.
LATEST BLOG NEWS: To Edit or Not To Edit – Check it Out Now
Sean J Connolly PhotographySean J Connolly PhotographySean J Connolly PhotographySean J Connolly Photography
  • About Me
  • Portfolio
    • Fashion and Lifestyle Photography
    • Location Photography
    • Event Photography
  • Google + 360 Photography
  • Blog
    • Resources
  • Contact
  • About Me
  • Portfolio
    • Fashion and Lifestyle Photography
    • Location Photography
    • Event Photography
  • Google + 360 Photography
  • Blog
    • Resources
  • Contact

Why your Mobile Phone is not as good as a Real Camera

  • 3 comments/
  • October 24, 2015

Being the photographer that I am, I get a lot of people asking me what type of camera they should get, and more often in todays climate, why should they even buy a camera at all. Especially when their mobile phone has a camera and it has a massive? 21 mega pixels, where as a DSLR may only have 16 mega pixels.

On the face of it, you may think they are right. Surely having 21 mega pixles or 21 million pixels is better than only having 16 mega pixels or 16 million pixels!!

The answer is a very simple NO!!

The problem is with the two main elements that are the basis of photography and these are light and drawing as in the word itself.

Photo (light) graphy (drawing)

So having a good quality photograph requires that you maximise the elements involved to produce the best results.

Light

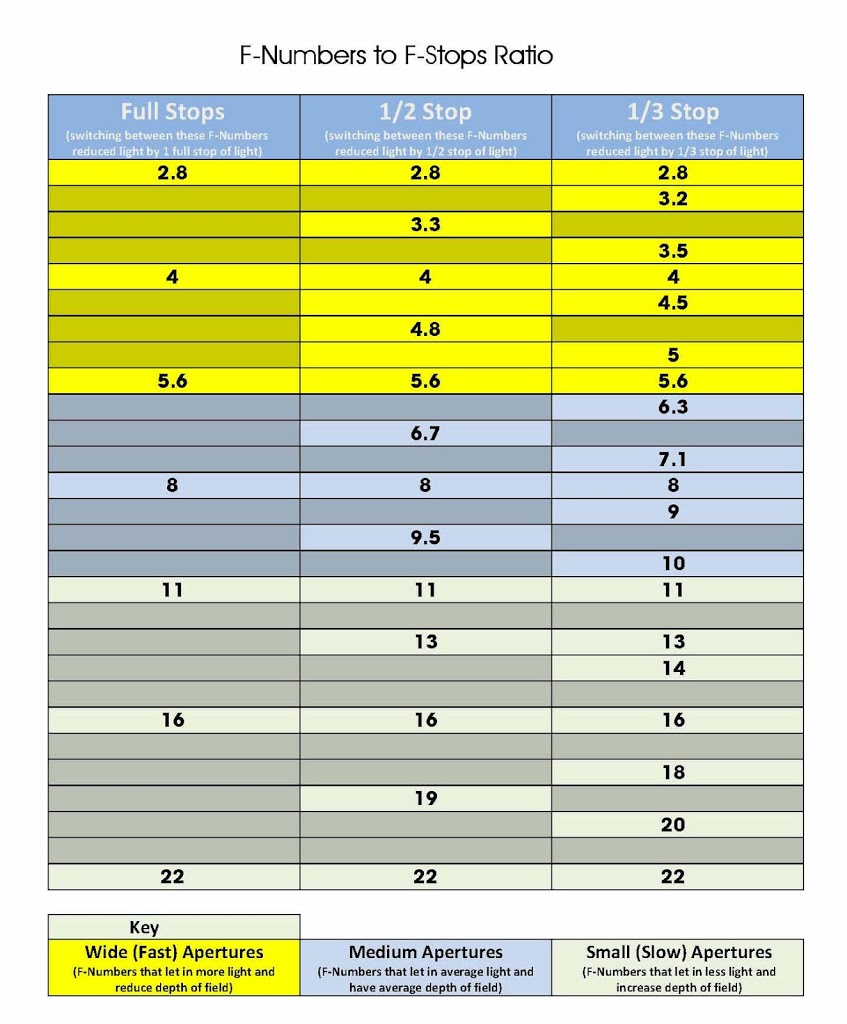
In order to get a good photograph you need the right amount of hitting the sensor (more on the sensor in a bit). This means having a lens that allows the most light in so it can create your photo. This is where one of the mistakes people make in comparing mobile phones with actual cameras comes in and that is the F Number of the lens (check out my article about F Numbers).

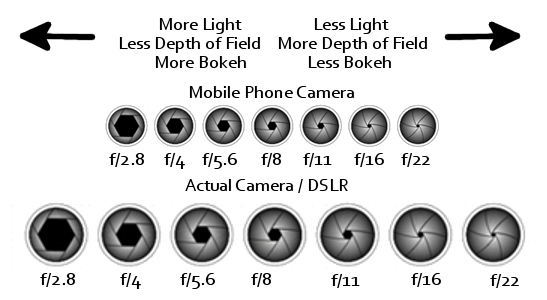
In most cases in order to maximise the light into the lens you need a large aperture and a fast lens, this usually takes the form of a lens with a low F Number something like an f/2.8 on the new iPhone 6s. So you will be thinking, thats great my new iPhone has the same F Number as a more expensive camera lens, so why do I need to buy a camera.

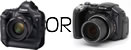
Simple – Not all lens are the physically the same size.

As you can see from the diagram above, the F Numbers on the mobile phone cameras can be the same as those on a DSLR camera, However as you can clearly see the actual lens opening (aperture)  is different. Put simply the DSLR lens has a larger diameter and as such even set to the same F Number will allow a lot more light in and therefore a lot more lights hits the sensor.

In simple terms fully open the lens on your mobile will be a few millimetres maximum, where as fully open the lens on a DSLR will be a few centimetres. (this is also why some lens can allow more light to enter compared to a faster lens at the lower F Number)

Drawing

The next important element in taking a good photograph is the drawing (graphy) or information stored during exposure.

This leads to one of the biggest mistakes in comparing mobile phone cameras and DSLR cameras, and that is mega pixels.

A mega pixels is simple an area of 1 million pixels that captures the information during exposure of a photography, so generally the more mega pixels the more details and the higher resolution the shot you will take.

This is where it gets interesting, not mega pixel is either the same quality or the same size. The sensors used in most modern mobile phones are way smaller than those used in modern DSLR cameras.

As you can see from the simple diagram above. If we take a 4 mega pixels mobile phone camera and compare it to a 4 mega pixel DSLR you can clearly see the size of each mega pixel is larger and in turn the size of the pixels inside are larger. So we get 4 million larger pixels in our DSLR as opposed to 4 million smaller ones in the mobile phone.

This means that we get more information stored and more detail in the photograph by the DSLR compared with a mobile phone.

In Closing

In modern day mobile phones and DSLR the technology has dramatically improved, this means it is possible to take decent photos on a mobile phone in low light, this is due to additional factors such as the actual sensor type and camera chips used in processing the photos. However, the same rules apply, no matter how much jiggery pokery you get from technology, the DSLR will always produce better photos.

However even the sensors in DSLR cameras are of a difference type and size, but more on that later.

  • Under : aperture, apple, CAnon, dslr, iPhone 6s, lens, light, mega pixels, opening, photography, sony, why your mobile phone is not as good as a real camera

Canon 1DX Now officially launched

  • 0 comments/
  • November 10, 2011

I just thought I would post and make you all aware that the Canon 1DX is now officially launched, and as it is a full frame, 18 meg professional DSLR its going to be a great addition to any photographers tool kit.

The anticipated arrival date in most stores will not be until March next year, although there will be a worldwide roll out between now and then, so you may be able to grab one a bit sooner.

The main features of the Canon 1DX are

  • 18.1 MP full frame CMOS sensor
  • Up to 12fps plus 14fps High speed mode
  • 100-51200 ISO, up to H:204800
  • 61 point AF system
  • 100,000 pixel RGB AE metering
  • Full HD 1080p EOS movie
  • Dual “DIGIC 5+” processors
  • Clear View II 8.11 cm (3.2”) 1,040k LCD
  • Ethernet port
  • for full product information visit the Canon website

    This will definately be on my wish list.

    I think thought that the initial rush to buy this new camera will not only push prices high, for at least the next 12 months, but will also make supplies limited. So if you are lucky enough to get your hands on one, let me know.

    • Under : 1d, 1dx, camera, CAnon, canon 1dx, canon eos-1dx march 2012, dslr, eos, launch, launches

    Why Buy a DSLR?

    • 0 comments/
    • October 28, 2011

    Over the last 10 years camera have come on in leaps and bounds, first digital then more and more megapixels and now with consumer cameras which cost under £200 having more mega pixels than some professional DSLRs, alot of people are wondering why do you need to buy a professional DSLR if you get the same results with a consumer level camera.

    Now there are many issues to consider when buying a camera and here are just a few of them
    What is the camera going to be used for?
    This one is simple to answer do you plan to use the camera for work or simply for fun. By work I mean take photos professionally, whether that be at weddings, portraits, events, PR, selling stock photographs or what ever.

    If you plan to use the camera for work then you have to buy a larger DSLR rather than a smaller consumer camera, and although the photo quality will be better, the simple fact that someone is paying you to take photographs means you cant really turn up with a small camera.

    Think of it this way in any professional work environment there are always the professional standard equipment, from kitchens to garages, hair salons to hotels, and photography is no different. You need to invest in your equipment in order to get the best out of your work.

    MegaPixels
    Now at first glance you may think that you can buy a consumer camera with the same amount of mega pixels as DSLR, and whilst on paper this is true in reality it is not, also as you go further up the professional DSLR ranges the amount of mega pixels far exceeds anything of a consumer level, such as Hasselblads having 31 mega pixels.

    Ok getting slightly off point, so back to mega pixels. The thing to remember is that the number of mega pixels is not the only factor to making a good quality photograph, and although it does play a part in the size a photo can be printed at it is not the end of the story.

    Think of it this way a truck has an engine size of around 10 litres with 800 bhp, whilst a car may only have a 2 litre engine with around 200 bhp, but which is faster? yes the car but it has less bhp and litres. This is the same rule that goes into photography, the whole camera makes the picture not just the amount or size of the sensor, component type and quality (including the sensor) all go into making the final photograph.

    If you look  at my post about Canon vs Nikon the sample shot on that post way taken with a 5 mega pixel camera, nothing by todays standard but it was a professional level DSLR, and I printed that shot at well over A1 size without any problems at all. How you may be asking yourself, simple all the components worked together to make the final photo a higher qaulity shot that I would get with a higher mega pixel consumer camera.
    Also another issue with using mega pixels as a guide is that mega pixel is an indication of the size of the sensor, but not the amount of information it can hold, such as in a medium or large format camera.

    Lenses

    Firstly every single photographer on the planet knows that the most important thing in taking a good photograph is the glass (lens) you use, the better glass = better picture, after all everything in your photo is made up of light which has to go through the lens before getting to the camera sensor.

    Whilst there are some consumer cameras with interchangable lenses, most have a lens that cant be changed, which means you are limited to the speed and focal length of the in built lens, not to mention the quality.  This one factor alone is enough to warrant buying a DSLR the variety of lenses out there means everyone will be able to get something for the type of photography they do.

    Whilst this choice is great it also allows the introduction of lenses of a more professional standard, such as Canon L series lens, you can also get lenses which are better in low light, known as faster lenses, you can buy longer range zoom lenses. Infact the world is your oyster and you are limited only by budget and your imagination.

    Selection of Canon Lenses
    EF or EF-S
    Canon has two current types of lens fittings EF and EF-S, EF is the full sized fitting used on all professional lenses, EF-S is the longer lenses used on non professional lenses. Higher end Canon cameras will only take EF lenses whilst the prosumer and below will normally take both EF and EF-S.
    This is due to the shorter mirror on prosumer models as the EF-S lenses back protrudes out more than the EF lenses.
    Size
    Now although size is not everything, if you plan to do any form of medium or large format photography, that is shots that you plan to print at a very large scale something over 1m x 1m then this is impossible with consumer cameras.
    Both medium and large format cameras require a sensor either larger than or to contain more information than a 35mm frame and you cant get this with consumer cameras.
    • Under : buy, camera, cameras, consumer, digital, dslr, format.medium, hasselblad, large, mega, photogher, pixels, printer, professional, why, work

    DSLR Controls – Front Controls

    • 0 comments/
    • October 28, 2011

    I must start first off by saying that the shots in this post are of my Canon 7D and whilst most Canon cameras all have the same layout, Nikons do not. This does not really make a lot of difference as the operation of most DSLR cameras are the same, and whilst the buttons may not be in the same place, they do operate in the same or similar way.

    Also another important note is that you can program the buttons on most DSLR to do different functions as you prefer, the diagrams and descriptions although are correct for the functions may not operate the same as your camera as these layouts are the default layouts.

    The way this will work is I will cover each side of the camera in turn, Back, Front and Top. I am not going to mention stupid things like where the batteries go, or how to attach a strap but the more necessary things as well as somethings that when I first started I just could not figure out. Also I have changed the names slightly to help you make more sense of things and not be too technical.


    Front of DSLR

    Front of Canon 7D


    The front of most DSLR cameras looks the same with the lens mount being in the middle with a release button to allow you to remove it.
    Again I will start at the bottom left of the picture and work clockwise.
    Lens Mirror
    When you remove your lens and see inside your camera, you see the lens mirror. this is the bit that makes you camera an SLR and allows you to see through the viewfinder.
    DO NOT TOUCH OR PUT ANYTHING IN HERE.

    Remote Sensor

    This is the sensor used by the camera when being operated by infrared remote control, it is not the same place that a remote camera cable release would use.
    Shutter Button
    The button your press to actually take the photo, at default settings pressing half way down will start focus and lock exposure, full press will take the shot.
    Red Eye Reduction / Self Timer Indicator
    This little light is a dual purpose little fella, when using the self timer it flashes to let you know when the shot it going to be taken.
    It also works to reduce red eye in your shots.
    Lens Line Up Marks
    On all DSLR there is a mark to show you where to connect your lens. On some makes of Canon which take both EF and EFS lenses there are two marks.
    Red for EF lenses
    White for EF-S lenses
    To connect a lens simply line up the make on the side of the lens with the mark on the camera and turn.
    Flash Button (only on certain models)
    On models with a built in flash there is a button to pop up the flash when you need it. This is normally only needed in manual modes as the flash will pop up automatically when needed in auto modes.
    Lens Release
    To the left of the lens mount there is a large button, this is to release the lens in order to remove it from the camera. Just press the button and turn the lens to remove.
    How to attach a lens to a DSLR
    In order to attach a lens to your DSLR camera simply do the following
    1. Remove the lens cover and lens cap from your lens.
    2. Line up the white or red mark at the base of your lens with the white or red mark on the lens mount on the camera.
    3. If the marks are lined up correctly the lens will just slip onto the camera, do not try to force it, if it does not just slip on you have not lined it up correctly.
    4. Now turn the lens, normally clockwise, until it clicks. Your lens is now on your camera.
    How to remove a lens from a DSLR
    To remove a lens from your DSLR simply do the following
    1. With one hand press the Lens release button (normally to the side / left of the lens)
    2. Now with the other hand turn the lens, normally counter clockwise, until it comes of the camera. It does not take any force to remove the lens so if it feel stuck make sure you have pressed the release button. Your lens is now off your camera  
    Depth of Field Button
    On certain DSLR such as the Canon 7D there is a depth of field preview button, pressing this shows you the best depth of field for your chosen settings.

    Final Note
    Most of the camera buttons have a dual function and in order to make adjustments you need to use either the rear dial or the top dial depending on what you want to change.
    • Under : 7d, attach, button, buttons, CAnon, controls, dslr, front, lens, operation, shutter

    Camera Lens

    • 1 comments/
    • October 28, 2011

    OK there is lots that can be said about camera lenses, good bad and ugly. It is not my aim on my blog to get really techical about lenses I am simply going to help you by giving you some basic necessary information to help you out, and in most cases this info applies to both video cameras as well as DSLR.


    Again the shots used are based on Canon, but all DSLR lenses work the same work, only slight differences are connected to two areas

    1. All telephoto or zoom lenses have a zoom ring, but on some makes of lense the ring turns in a different direction to others, noticably Sigma lenses turn the opposite way to Canon lenses in order to zoom.
    2. NOT all lenses have a form of Image Stabilizer on them, and on some its called something different such as VR on Tamron lenses.


    DSLR Lens Controls

    Canon IS Lens


    Again for this I will start at the bottom left of the diagram and work clockwise.


    Image Stabilzer Switch (IS) Switch

    This switch is used to turn on or off the image stablizing functions of the lens, again remember this switch may be called something different on your lens but will work in the same way.

    Switching this on will give you a bit of assistance when hand holding the camera, normal this is around 1 stop of light, but put simply means you can shoot in a slower shutter speed or narrower aperture than without using it, lettginy ou take more professional shots. I would highly recommend taking a look at David Petersons Book as it is full of very useful tips and tricks to get more out of your photography.


    NOTE – remember when using a lens with built in stabilzation that when ever you mount the camera on a firm surface or a tripod turn off the IS in order to avoid it interferring with your shots.

    Lens Mount Indicator

    The is the mark that you line up with the matching mark on your camera body to mount your lens. In canon lenses it also indicates the of lens. EF lenses are RED and EF-S lenses are white.

    How to attach a lens to a DSLR
    In order to attach a lens to your DSLR camera simply do the following

    1. Remove the lens cover and lens cap from your lens.

    2. Line up the white or red mark at the base of your lens with the white or red mark on the lens mount on the camera.

    3. If the marks are lined up correctly the lens will just slip onto the camera, do not try to force it, if it does not just slip on you have not lined it up correctly.

    4. Now turn the lens, normally clockwise, until it clicks. Your lens is now on your camera.

    How to remove a lens from a DSLR
    To remove a lens from your DSLR simply do the following

    1. With one hand press the Lens release button (normally to the side / left of the lens)

    2. Now with the other hand turn the lens, normally counter clockwise, until it comes of the camera. It does not take any force to remove the lens so if it feel stuck make sure you have pressed the release button. Your lens is now off your camera


    Auto / Manual Focus Switch

    This is the switch you use to switch the lens between Auto and Manual Focus. Again remember that no matter what settings are on your camera it will not fiocus if this switch is set to Manual. To manually focus your lens after switching this to manual use the Focus Ring.

    Focus Ring

    This is used to focus your camera on yoru subject, only works after you switch the Auto / Manual Focus Switch to manual. Then simply turn the ring as you look through the view finder or at the Live View screen to focus.

    Zoom Ring (only on Tele-Photo / Zoom Lenses)

    This ring is used to bring your subject closer or further away. Please note that some lenses work in the opposite direction to zoom in or out.

    Filters

    I thought I would briefly touch on the use of filters with your lens, filters are a way to change the light entering the camera and can be used to simply add colour, or to control the light entering the camera in a variety of different ways, the most common filters for controlling light are known as an ND or neutral density filter and a polarizing filter.

    Although filters are more common in landscape photos they can be used in any environment to enhance your shots.

    UV Filter

    My first suggestions and HUGE piece of advise which I am happy to repeat is to fit a screw on UV filter to your lenses, this will not change anything in your photographs but will protect your lens from getting scratched, and being that it is cheaper to replace a screw on UV filter than your lens this makes sense and is exactly what I do.

    Filters are generally attached to the front of your lens as either a dual threaded screw on fitting which simply screws directly onto your lens front, or in filter holder arrangement such as Cokin holders, these attach to your lens by an adapter ring screwing onto your lens, on this is attached the filter holder into which you put your filters.

    Cokin P Filter Holder and Adapter Rings

    The Cokin filters are all the same size for the holder normally A or P size, the filters simply slide into the holder and you use the same filter for each lens, and you only need to buy different size adapter rings as per the thread size fo your lenses.

    Cokin P Size ND Filter


    So in short buy and keep a screw on UV filter on your lens, then buy a Cokin P filter holder and adapter ring, and simply buy cokin P filters as you need then, cokin filters are numbered so for example a P164 is a Circular Polarizing filter.


    Neutral Density ND Filter


    A very useful tool in your photography arsenal is a set of ND filters. An ND filter will block out light entering the lens without effecting the colours of the photograph, these are normally number and the higher the number is more light will get blocked by the filter, yet at all times retaining the colour of your photograph.

    Shot taken without ND Filter

    As you can see from the above shot trying to capture some scenes during strong daylight is impossible and you end up with a very over exposed shot.

    Shot taken with ND Filter

    Now if we look at the second shot by adding an ND filter, you can clearly see that the light in greatly reduced but the colours remain.


    Circular Polarizing Filters CPL


    Circular Polarizing Filters known as CPL filters reduce the amount of reflective light in your photo as they do this by removing white light from the photo they are also used to enhance the sky or to remove the reflection from a pond, glass or anything else.

    Shot taken without Polarizing Filter

    As you can see in the above shot, although the colours are generally ok the sky is totally washed out and we cant make out the clouds.

    Shot taken with Polarizing Filter

    Now if we look at the second shot the colours are less washed out and we can now make out the detail and clouds in the sky.

    Remember though when using a polarizing filter it will effect your whole image and unlike ND filters they do have an effect on the colour of your shot.

    NOTE – with modern DSLR cameras make sure to use a Circular Polarizing Filter CPL and NOT a Linear Polarizing Filter LPL, as the Linear filter can have an adverse effect on your cameras auto focus, although if you intend to only use manual focus you can use either filters

    • Under : auto focus, CAnon, circular polarizing, cokin, cpl filter, dslr, Image stabilzer, IS, lens, manual focus, nd filter, neutral density, sigma, tripod, uv filter, vr zoom ring

    DSLR Controls – Back / Rear Controls

    • 0 comments/
    • October 28, 2011

    I must start first off by saying that the shots in this post are of my Canon 7D and whilst most Canon cameras all have the same layout, Nikons do not. This does not really make a lot of difference as the operation of most DSLR cameras are the same, and whilst the buttons may not be in the same place, they do operate in the same or similar way.
    Also another important note is that you can program the buttons on most DSLR to do different functions as you prefer, the diagrams and descriptions although are correct for the functions may not operate the same as your camera as these layouts are the default layouts.

    The way this will work is I will cover each side of the camera in turn, Back, Front ,Top and left. I am not going to mention stupid things like where the batteries go, or how to attach a strap but the more necessary things as well as somethings that when I first started I just could not figure out. Also I have changed the names slightly to help you make more sense of things and not be too technical.

    Back of DSLR

    Back / Rear of Canon 7D

    
    The rear of most DSLR consist of a large screen and to the side the main image selector wheel. I will start at the bottom left of the picture and work clockwise, ok here goes

    Playback / Live View Screen
    The large screen on the back of your DSLR serves two purposes. One is very simply it allows you to view shots you have taken after you press the Playback button, and by using the Adjust / Scroll wheel you can view your shots and then zoom in or out using the Zoom in or Zoom Out buttons on the right above the big wheel.
    Note when you zoom into an photo and view it on the screen you can use the View Joystick to move around the image.
    The other use for this screen and hence why I have named it the Live View Screen is that when you are taking photos with your camera it is possible to see a variety of different things on this screen and not just what you are taking a photo of. These include a Quick Menu, a Camera Level, Shot histogram and information and of course Live View (basically what the camera sees). Most of these are accessed by using the Info button. (more on this later)
    How to Access to Live View on DSLR
    HUGE note to get Live View to work on the LCD screen you actually press the Start / Stop button during shooting mode, just make sure the little outer ring around the Start / Stop is pointing at the white camera.
    If Live view fails to operate you need to enable it as follows

    1. Press the System Menu Button
    2. Use the Little Wheel on the top of the camera and scroll to menu option 4
    3. Use the big wheel to select live view
    4. Press the Set / Enter button then select enable to activate live view, press the Set / Enter button.
    5. Press the System Menu button to come out of the system menu.

    Live view is now working

    Delete
    Does exactly what it says on the tin, deletes your photos.
    Playback
    Go on guess, yes it shows you photos you have taken on the big Live View screen, not quite 3D IMAX but at least you know what you shot.

    Info /Level / Quick Menu

    When in shooting mode this button allows you to do 1 of 4 things

    1. On first press you see the information about the shot your are taking, such as colour temp, white balance as well as how much space you have on your card and how many shots you can take.
    2. On pressing again you get a camera level indicator, showing if the camera is level or not, a solid green line indicates your camera is level (note this is not available on all DSLR’s)
    3. On a third press you get the Quick menu, a quick over view of your current settings such as Aperture and shutter speed. (Note this is a view only option and in order to make changes you need to use the Quick Menu button)
    4. On a fourth press you turn off the back LCD screen all together.

    When in playback mode this button gives your either on screen info about the shot or pressed again gives you more detailed shot information.

    Picture Style

    This button allows you to change how your photo will turn out whether you are shooting a landscape, portait or want to change the sharpness.

    System Menu

    This is the main menu button on your camera and gets you into the main system menu, where you can change all sorts of good things and some not so good things.

    Quick Menu

    This button gives you access to the quick menu, where you can quickly change many camera settings. To scroll around the screen use the Qucik Menu / View Joystick and then use the main dial or Adjust / scroll wheel to make changes.
    Instant Raw + Jpeg

    This is a kinda cool button it allows you to quickly set you camera to take both a RAW and Jpeg photo at the same time, can save you alot of time. Although my advice is to always shoot in RAW.

    Viewfinder

    D’oH  this shows you what you are taking a photo of, that is unless you are using the Live View Mode.

    Word of caution if you are using Mirror Lock after your shot you will not be able to see through the View Finder

    Still / Video Recording (outer ring)

    The little outer ring switch to the right of the view finder is the selector to set the camera to either shoot still photographs or record HD video, white for photos red for video.

    Video Record Start / Stop / Live View

    The button marked start /stop to the right of the view finder is the button that does one of two things.

    1. If the camera is set to record video it starts and stop the video
    2. If the camera is set to take still photographs this button shows / turns on Live View on the LCD screen.  (see note above about how to enable live view)

    Auto Focus Button
    This button starts the camera focussing, it does not take a shot it simply gets the camera in focus ready to take a photo. Great for use if you are taking shots of things that will move.

    AE Lock Button / Zoom In

    This button allows you to lock the exposure for a given shot, simply press the button and the green light in the viewfinder will show to show you exposure is locked, when you take a photo it will be taken with this exposure setting.
    This button also acts as a zoom in or magnify button during playback.

    Focus Mode / Zoom Out

    This button lets you select the area to focus on when used in conjunction with the Main Dial on top of the camera. Simply press the Focus Mode button them use the Main Dial to select the area to focus using the view finder.
    This button also lets you change the focus mode and lets you scroll through the active modes on your cameras to change focus mode.
    How to select Focus Mode and Focus Point on DSLR

    1. Press the Focus Mode / Zoom Out button
    2. Look through the view finder and press the Multi Function / Manual Focus Select button on top of the camera (next to the shutter release), for each press of this button you will see the focus point and mode change in the viewfinder. Just keep pressing it until you see the desired Focus Point / Mode in the view finder.
    3. Once you find the desired mode, simply use the Main Dial on top of the camera to move the point to where you want to focus.

    Quick Menu / View Joystick

    When in quick menu after press the Quick Menu button this joystick allows you to select the option you wish to adjust.
    Whilst in playback this joystick allows you to navigate around a photograph after pressing the Zoom In button.
    This joystick can also be set to allow you to select a focus point on the screen.
    Set / Enter

    This is kinda like the save button, pressing it selects menu options.

    Adjust / Scroll Wheel

    This is the companion to the main dial, it allows you to change camera settings, as well as being used to scroll through photos during playback.

    Activity light

    This shows when the camera is doing something, such as writing to the card, cleaning the sensor, etc.
    Wheel Function Lock

    This switch when pushed to the right stops you from accidently making camera setting changes.

    NOTE the quick menu adjustment and on screen options still work with this in the Lock position, the main purpose of this switch is during shooting as it stops you making adjustments via the top LCD screen.
    Light Sensor

    There is a small light sensor just to the left of the big adjust / scroll wheel this is used by the camera for taking light readings. It is mainly used during exposure setting in non manual modes and in auto mode it also sets the LCD screen brightness.

    Final Note
    Most of the camera buttons have a dual function and in order to make adjustments you need to use either the rear dial or the top dial depending on what you want to change.
    • Under : access, controls, dial, dslr, enable, focus, how, live, live view, lock, on, photo, photos, point, rear, select, take, to, turn, view

    DSLR Controls – Top Controls

    • 0 comments/
    • October 28, 2011

    I must start first off by saying that the shots in this post are of my Canon 7D and whilst most Canon cameras all have the same layout, Nikons do not. This does not really make a lot of difference as the operation of most DSLR cameras are the same, and whilst the buttons may not be in the same place, they do operate in the same or similar way.

    Also another important note is that you can program the buttons on most DSLR to do different functions as you prefer, the diagrams and descriptions although are correct for the functions may not operate the same as your camera as these layouts are the default layouts.

    The way this will work is I will cover each side of the camera in turn, Back, Front, Top and left. I am not going to mention stupid things like where the batteries go, or how to attach a strap but the more necessary things as well as somethings that when I first started I just could not figure out. Also I have changed the names slightly to help you make more sense of things and not be too technical.


    Top of DSLR

    Top of Canon 7D

    The top of most DSLR cameras looks the same with the Hot Shoe in the centre and the LCD screen to one side. I am going to start from the bottom left of the picture and work clockwise, ok so here goes.

    On / Of Switch

    This is the main on / off switch on your camera, and although your camera may go into powersave mode after a period of non use in order to turn it off completely simply switch this switch to off. Then back to on to switch it on.

    Mode Selector Dial

    This is the mode your camera will operate in simply turn the dial to the desired mode, everything from Full Auto right up to Full Manual. To select a mode just line up the indicator with the small white line on the camera body to the right of the dial.

    I am going to list the selection here, but note these are specific to Canon and whilst other makes have exactly the same options they are labelled differently. Although they will function in exactly the same way, I will start at the green square and work anti-clockwise.

    Green Square – Full Auto
    This is fully automatic mode, the camera will take care of everything just point and shoot.

    CA – Creative Auto
    This stands for Creative Auto, and whilst the camera will take care of everything you can change some setting to be a bit more creative, such as depth of field, picture style, etc.

    P – Program AE
    This is the Program AE mode, it is the next best thing to manual, in this mode the camera sets the basic exposure setting shutter speed and aperture, but you set everything else.
    TV – Time Value
    This stand for Time Value and in this mode you set the shutter speed and the camera automatically sets the correct aperture, again you have full control over everything else as this is classed as a manual mode.

    AV – Aperture Value
    This stands for Aperture Value and is the opposite of TV in that this time you set the aperture and the cameras sets the correct shutter speed, again you have full control over everything else as this is classed as a manual mode.

    M – Manual
    This is Manual mode and this is for big boys only. In this mode the camera does not set anything, its all doesn to you, aperture, shutter speed and everything else. This is fully manual mode, and my personal choice.
    B – Bulb
    This stands for Bulb and in this mode the camera opens the shutter when you press the shutter release and closes it when you let go. In this mode it is important to use a remote trigger to avoid camera shake.

    C1, C2, C3 – Custom
    These are custom modes and all you to save specific camera setting and recall them simply by selecting the option such as C1. for example you can setup you camera perfect for night photography and save it under C1, then simply select C1 everytime you want to take night photos.

    Metering / White Balance

    This allows you to change the white balance settings and metering mode of the camera.
    AF Mode / Shot Drive Selection

    This allows you to select the auto focus mode type, such as spot, centre. This button also lets you change how many shots are taken when you press the shutter.

    Multi Function / Manual Focus Point Selection
    This button works differently depending on the chosen camera mode, but it is mainly used for setting the focus mode of the camera. After you press this button you can choose the focus mode by pressing the Focus Mode button (third button top right on the rear of the camera) repeatedly until you get the desired focus mode.

    Setting Selection Main Dial

    This is one of the two main dials on the camera, whilst the larger dial on the camera rear is the main system dial, this dial allows you to change other settings such as aperture, shutter speed and basically works with the large dial for all camera buttons that are dual function such as when you press the AF Mode button.

    ISO / Flash Exposure Compensation
    This button allows you to change the ISO of the camera as well as make adjustment to the cameras flash compensation.
    LCD Screen Back Light
    This turn on and off the back light for the top LCD screen.
    Settings LCD screen

    This is the main setting screen, where you can view and change settings such as aperture, shutter speed, ISO, etc.
    Dipotric Adjustment
    When ever you use the view finder it is factory set for most people with normal eyesight, however if you where glasses or have poor eye sight you may find that you think shots are in focus when in fact there not. To combat this you can adjust the viewfinder by moving the Dioptric adjuster to match your eye sight and bring everything into focus.
    Hot Shoe / Flash Attachment
    This is where an on camera flash connects, its also where any off camera flash accessories connect to such as triggers or off camera flash cords.

    HUGE IMPORTANT NOTE – check in your user manual before connecting anything here, check for the trigger voltage and that it does not exceed that advised for your camera. For the Canon 7D this is 5v but will vary from camera to camera. But check before you attach anything in order to avoid damage to your camera.

    Final Note
    Most of the camera buttons have a dual function and in order to make adjustments you need to use either the rear dial or the top dial depending on what you want to change.
    • Under : aperture value, av, bulb mode, c1, c2, c3, CAnon, creative auto, dslr, full auto, functions, program ae, settings, td, time value, tv

    Welcome to the new Photography Blog on the block

    • 0 comments/
    • October 26, 2011

    First off thank you for visiting my new blog.

    The idea of this blog is to share both my knowledge of photography, everything from cameras, bags, lighting, locations, shutters to studios and everything in between. So if you have anything you are not sure about in the world of photography dont be afraid to ask I am here to help.

    I am also going to share some information which I found hard to find when I started in photography and hopefully put everything in one easy to find place for you to enjoy and share.
    Also I am going to share experiences from my photo shoots, both with and without models, on location, in studios and what ever else I get up to.
    Put simply this is a blog about my journey and experience in photography, as I learn more stuff I will share that with you, as I do stuff I will share that too.
    Another point to remember I work with a Canon 7D camera and being a Canon certified professional means I will be bias towards Canon, but everything in general is the same on DSLR’s whether its Canon, Nikon, Sony, Hassleblad or what ever else you use.
    Ok so lets get this party started.
    Who am I
    I am Sean J Connolly and I work as a professional Advertising Photographer specialising in advertising, editorial, fashion photography, I am based in Richmond, North Yorkshire and cover all Yorkshire, North East and anywhere else I am needed.
    I have worked professionally full time now for about 2 years, but have been in photography for about 10 years. I must say I love the challenge it brings, as there are lots of good and bad photos out there, so taking that special shot is something I pride myself on.

    You can find out more about me from any of the following links.

    1. www.seanjconnollyphotography.co.uk  (my main website)
    2. www.facebook.com/seanjconnollyphotography (photography facebook page)
    3. http://www.flickr.com/photos/seanjc/ (my flickr account)
    4. http://www.modelmayhem.com/seanjconnollyphotography (model mayhem portfolio)

    Feel free to get in touch, whether you are a fellow photographer, make up artist, model, stylist or looking for a photographer. I promise I wont bite.

    Thanks for reading
    Enjoy

    • Under : afd micro adjustment, blog, cameras, CAnon, dslr, filters, hdr, hyper focal distance, nikon, photo, photography, sean j connolly

    1. DSLR Controls
      1. Front Controls
      2. Back / Rear Controls
      3. Top Controls
      4. Left Controls
    2. Camera Talk
      1. Why Buy a DSLR
      2. Canon or Nikon?
      3. Camera Lens
      4. Canon 7D Soft Focus Fix
    3. Learning Zone
      1. Photography Golden Triangle
      2. Photography Tips
      3. Common Photography Terms
      4. Types of Photography
      5. Lighting
      6. F-Number to F-Stop Chart
    Notable Posts
    • How to Reduce Light Stops Entering Camera by Using F-Numbers
    • Using Polarizing Filters to reduce Reflections when shooting through glass
    • How to Setup Canon 7D to take HDR shots / Bracketed Exposure
    • Spofforth Castle Wetherby Fashion Shoot – Jenna Duffin
    Recent Posts
    • To Edit or Not To Edit – That is the Question!
    • Photography Tips for Beginners
    • Photography Golden Triangle
    • Reviews
    • Smoke Bombs and High Fashion
    Archives
    • February 2019
    • January 2019
    • December 2018
    • November 2018
    • August 2016
    • March 2016
    • October 2015
    • June 2015
    • May 2015
    • July 2014
    • April 2014
    • December 2013
    • May 2013
    • March 2013
    • December 2012
    • November 2012
    • October 2012
    • September 2012
    • July 2012
    • June 2012
    • May 2012
    • April 2012
    • March 2012
    • February 2012
    • January 2012
    • December 2011
    • November 2011
    • October 2011
    Privacy Policy
    Copyright Sean J Connolly Photography 2018. All Rights Reserved